![White Logo Blue Banner copy-100.jpg]](https://knowledge.fisikal.com/hs-fs/hubfs/White%20Logo%20Blue%20Banner%20copy-100.jpg?height=50&name=White%20Logo%20Blue%20Banner%20copy-100.jpg)
You can import your client data into Fisikal by using a combination of free online services.

This option is suitable if you have between 20 and a few hundred client records to import.
If your client list is less than 20 then you could probably enter them in manually into Fisikal faster than it will take to set up the import process below.
If your client list is bigger than about 700 clients then it will still work but you may have pay for some of the services.
If your client list is in the many thousands then it is more efficient to request an import by the Fisikal team as you will not have to pay the per transaction costs, just a one-off import charge.
Pre-requisites
Before proceeding please organise the following:
- Your Fisikal club is operational and you can successfully add clients in manually. Ensure you have a Manager user created.
- Sign-up to Zapier
- Sign-up to a Google Docs or Office 365 account so that you can use either Google Sheets or Excel online.
Note: This technique will not work with an Excel sheet that is not online. - Request access to the Fisikal Zapier integration.
Contact Fisikal support for this. - Optional: Switch off the Welcome emails for your clients in Fisikal. This is a belt and braces approach to avoid sending welcome emails.
All the clients do need to eventually receive the Welcome email as it contains their log in details, but you may want to turn them off at this point to allow you to verify their records, and maybe assign packages. You can resend the welcome emails in bulk using this same method later. Learn more
Once these are in place the overall steps are:
- Create an online worksheet containing all the client data to be imported
- Add a new Ready column to indicate the record is ready to be loaded, and set it to false for all.
- Create a Zap in Zapier that is triggered by either:
- New or Updated Spreadsheet Row in Google Sheets
- Update Row in Microsoft Excel
- Turn on the Zap
- Edit the worksheet and set the ready column to True
- The Zap is triggered and the clients are loaded into Fisikal.
These steps can be completed within 15mins, depending on how much cleaning up the client data requires.
Here is a video of the entire process, and the detailed steps are below:
1. How to create an online spreadsheet of client data suitable for Fisikal import
Create a list of your clients so that all the required information is in one row in a spreadsheet with all the column headers, like this:

Most lists of client data will need a little cleansing or massaging to get them into the correct format for import into Fisikal. This can easily be achieved using a spreadsheet. Here are some common tasks required:
Combine First and Last name into a single Name column
In Fisikal there is only a Name field. If your data has client names split into first and last then create a new column and concatenate the two fields together with a space in between.

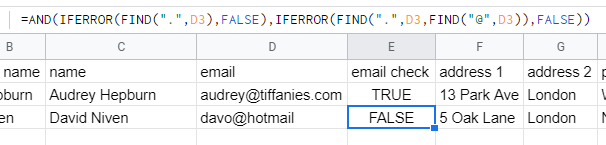
Check the emails
The email address is important in Fisikal as it is how the user finds out how to log in. Avoid issues by checking it is valid and whether there are duplicates.
Here is a useful Excel formula for checking an email address is generally valid:
=AND(IFERROR(FIND(".",A2),FALSE),IFERROR(FIND(".",A2,FIND("@",A2)),FALSE))
Find and set the Country ID
To import the Country field you must use a number which represents the country in Fisikal. There are two options:
If all the addresses are from the same country then you can just choose the country from a list in the Fisikal step in Zapier, you do not need a country column in your import file.

If your client's could be from multiple countries then you need to create a lookup in your sheet to find the country in a list and use the Fisikal ID of that country. You can find the number of each country in this list.
Set the Location ID
If you are loading the data for just one location at a time then you can select the location in the Zap step so it applies to all the clients in the import and you do not need a column for it.

If you are loading client data for more than one of your locations then you can set the Home Location for the client while uploading. In this case you need to know the Fisikal ID of the location.
How to find the ID of a location
- Log into Fisikal as a manager
- Click Services > Locations
- Edit the location by clicking the pencil
 icon
icon - In the URL in your browser the location ID is shown as the last part or the address
For example in the screenshot below the id of this location is 2010.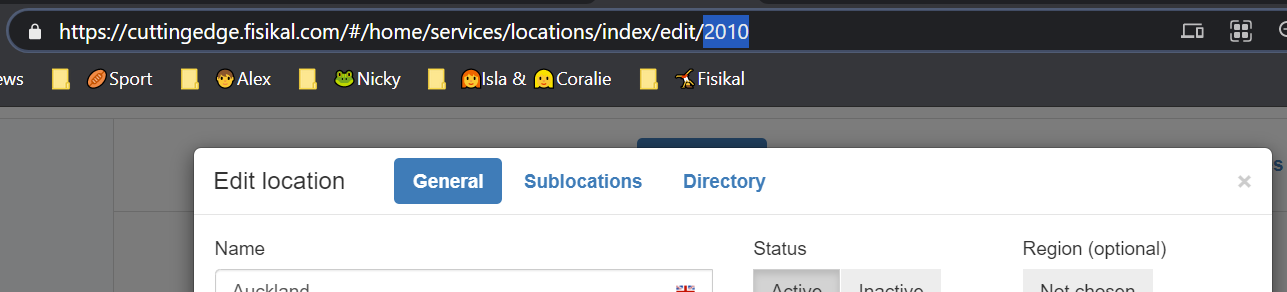
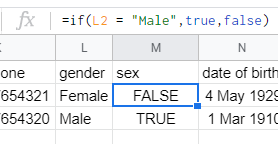
Convert Gender to Sex
In Fisikal the sex column is stored as:
- True = Male
- False = Female
- blank = Unknown
So you may need to create a formula in the spreadsheet to convert the gender value to one of these options, here is an example:
2. Add a Ready column
Add a column to your sheet called Ready, and set the value to False for all the rows in the sheet.
We will use this column as the trigger for the Zapier Zap to start.
3. Create the Zap to import
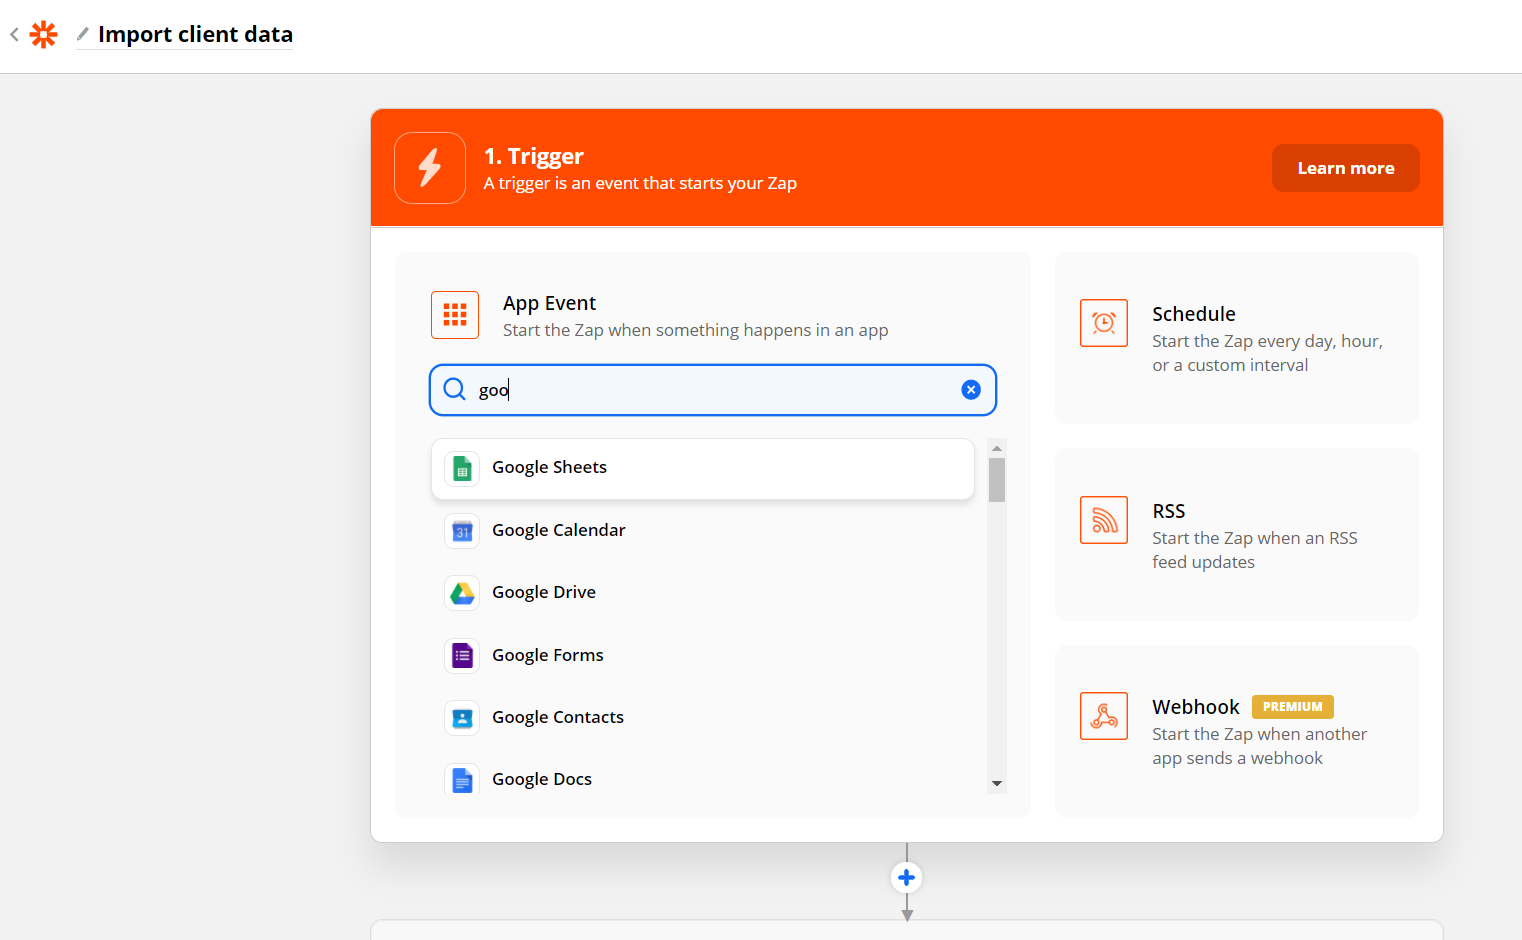
- Log into Zapier.com and create a new Zap.
- Give the Zap a useful title and then add a Trigger for Google Sheets or Excel as necessary
- Choose the trigger event:
- New or Updated Spreadsheet Row for Google Sheets
- Update Row for Microsoft Excel
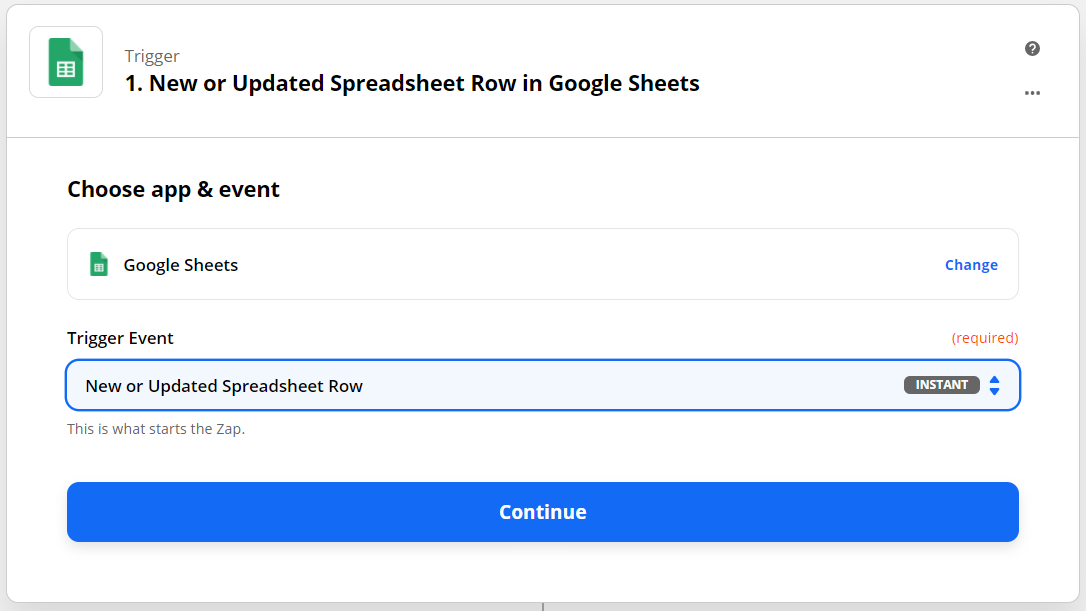
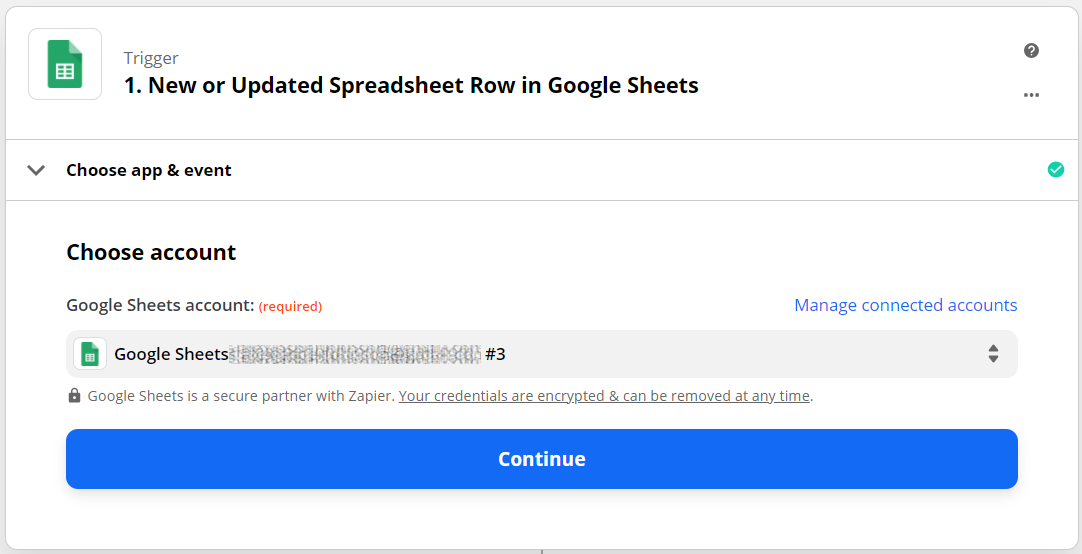
- Next you must either add an account that can access the spreadsheet or select an existing account. Complete the login procedure to continue.
- Set up the trigger, select the spreadsheet you are working from and the sheet within it that contains the data. If possible, choose the Ready column as the trigger column, then continue.
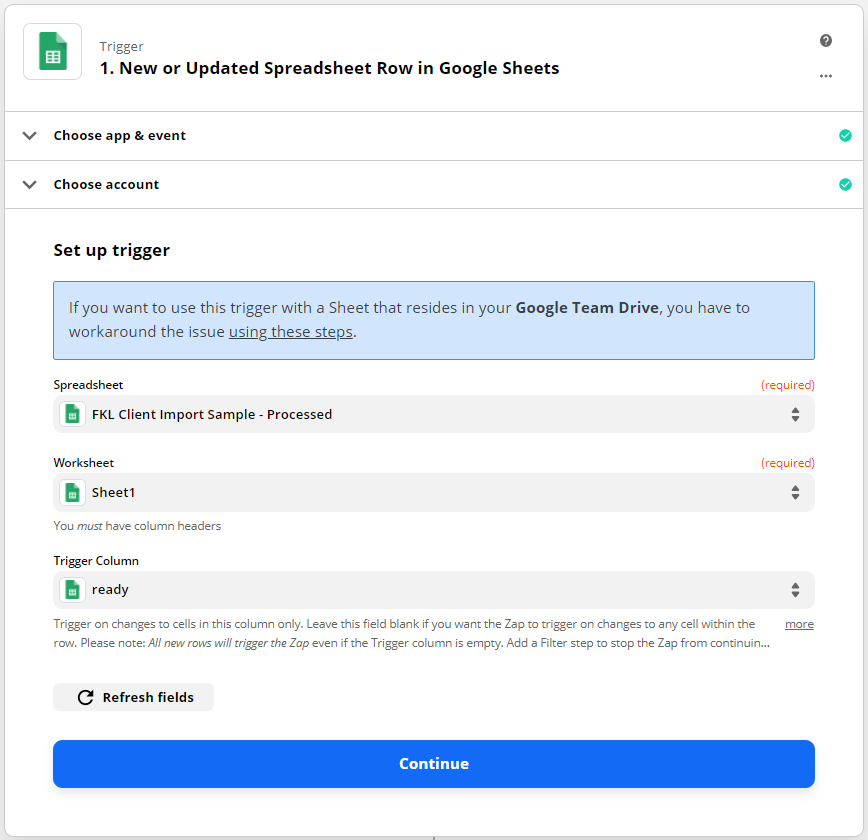
- Test your trigger and confirm that Zapier is able to retrieve a row from your sheet. If not the resolve any problems before continuing.
- Now add an Action step to the Zap; search for Fisikal in the list of apps.
If you cannot see the Fisikal app in the list please contact Fisikal support for the invitation.
- Choose the Create Client event for the action.

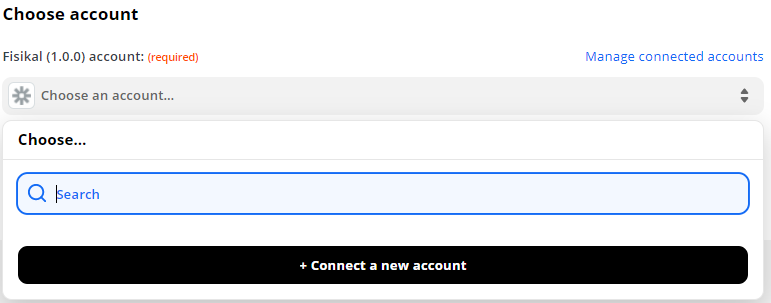
- Next select an account in Fisikal to use to import the data.
If there is none in the list then please complete the steps here to sign in to Fisikal, otherwise skip ahead to the next step:- In a new browser tab log into Fisikal as the user who the Zapier activity will be recorded as. Or log in as you and Spoof as the user.
- Navigate to Settings > Preferences
- Edit the Schedule Settings
- Set the 'Show Schedule in External Calendar' option to ON
- Click the 'Google Calendar' option
- Copy the 128 character auth_token from the box on the right, after where it says auth_token=

- Return to the Zapier browser tag
- Click +Connect a new account in the Choose Account option.
- The Fisikal authentication form is displayed
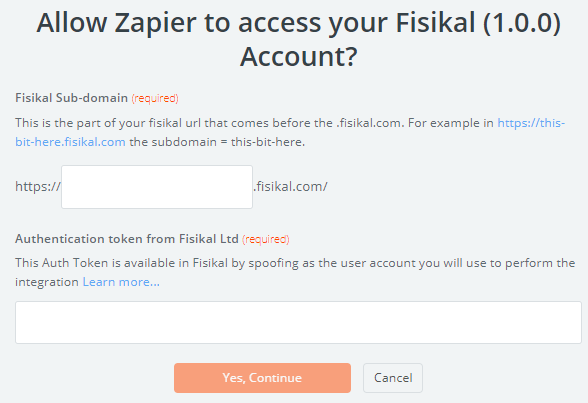
- Paste the 128 character token into the Authentication token box.
Type the subdomain of your Fisikal site into the subdomain box.
Continue.
- Complete the Set up action step by mapping all the fields from your import file to the corresponding fields on the client record in Fisikal.
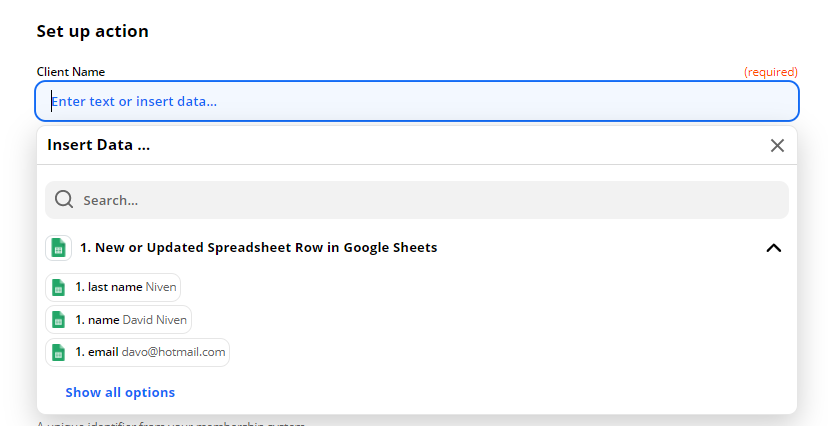
If a field is the same for all the clients in the file you can set it directly to that value for some fields by choosing from the drop-down list.
For example, if all the clients are in the same location you can select the location at this point.
- Once all the fields are mapped then Zapier will suggest that you test the import. This will send the data for the test client to Fisikal and their record will be created for real.
Make a note of the test client and do not resend them later to avoid a duplicate. - Once the test has succeeded the turn your Zap on.

The Zap will now await an update in your Spreadsheet before sending information to Fisikal. - Return to your spreadsheet and update the Ready column for 10 clients in the list from False to True.
This will trigger the Zap to run.
There may be up to a 10min delay between updating the sheet and the Zap being triggered.
Use the Zap History in Zapier to monitor when it has run.
When the first batch has worked then change the Ready column for the rest of your clients to True to trigger them into the Zap.
Troubleshooting
Using a free account in Zapier can mean the import gets throttled. This is not really a problem, it will just take a little while to get processed. However sometimes the importing of 100s or records can also trigger the Zapier flood protection. This means all the zap tasks are held in Zapier and must be authorised before they run. If you find that nothing is happening then log in to Zapier look at your task history, and allow all the tasks to run.
Read more about this here:
https://zapier.com/help/troubleshoot/behavior/rate-limits-and-throttling-in-zapier