![White Logo Blue Banner copy-100.jpg]](https://knowledge.fisikal.com/hs-fs/hubfs/White%20Logo%20Blue%20Banner%20copy-100.jpg?height=50&name=White%20Logo%20Blue%20Banner%20copy-100.jpg)
Clubs can make this a chargeable class or inclusive for their members. Members would book the session as they usually do within the app and when the live session starts, they can launch this directly within their member app.
This solution removes the need for the trainers to have to WhatsApp clients to tell them what URL they need to access this session.
All booking information is stored within the platform enable clubs to see who is attending and not. Other online services such Instagram-Live do not allow Clubs to see who is attending, deliver the solution within their branded experience or charge non members for attending.
This tutorial has been broken down into the following sections:
- SYSTEM CONFIGURATION
- ZOOM CONFIGURATION
- SCHEDULING ZOOM SESSIONS
- STARTING YOUR ZOOM SESSION
- CUSTOMER BOOKINGS
SYSTEM CONFIGURATION
In order to start delivering Live Streaming, Users should make sure they have set up Services and Locations correctly. Things to consider are as follows:
- Locations
- Service Categories
- Services
You may not need to make any changes to these maybe with the exception of changing the Service titles to indicate that they are now online, eg "HIIT 30MINS - ONLINE".
If you do want to set up / change Locations, Service Categories and Services, you can do so as shown below.
CREATE A NEW LOCATION OR SUB LOCATION FOR VIRTUAL/ONLINE TRAINING
You may need to add a new location for your virtual or online training. We suggest you call this ONLINE. If you are an operator with clubs in many locations you may schedule all your online classes centrally or each club may run their own online classes.
- If you are a multi-site operator and you want to run your class from a central location, you can either change the name of your existing Location or you can set up a new locations such as "ONLINE". See details of how to do this here.
- If you are a multi-site operator or have a single site and you want to run your class from your locations separately, you can either change the name of your existing Location or you can set up a new Sub Location (eg CHELSEA > ONLINE). See details of how to do this here.
CREATING AN ONLINE SERVICE CATEGORY
Service Categories are a grouping mechanism that helps clubs manage bookable entities. You could create a new Service Category for ONLINE SERVICES or they can be included in your classes. If you would like to create a separate service category for online offerings please see details of how to do this here.
Please note that if you do add a new service category, you will need to enable this to be visible within the app.
CREATING AN ONLINE SERVICE
A Service is something that you can book, with an associate Trainer, in an associated Location with an associated Activity Category, with a specific Group size and some permissions. Without a Service (and all underlying attributes) it is not possible to add a booking to the Schedule.
It is essential to add the correct colour, images and description to these online Services to ensure clients know they are either LIVE STREAM CLASSES or ONLINE.
To view how to add an Online Service please see the attached article here.
ZOOM CONFIGURATION
VIRTUAL TRAINING ON ZOOM
ZOOM is an easy way to reach your community in real time. Whether you’re hosting a meeting, doing a virtual training session or hosting a workshop, Zoom has* tools that will help you manage and interact with viewers in real time.
See the Zoom getting started guide.
All content must adhere to Zooms Community Standards and Terms of Service. If a user suggests that they will live stream content that violates our Community Guidelines, Zoom may age-restrict or remove the live stream.
If you want to deliver sessions longer than 40mins with 3 or more attendees you will need to updated from the BASIC account. Click HERE to view pricing packages on Zoom.
CREATE A ZOOM ACCOUNT
If you do not have a ZOOM account please see how to create one here.
Now that you have configured your Zoom account you can start scheduling Zoom sessions in Fisikal.
SCHEDULING ZOOM SESSIONS
Steps to create a Zoom meeting and embed it in a Fisikal session booking:
- CREATE A MEETING IN ZOOM
- SCHEDULE SESSIONS IN FISIKAL
CREATE A ZOOM MEETING
There are many ways to schedule a meeting, including the Zoom web portal, through the Zoom client, or with an extensions or plugins. Here are some basic instructions for scheduling your first meeting.
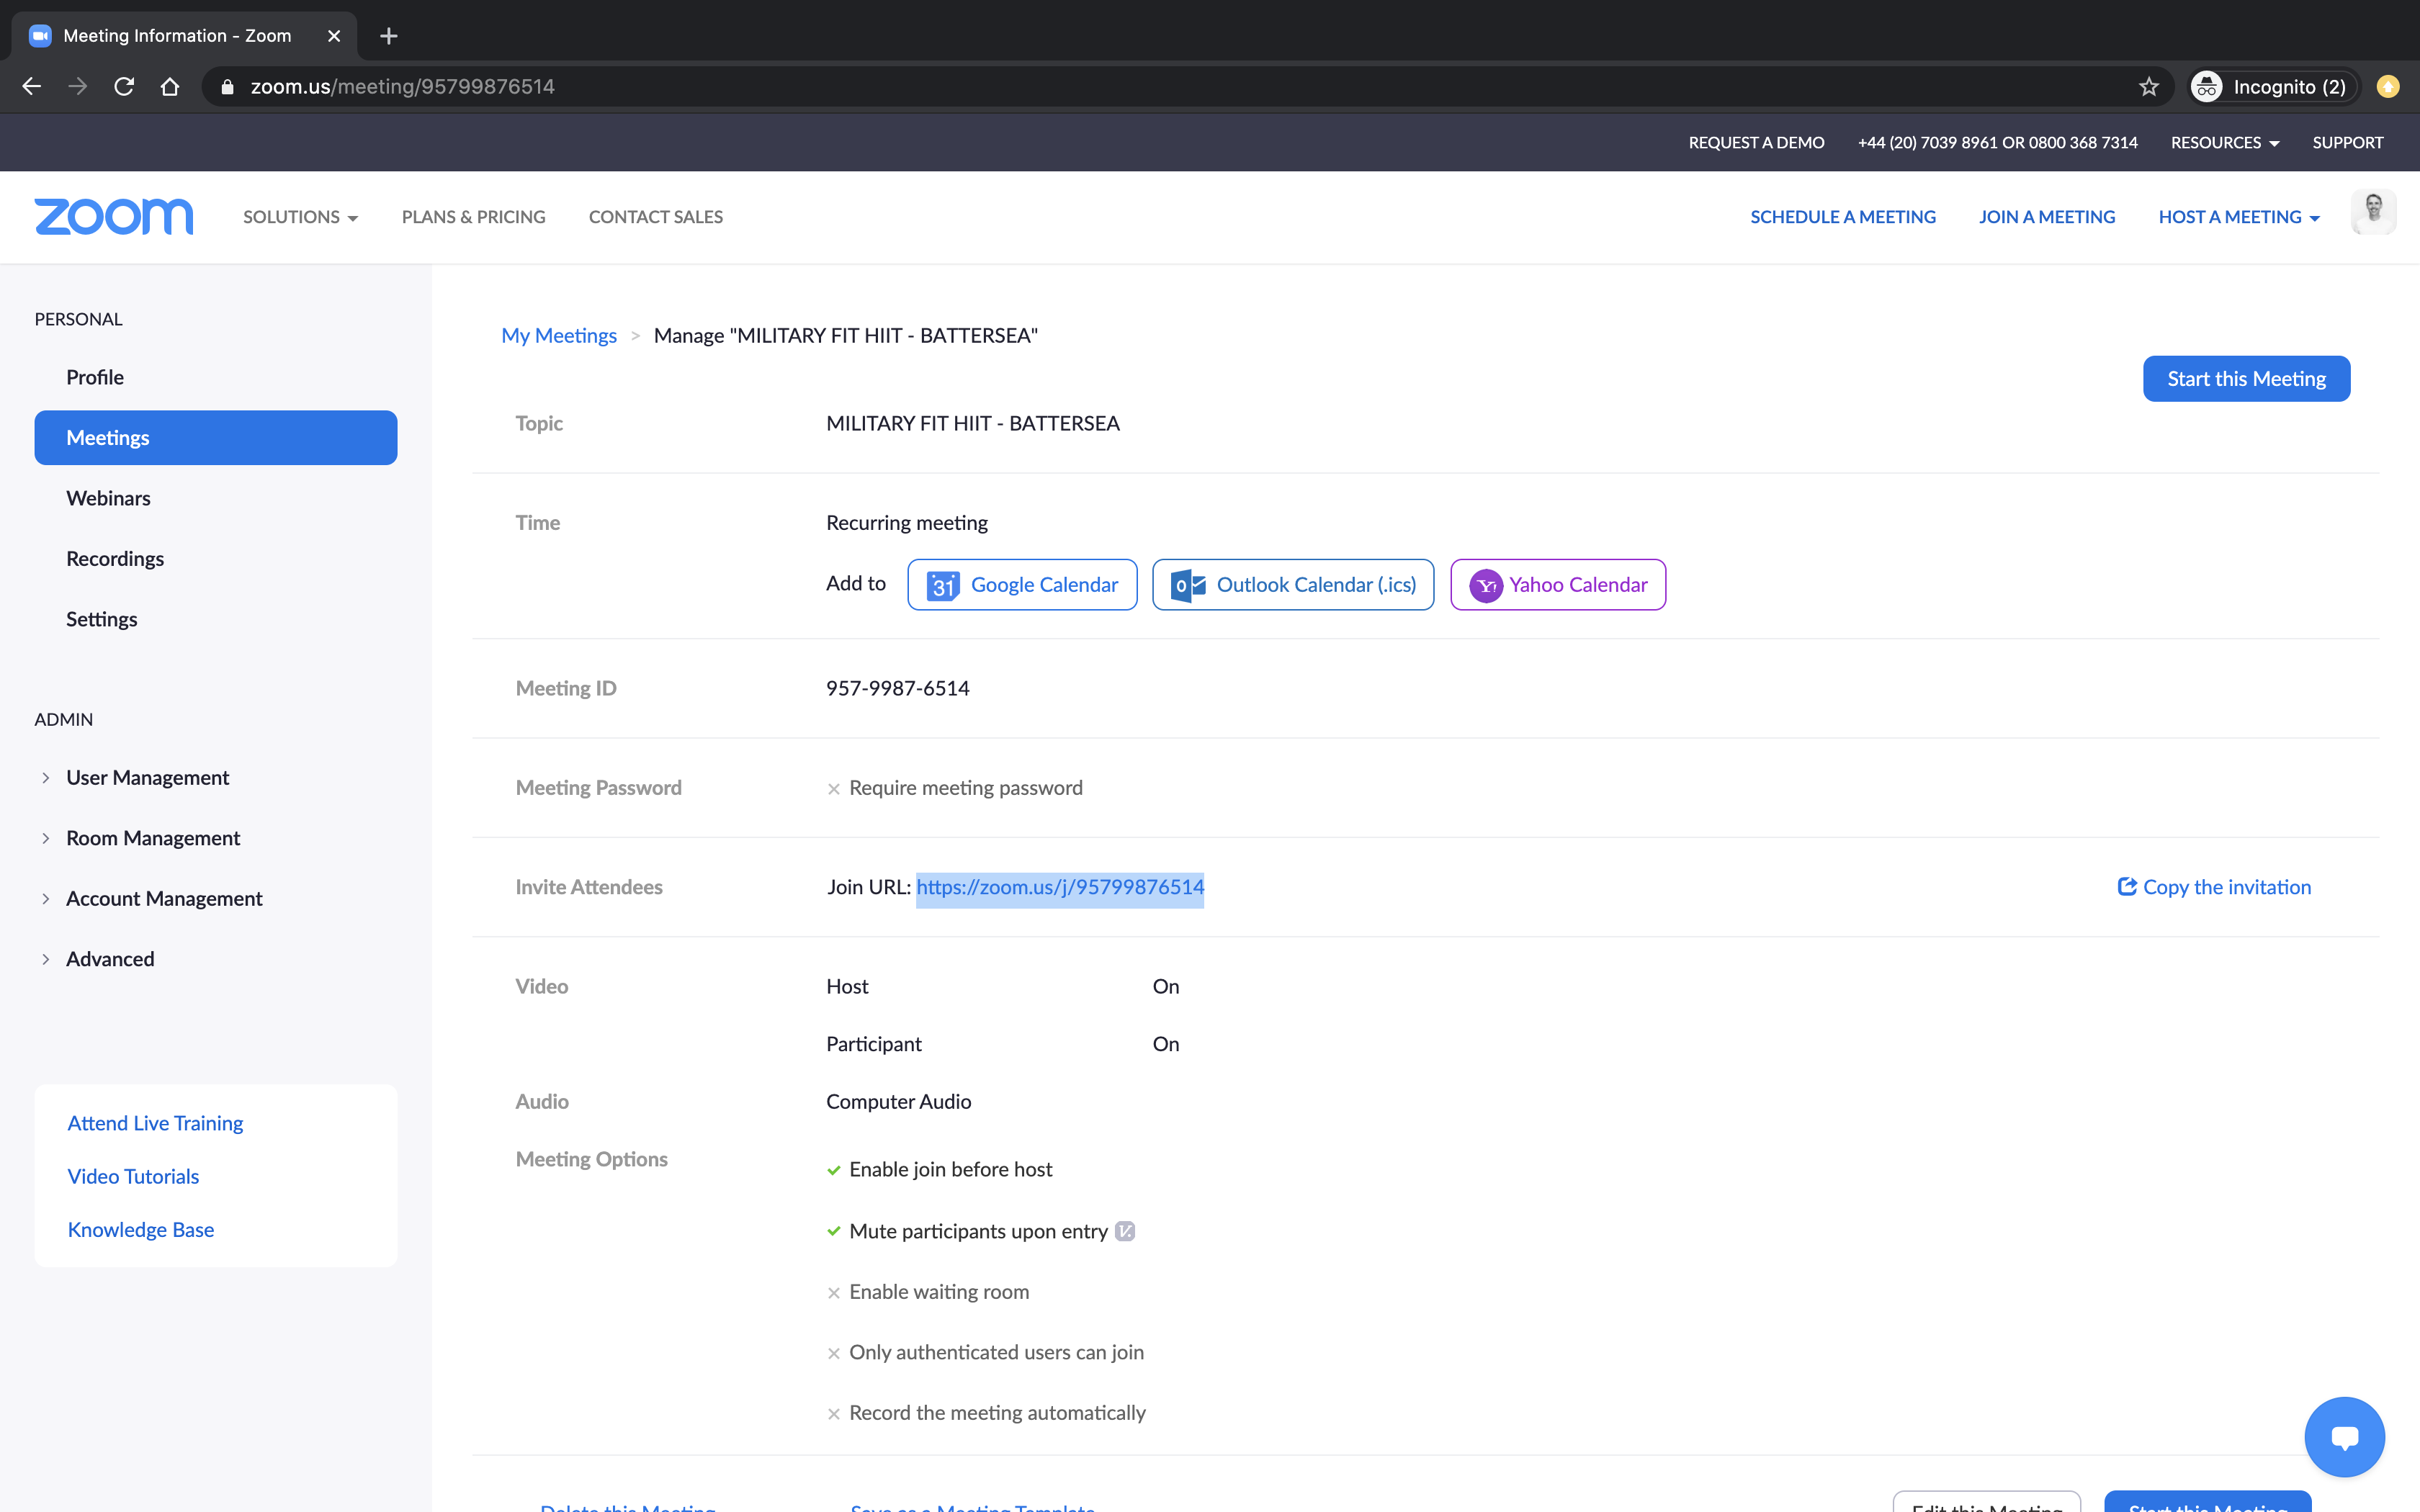
Sign in to your Zoom web portal, you will land on your overview page where will see details of any other meetings you have already created.

Select SCHEDULE A NEW MEETING and then fill in the form.
Enter a TOPIC. We suggest to enter the generic Class or Booking title followed by the Location name (if you offer your Services in multiple Locations) - eg MILITARY FIT HIIT - BATTERSEA.
Select RECURRING MEETING and configure it to show NO FIXED TIME. This configuration enables you to use the same URL for any session that you deliver with this Service.
Select GENERATE AUTOMATICALLY on the MEETING ID section.
Disable the checkbox in REQUIRE MEETING PASSWORD. As this meeting URL is only visible to people who book the session then this save 1 additional step for customers to do.
Configure the VIDEO options as you would like. We recommend that you select ON for both Host and Participants as this will save users messing around with turning these ON at the start of the session.

Configure the AUDIO section to use COMPUTER AUDIO by default. This will enforce that Customers join the session via the web / app so you can see them as well.
Configure the MEETING OPTIONS as you would like. We recommend the following configuration
- Enable join before host - ON
- Mute participants upon entry - ON
- Enable waiting room - OFF
- Only authenticated users can join - OFF
- Record the meeting automatically - OFF
You can configure your meetings however you would like to.
Once you have configured the meeting you should select SAVE. You will be taken back to the Meeting Overview page where you can see a summary of all of your meetings.
Now that your Zoom meeting has been created, you need to select the TOPIC and copy the JOIN URL so that you can paste this back into Fisikal to embed it into an appointment.
SCHEDULE SESSIONS IN FISIKAL
You can simply create sessions as you usually would in Fisikal, the process for embedding Zoom is slightly different for the following appointment types.
- INDIVIDUAL SESSIONS
- RECURRING SESSIONS
INDIVIDUAL SESSIONS
When creating an individual session you can embed the Zoom JOIN URL directly on the appointment creation form.
To schedule an individual appointment, go to Schedule > Create Appointment and the appointment form with appear. Start to create an appointment as you usually would be doing the following:
Choose the SERVICE and TRAINER that will be delivering the session.
Configure GROUP SIZE, ASSISTANT TRAINERS (if a Club), SUB LOCATION and ROOM MAP - if required.
Select the DATE and TIME and adjust the DURATION if required.
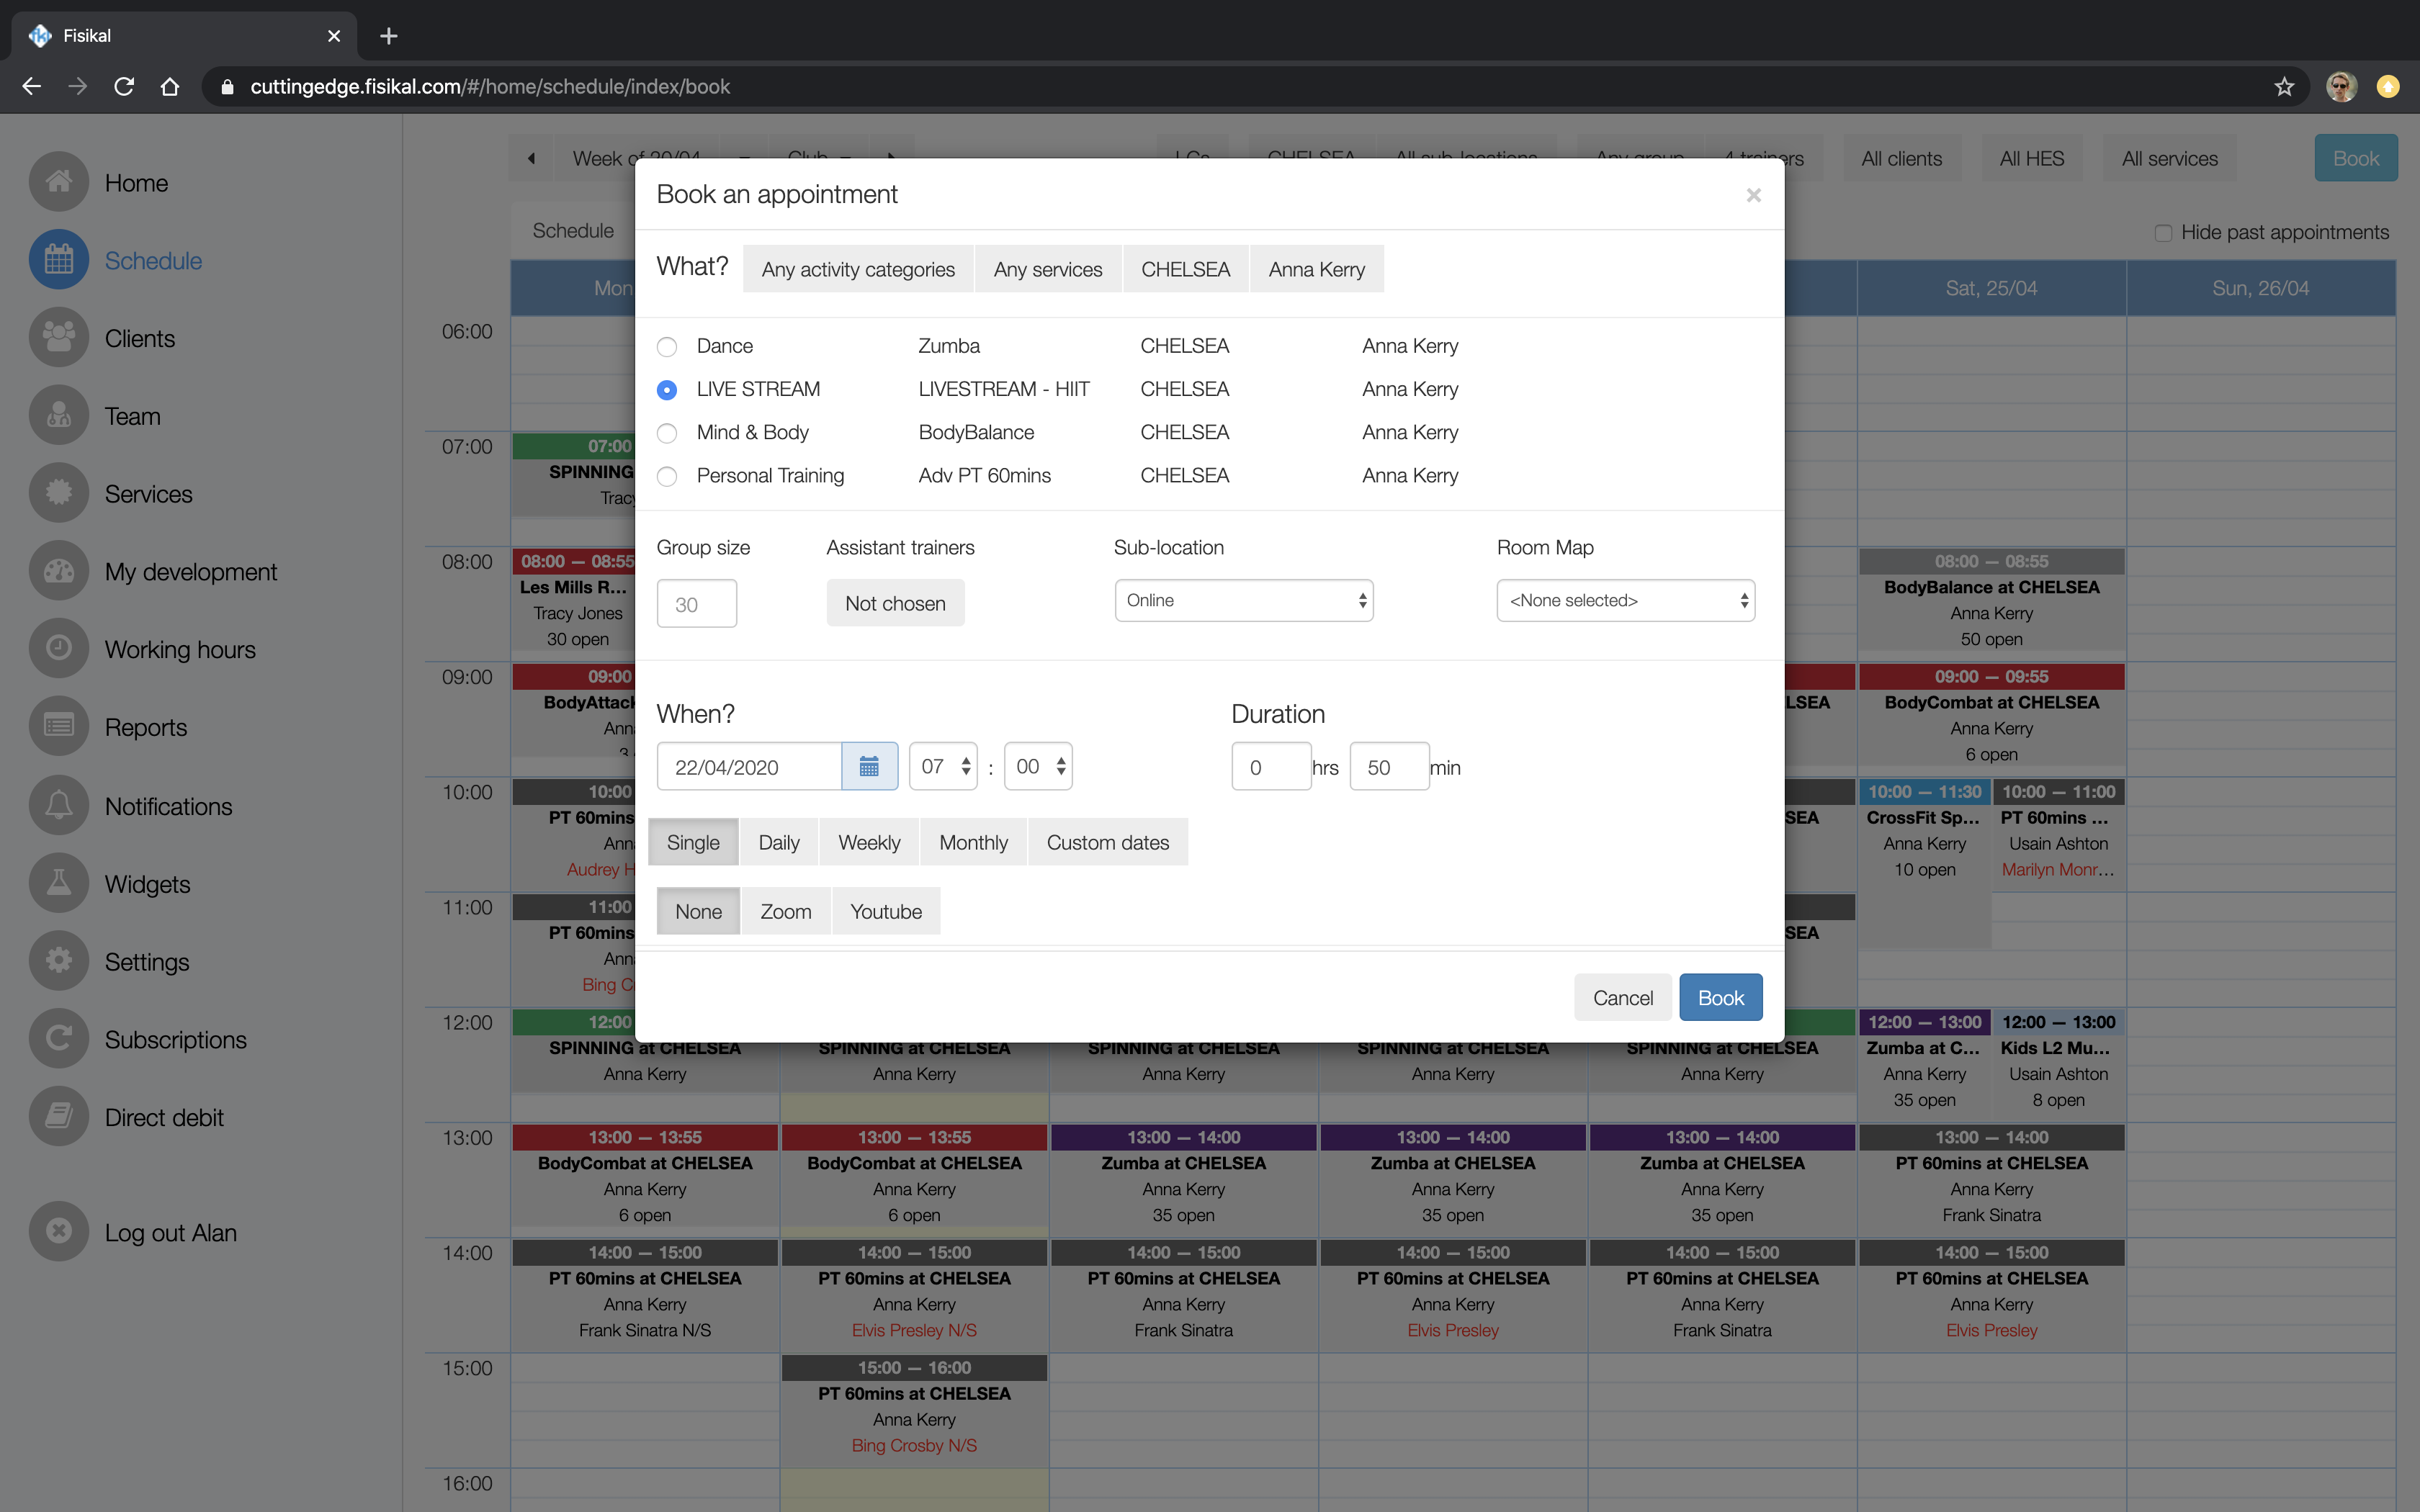
Select SINGLE and you will see new options appear to enable you to select:
- NONE - if this session is not going to use Zoom or YouTube
- ZOOM
- YOUTUBE
Select the ZOOM option and then paste in the JOIN URL that you have copied from Zoom into the EXTERNAL LINK box.
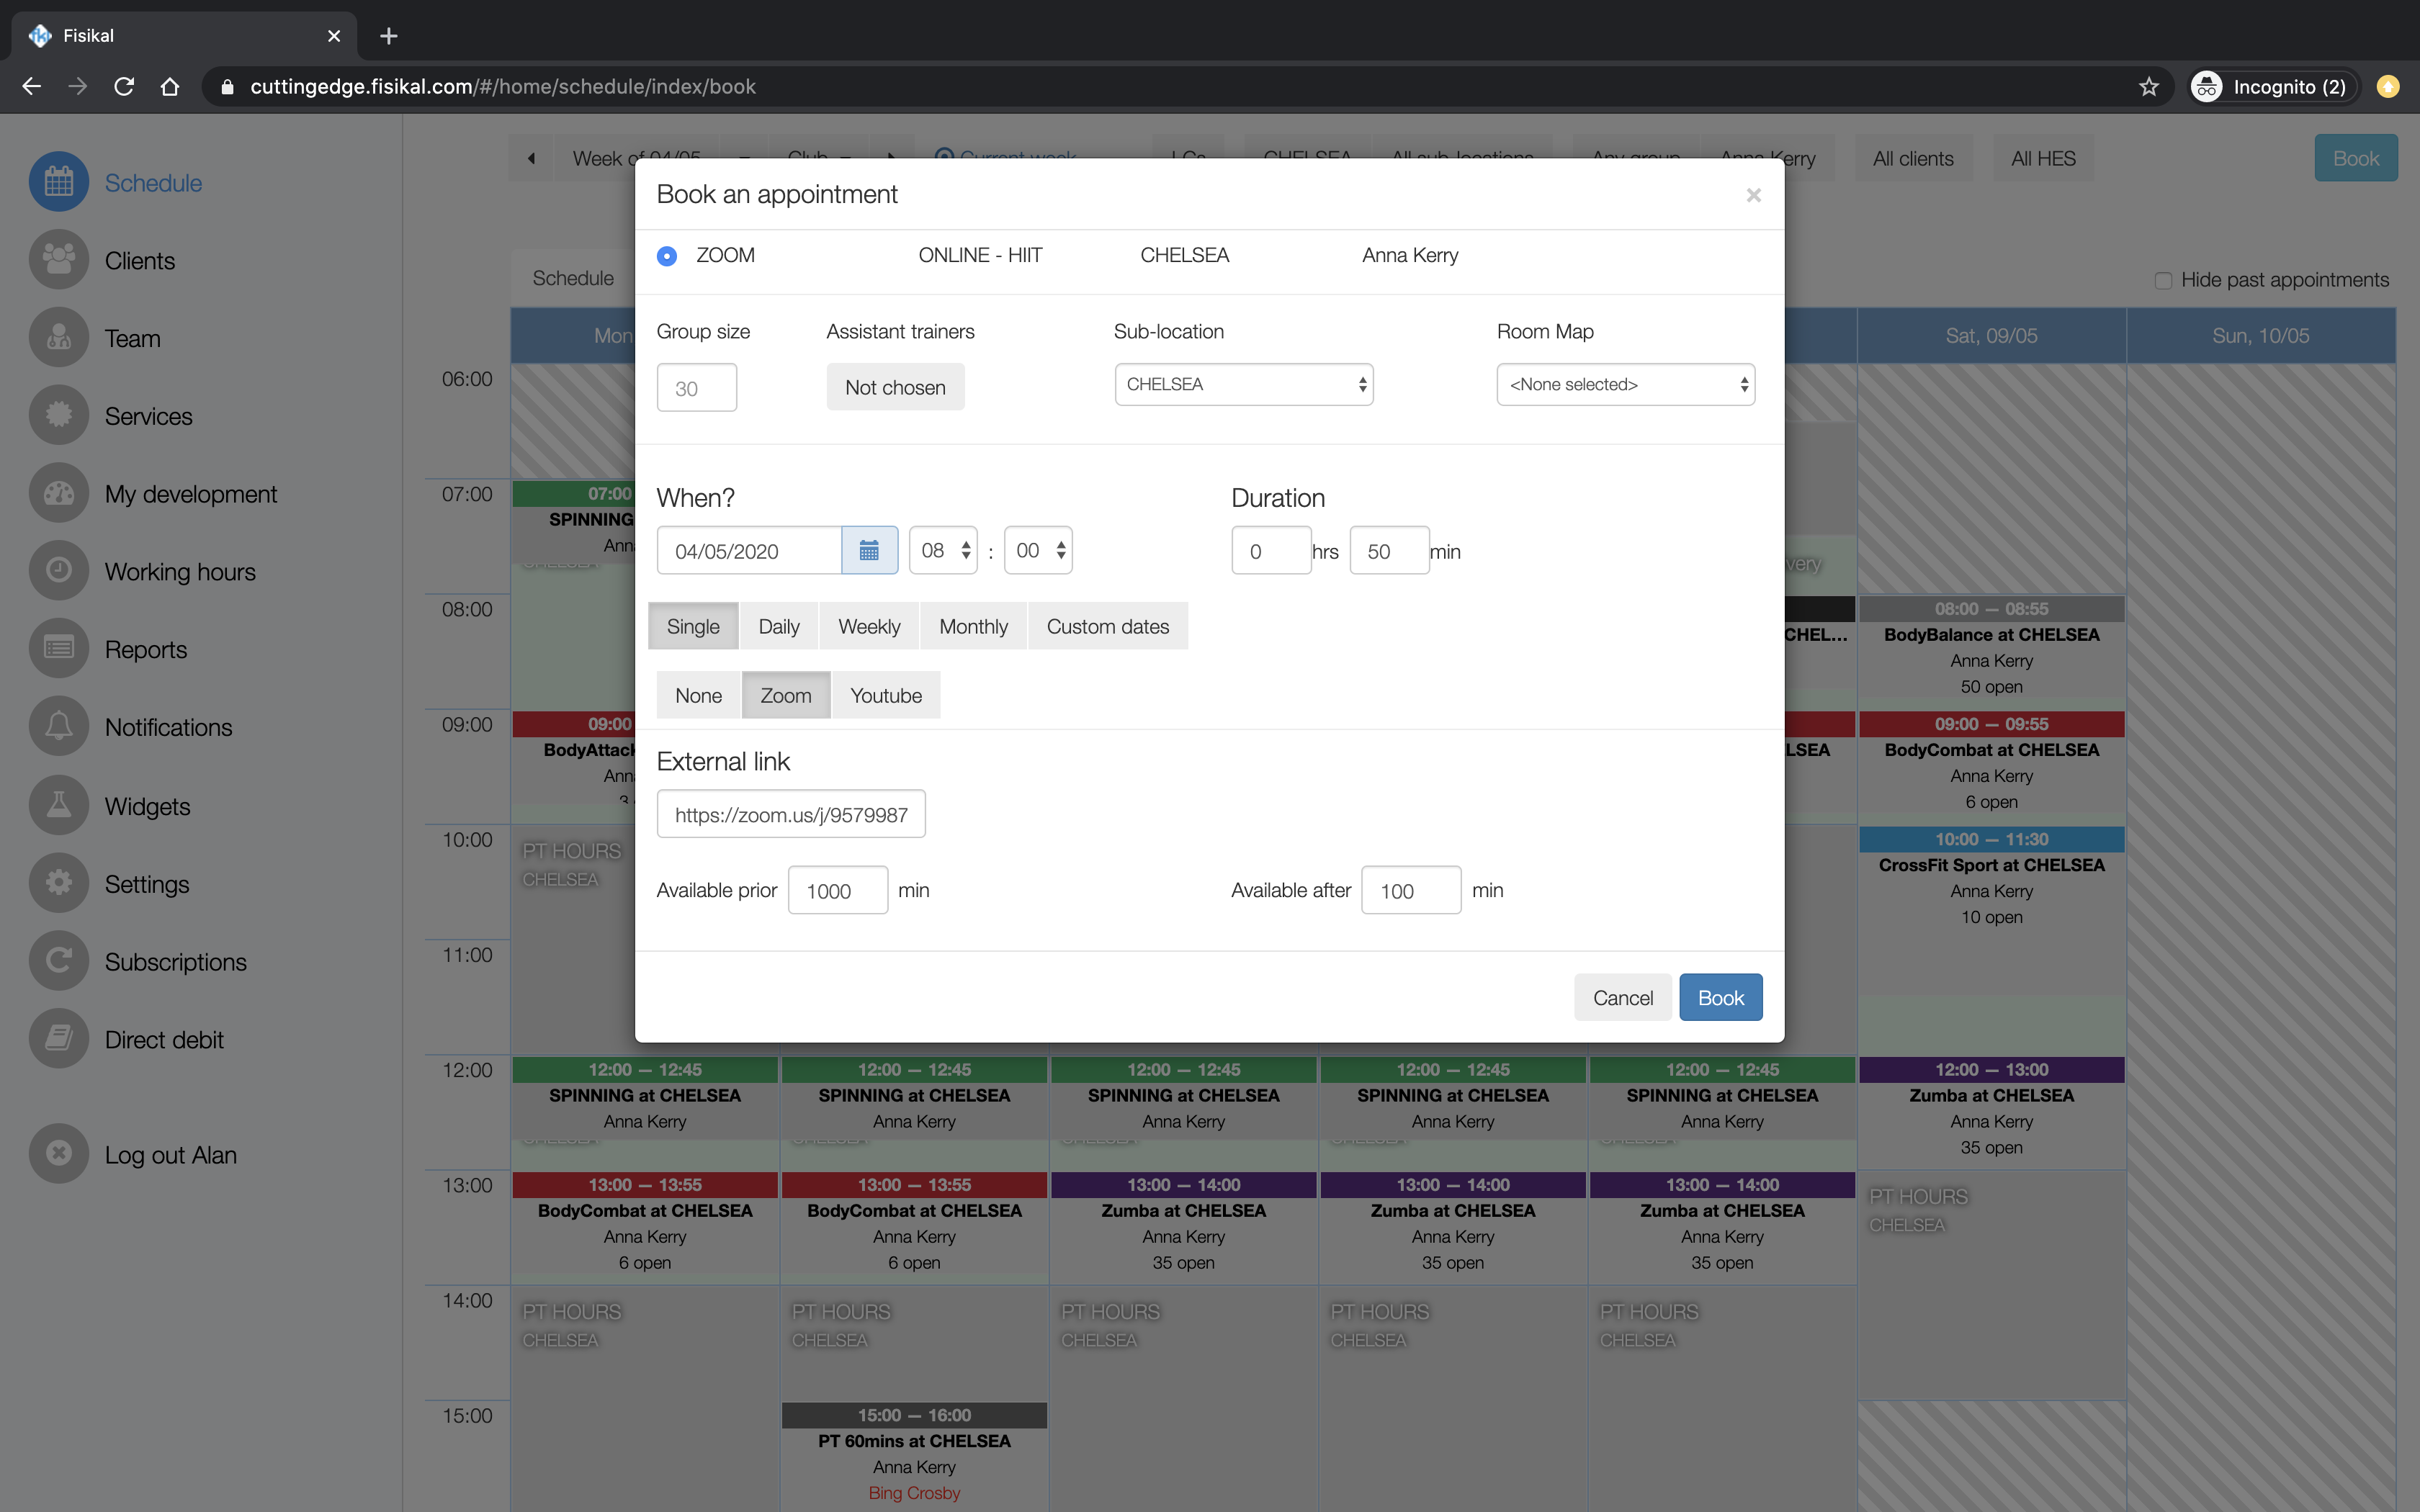
Update time values PRIOR and AFTER availability options (in minutes).
- PRIOR time allows clients to see the video button available for them to join.
- AFTER time allows clients to continue see the video button after the start time of the booking.
You can also add clients to an event if needed.
Select the BOOK button to save this new booking.
You can always EDIT the appointment if you want to make any changes to the session to include changing or removing the Zoom URL.
RECURRING SESSIONS
When creating recurring session you cannot embed the Zoom JOIN URL directly on the appointment creation form, you will have to first create the recurring appointment and then go back to EDIT them in order to embed the Zoom JOIN URL.
Create a recurring appointment as you usually would in Fisikal. To learn more about how to do this click HERE.
Now that you have created a recurring appointment in Fisikal, you can embed the Zoom JOIN URL into either an individual session, selected sessions or all future sessions.
Click EDIT on the session you want to apply the Zoom JOIN URL to.
In the LIVESTREAM SETTINGS section select CHANGE and then select ZOOM.
Enter the Zoom JOIN URL into the EXTERNAL LINK section.
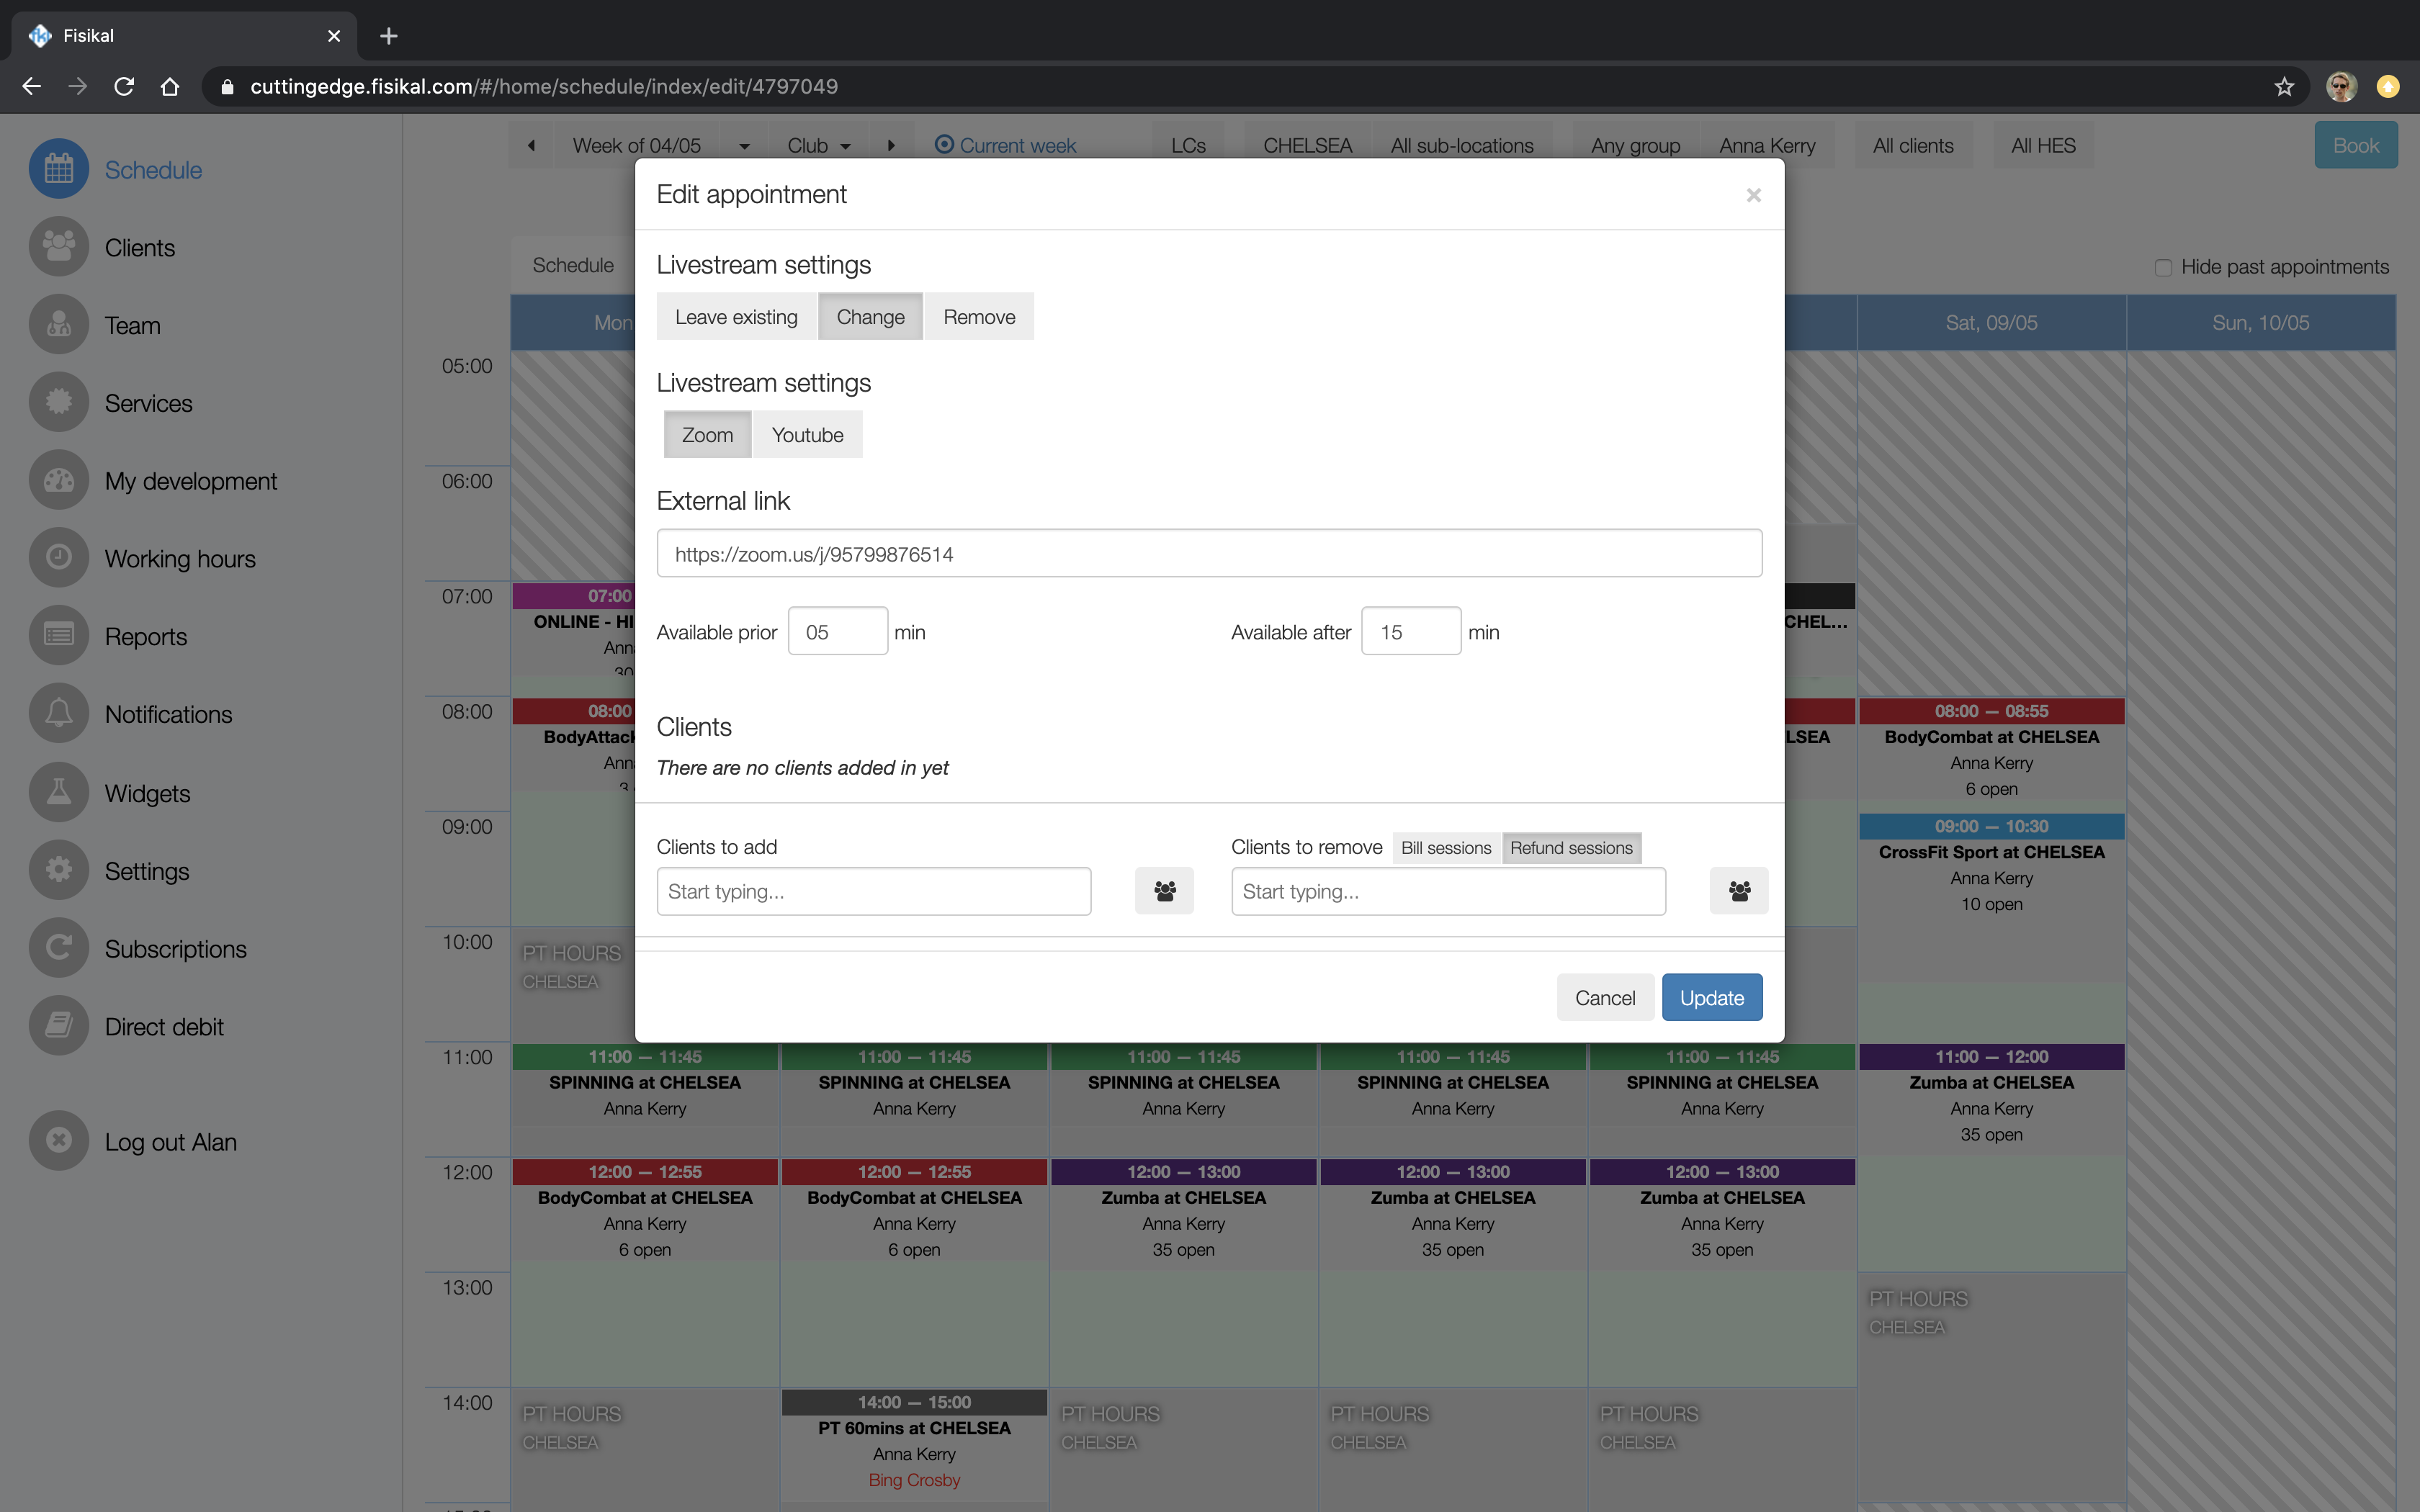
Enter time values PRIOR and AFTER availability options (in minutes).
- PRIOR time allows clients to see the video button available for them to join.
- AFTER time allows clients to continue see the video button after the start time of the booking.
You can also add clients to an event if needed.
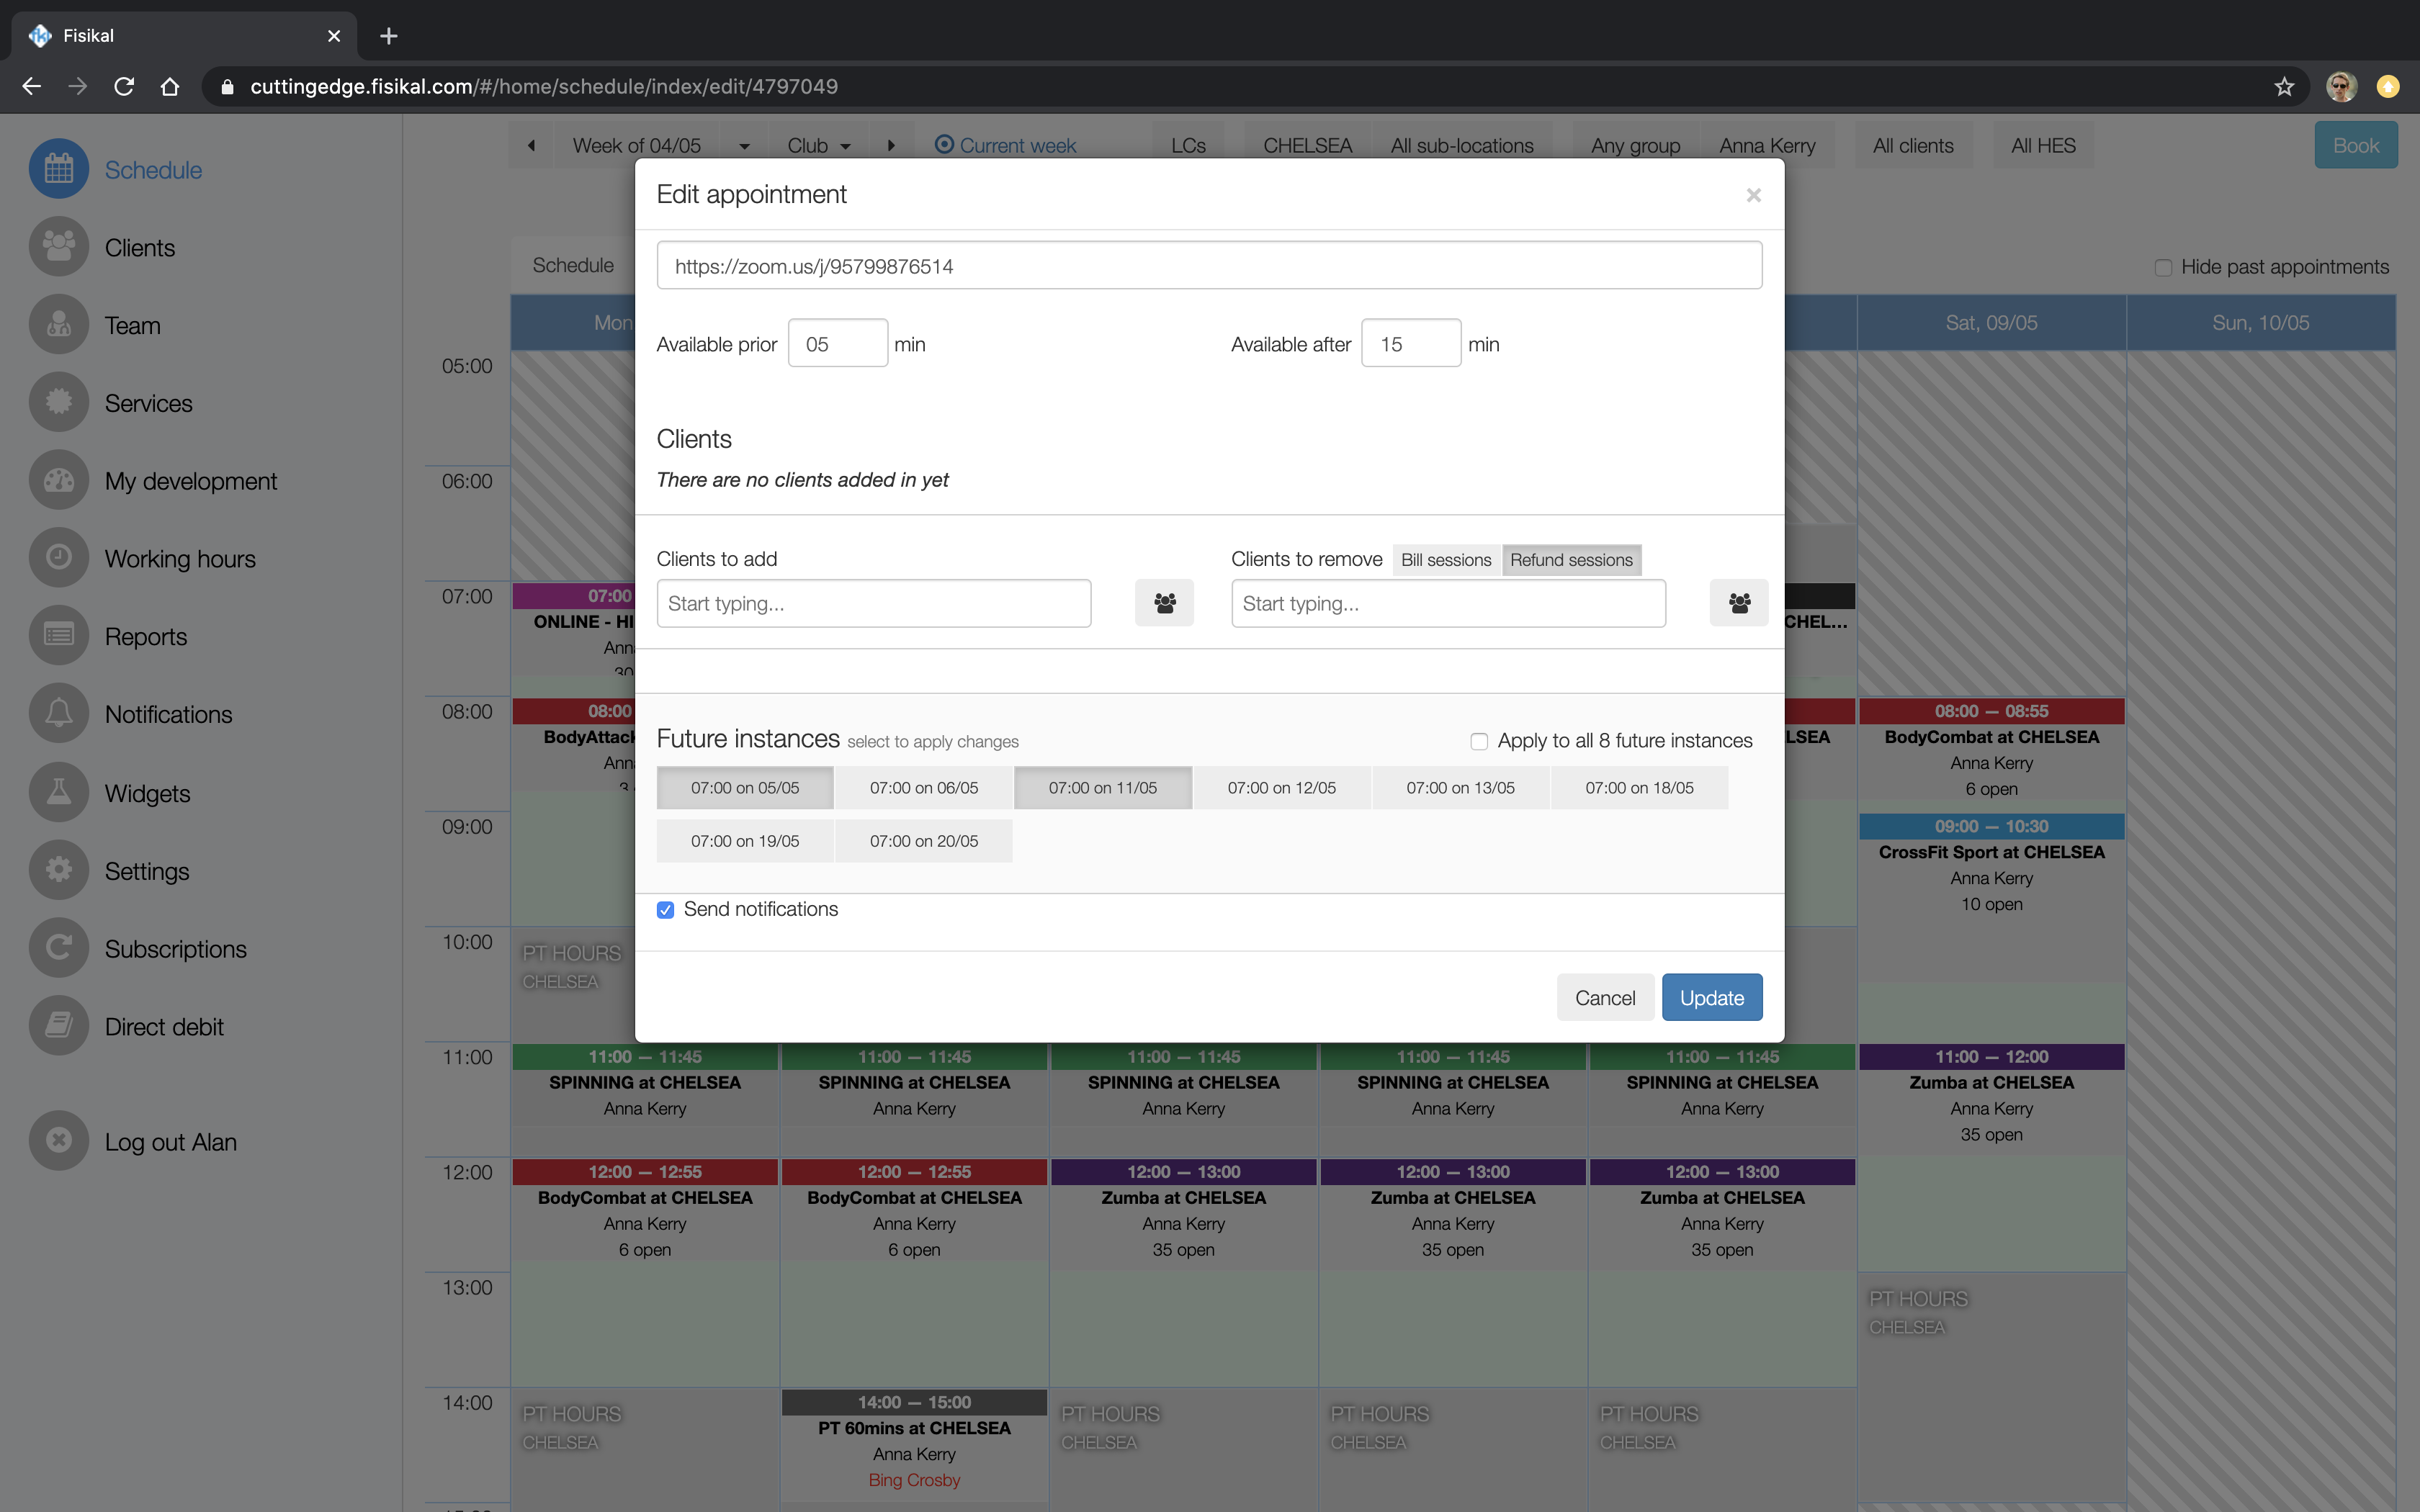
Scroll down to view the FUTURE INSTANCES section of the form. Here you can select to apply the Zoom JOIN URL to:
- Selected future instances
- All future instances
If you only want to apply the Zoom JOIN URL to this instance only, then you do not need to touch any of the options in the FUTURE INSTANCES section of the form.
Select the UPDATE button to save changes made to the sessions.
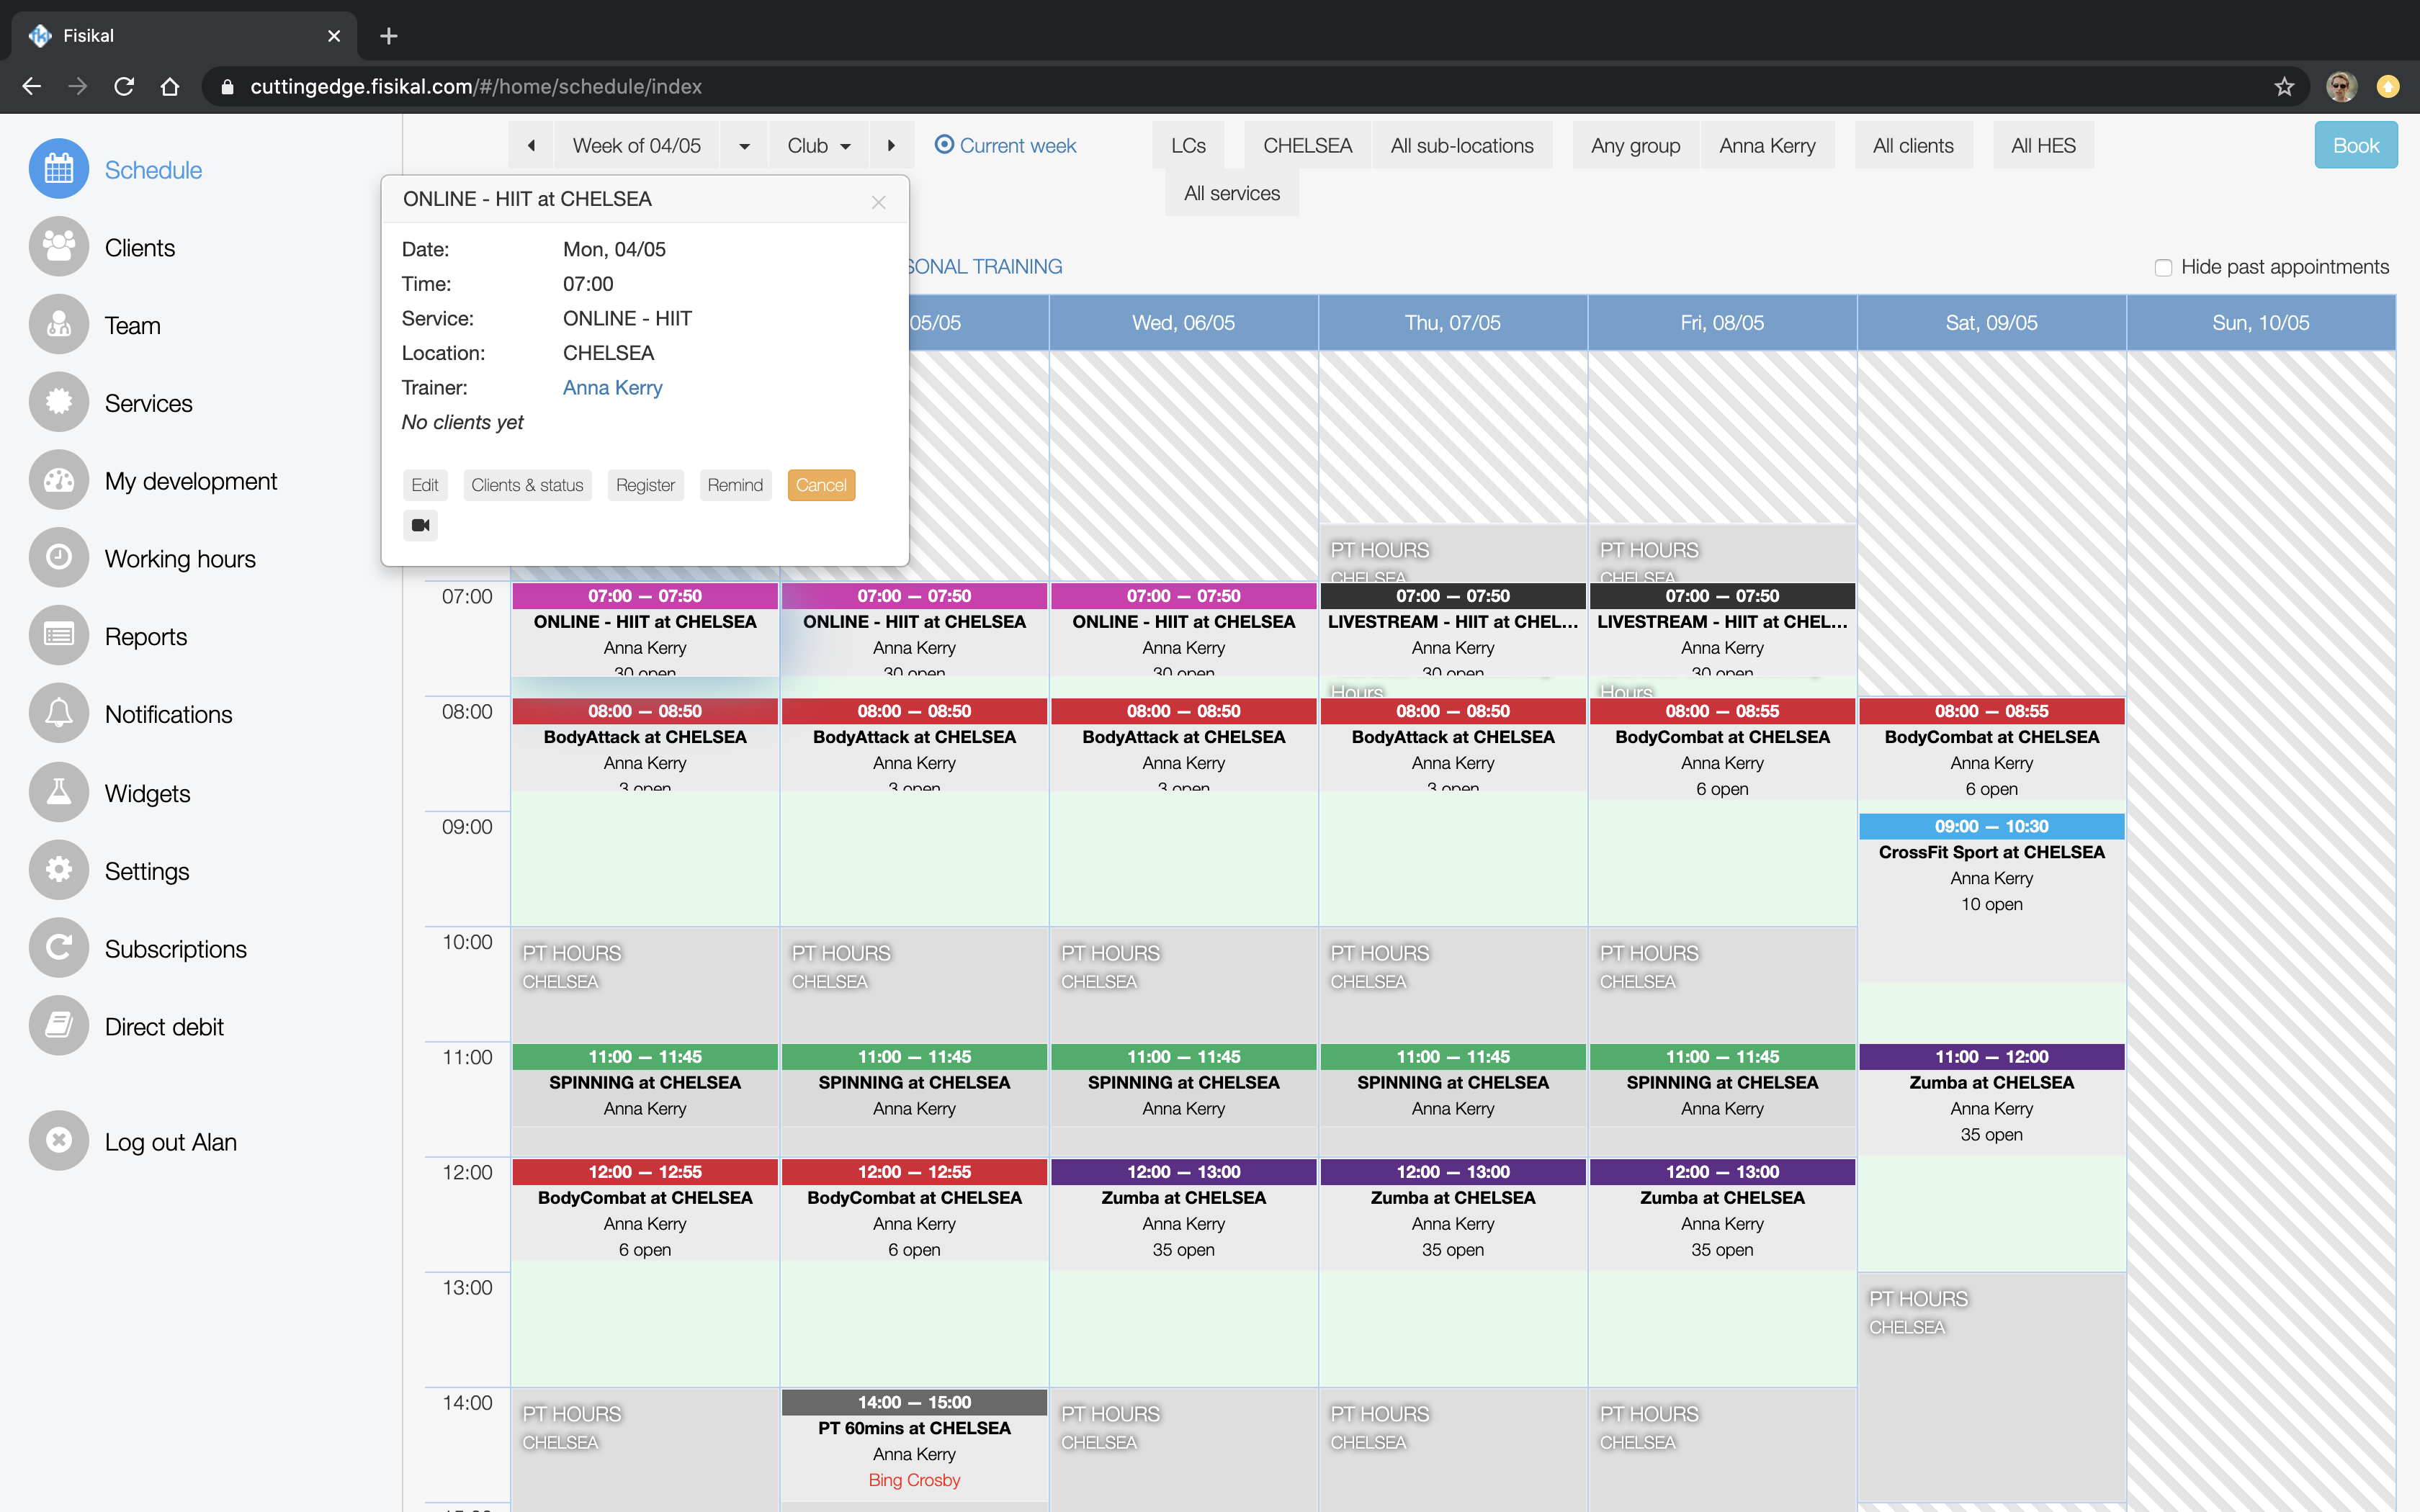
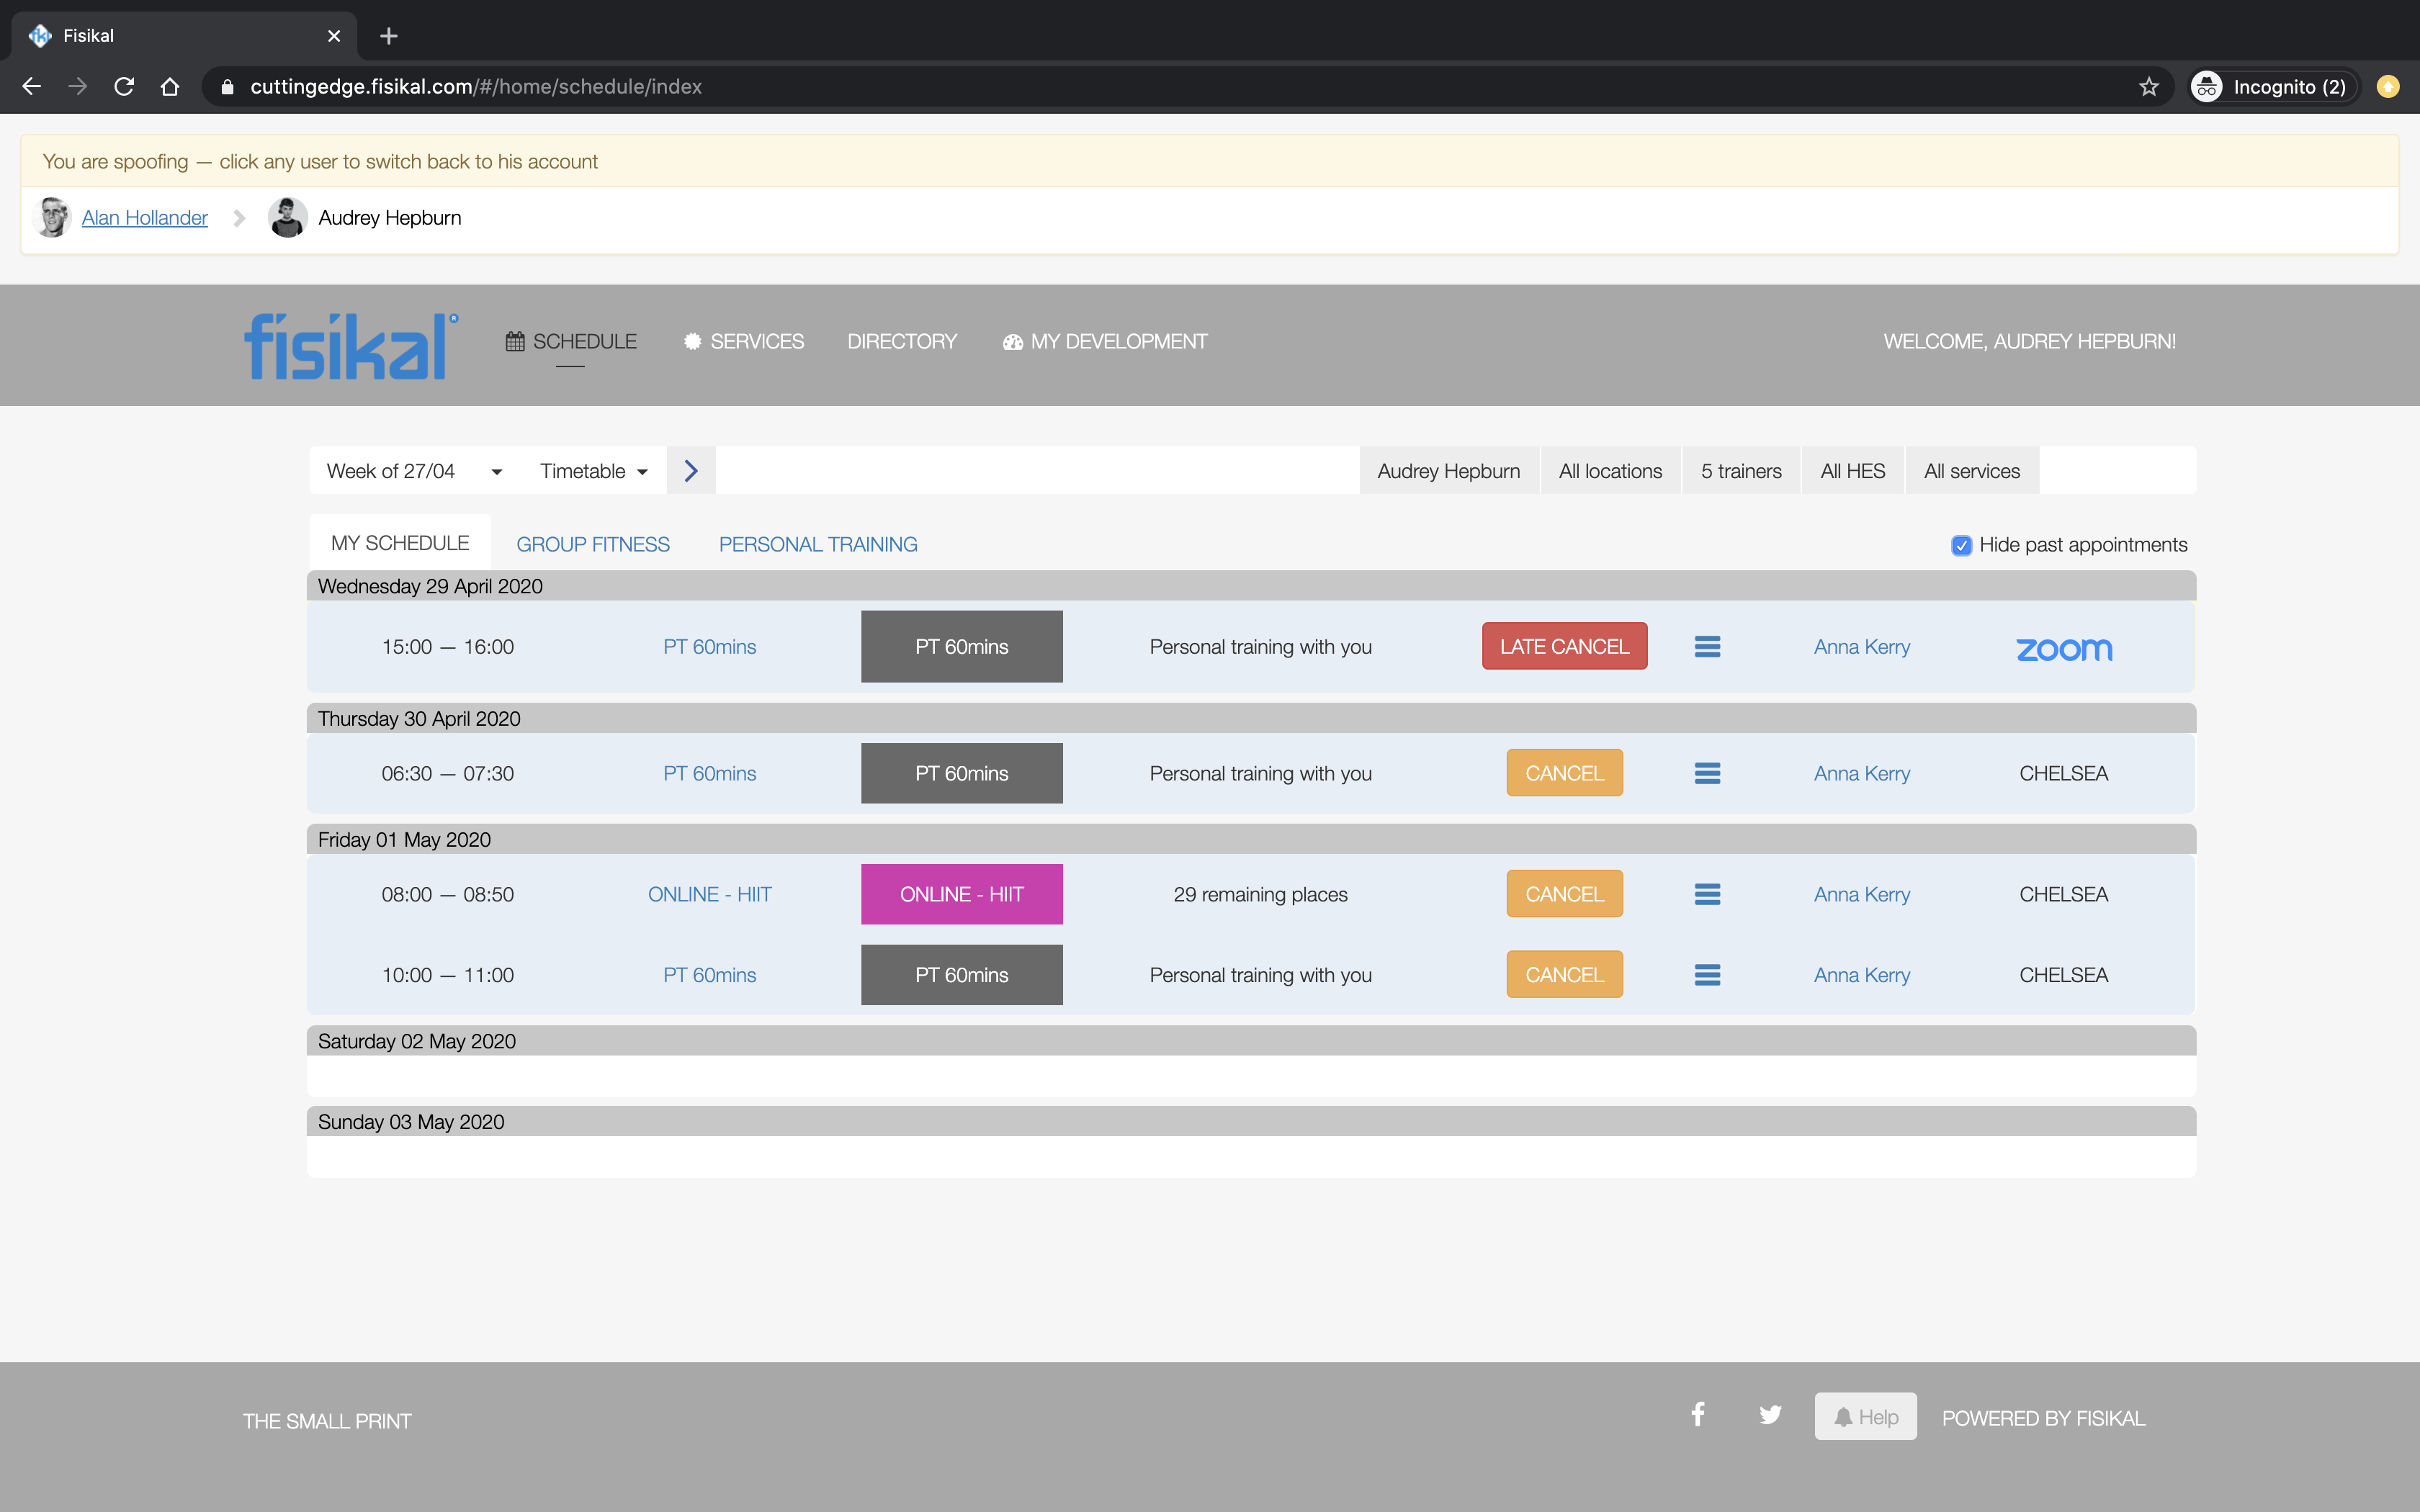
You can check that the Zoom JOIN URL now has been applied to the sessions you wanted it to by selecting the appointment on the Schedule - you will see a VIDEO icon, if selected it will take you to the Zoom JOIN URL as if you were a Client.

You can always EDIT the appointment if you want to make any changes to the session to include changing or removing the Zoom URL.
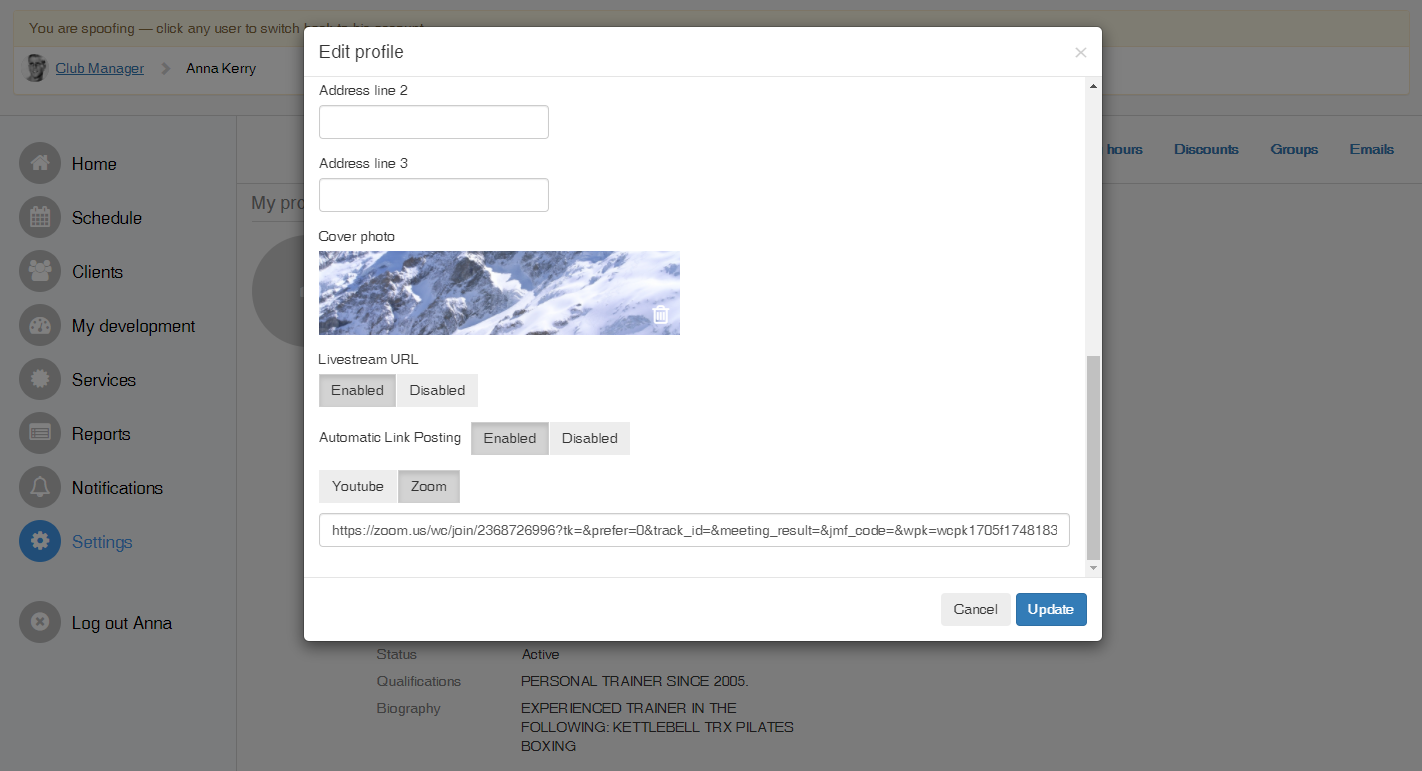
ADD A DEFAULT ZOOM LINK TO YOUR TRAINER PROFILE
To streamline the process of assigning a specific Zoom link to a schedule, trainers are able to add a default Zoom link to their profile. This default Zoom link will be automatically added to any livestream-enabled occurrence when it is scheduled, although this default link can be overridden during the scheduling process if desired. This can be turned off using the 'Automatic Link Posting' option within the same settings page.
Note: To edit a trainer's personal Zoom link as a manager, you must spoof into that user and navigate to their settings page.
STARTING ZOOM SESSION
Now that your session has been configured and Customers have booked into the session, simply login to ZOOM and navigate to the MEETING page. Navigate to the specific meeting that you want to start and select the START button. Follow the directions on screen.

Once the meeting is underway, you will be able to view your attendees on the screen. There are a number of different view options so you can see more or less of attendees.

Once the session has completed select the END MEETING button and then select END MEETING FOR ALL. The meeting will finish and all Clients will be removed from the session.
CUSTOMER BOOKINGS
Customers can book into the session as they would for any usual appointment. This can be done on both web and app. Customers will only be able to book for the session if they have a Package assigned to them that contains the credit, or no credit is required for the booking as the Service has been configured with "Restrict to book with advanced credits" set to NO.
When a customer goes to make the booking, they will simply JOIN the session as they usually do. They will go to their MY BOOKINGS area of the app and tap on the appointment which has been Zoom enabled and they will see a message to JOIN MEETING. The JOIN MEETING panel will only show in the time is within the AVAILABLE PRIOR field on the booking form.
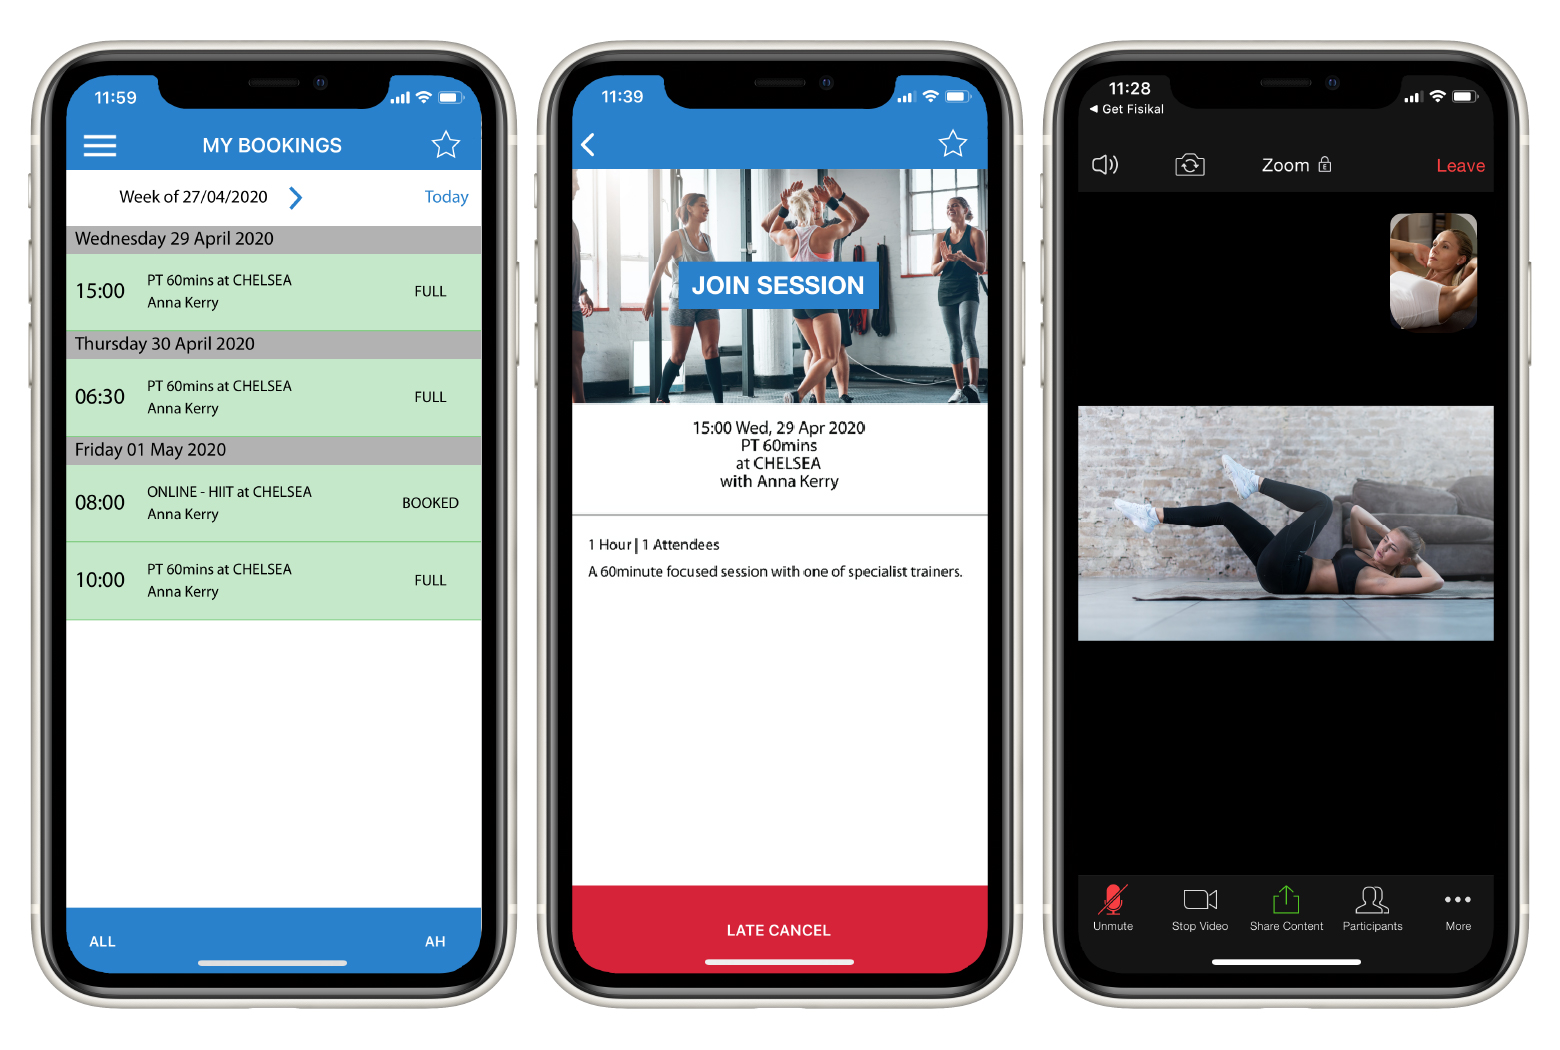
Once customers select JOIN MEETING, the Member app will launch Zoom and they will be able to join the session without having to enter any meeting credentials (unless configured to have a Password by the Trainer). Users should have Zoom already downloaded in order to streamline this experience.
Once the Trainer has started the session they will be able to view the Trainer and the Trainer will be able to view them. The app experience is shown above.
The view below shows an example web view of a Client portal where they can see the ZOOM button, once selected ZOOM will launch in a new browser tab for the Client to join the session from their computer.
The screen below shows how both Trainer and Client can view
