![White Logo Blue Banner copy-100.jpg]](https://knowledge.fisikal.com/hs-fs/hubfs/White%20Logo%20Blue%20Banner%20copy-100.jpg?height=50&name=White%20Logo%20Blue%20Banner%20copy-100.jpg)
This article describes the process to add historic package purchases to clients and to load future sessions.
This process assumes that your client data is already loaded into Fisikal.
OVERVIEW
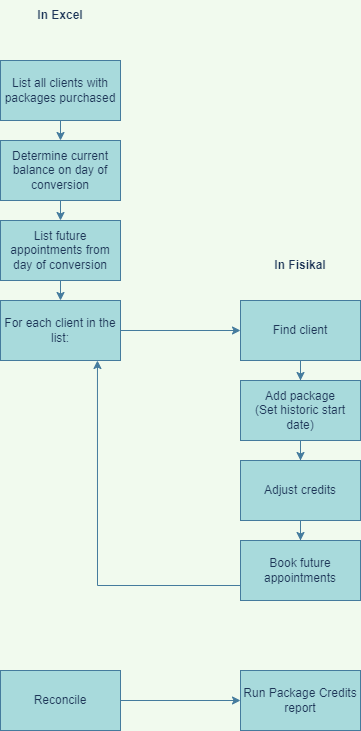
Collect your data on the current credit balance for each of your clients, analyse that and then make a manual change to each of your clients to add the correct package, adjust the remaining balance and move any existing appointments into Fisikal.
Special step for self-employed trainers
- the user is a Manager
- if the user is a Trainer and there are no payment method restrictions applied to a package.
Steps for a Trainer to remove the Payment Method restrictions from all of their packages
- Log into Fisikal as a Trainer
- Click Services > Packages
- Edit each package in the list:
- Click Payment Information
- Under the heading: Allowed payment providers.
If the button underneath says ‘All providers’ then no action required, Cancel the edit and move to the next package.
If the button says text like ’2 providers’ then click the button and proceed.
- Click the Trash can icon at the top of the Current selection list so that the list is empty.
- Click Apply Filter.
- The Allowed payment providers button now says ‘All providers’
- Click Update to save the package.
- Repeat for all packages
Prepare your data
We recommend that you document all of the important information onto an Excel file so that you can keep track of the information and have something to reference when loading this information onto the system. Please click HERE to download a template file.
You will need to record the following information:
- Client name or Alt ID (so you can look them up easily)
- Title of the last package they purchased
- Date they last paid for the package
- The amount they paid for the last package
- Go-live credit balance
- Future bookings for this package
- Credit balance after all future bookings are applied
NOTE: when calculating the GO-LIVE CREDIT BALANCE value, this will as at the day that you go-live with your bookings for your clients. So if you decide you go-live on Mon 03 Jan for example, you may have existing sessions between now and then. You will need to know what your credit balance will be on the GO-LIVE date. This will take into consideration any past sessions that you have delivered that you have NOT added into the software. We are only interested in recording sessions that were billed and the credit that was deducted from the package balance.
The GO-LIVE CREDIT BALANCE should also take into consideration time as well. So if you are going live on Mon 03 January at 09:00 and your client has a session at 17:00 on the same day. Your GO-LIVE CREDIT BALANCE will take into consideration all sessions that have occurred before 09:00 on Mon 03 January. So the 17:00 session will be deducted from the GO-LIVE BALANCE.
In the example below, Audrey purchases a 10 pack of PT for £600 on Monday 06 December. She has her first session that afternoon at 16:00 - which means after that she has 9 sessions left in this package.
| NUMBER | DATE & TIME | REMAINING CREDITS |
| SESSION 1 | Mon 06 Dec, 16:00 | 9 |
| SESSION 2 | Wed 08 Dec, 16:00 | 8 |
| SESSION 3 | Mon 13 Dec, 16:00 | 7 |
| SESSION 4 | Wed 15 Dec, 16:00 | 6 |
| SESSION 5 | Mon 03 Jan, 16:00 | 5 |
| SESSION 6 | Mon 03 Jan, 16:00 | 4 |
| SESSION 7 | Wed 05 Jan, 16:00 | 3 |
| SESSION 8 | Fri 07 Jan, 16:00 | 2 |
| SESSION 9 | Mon 10 Jan, 16:00 | 1 |
| SESSION 10 | Wed 12 Jan, 16:00 | 0 |
The GO-LIVE date is set for Mon 03 Jan at 09:00. So the GO-LIVE BALANCE will show 6 remaining credits.
The first session to be recorded in the software will be Mon 03 Jan, 16:00. This will be the 5th session in the package and after this has been booked, Audrey will have 5 remaining credits in this package.
Do remember to take into account the TIME & DATE of the legacy appointments, as this will make it clear how many credits you have to adjust on their package.
Steps in Fisikal
- Log into Fisikal with a Manager, FOH Manager, PT Manager or Trainer login.
- Look up the client to be onboarded
Click Clients on the main menu and enter the client's name, email or alt-id in the search box.
Click the clients name in the results list to view their record. - Add the package:
- Click the Products tab.
- Click +Package
- Choose the package from the list
- Choose the Starts At date to match when they bought the package
- Use the Discounts > Custom > Value option to change the price as required.
You can use a -ve discount to increase the price if necessary.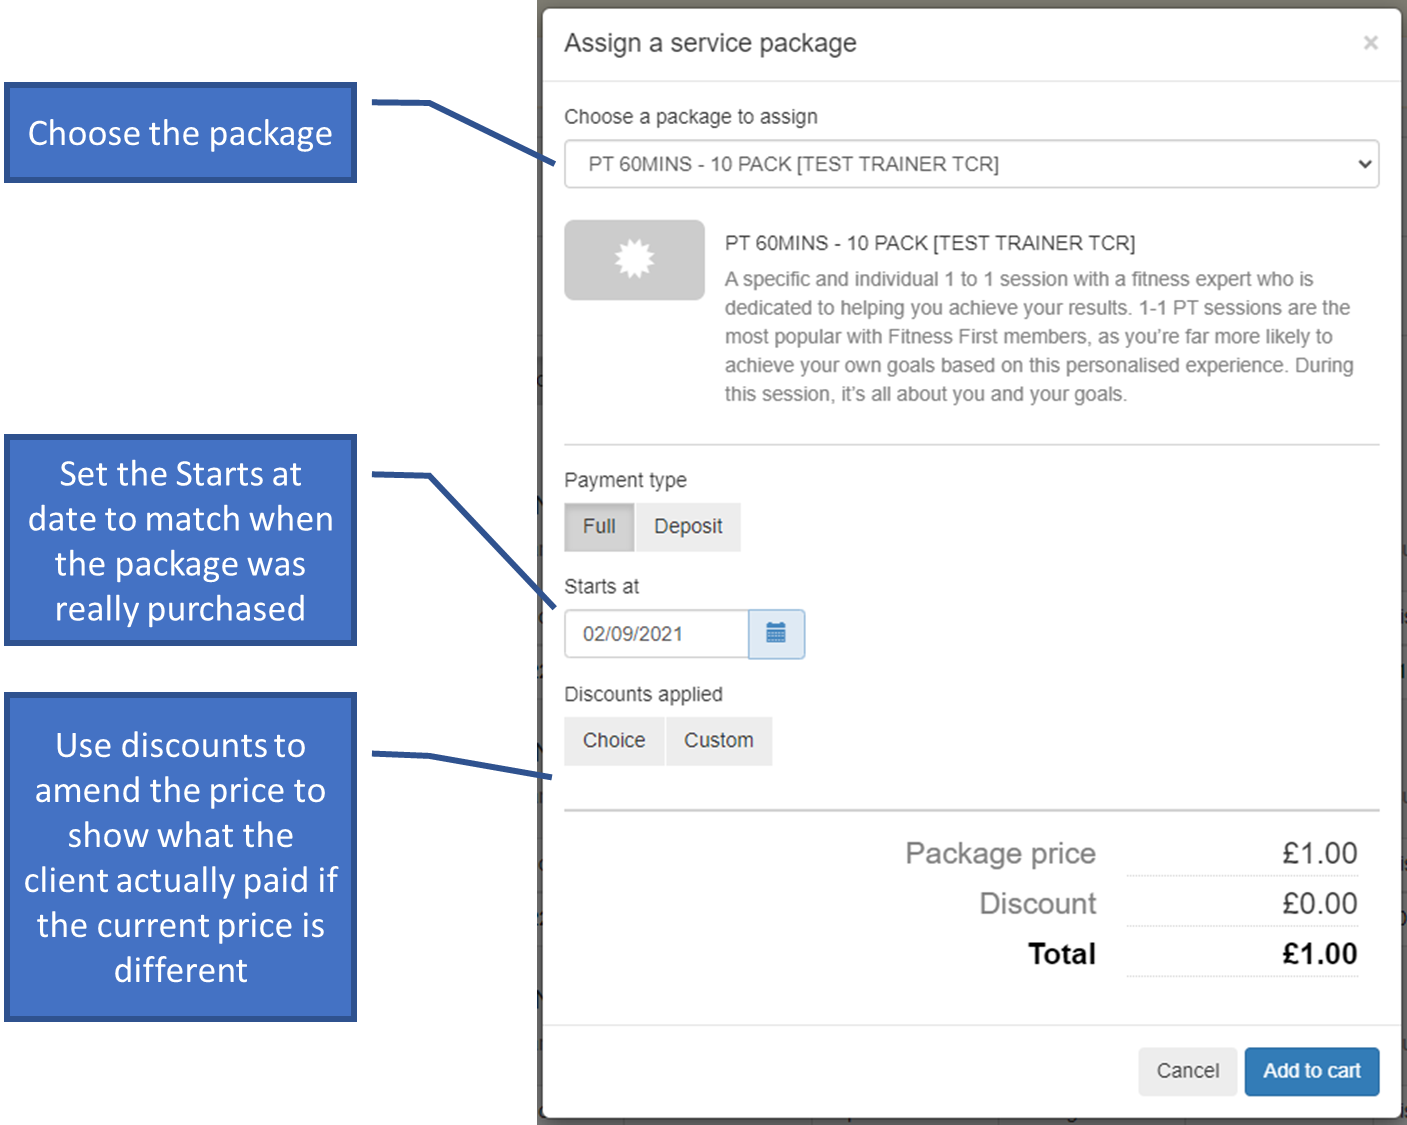
- Click add to Cart
- Complete the purchase:
- Click 🛒Checkout
- Change the Payment Date to match the original purchase date
- Change the Payment Method drop down to the correct option for what was used originally
- Click the Choose a payment method button, and click Pay Offline
If the Pay offline option is not available then the special step above for self-employed trainers has not been completed for this package.
- The package is now added to the client's record.
Note the client may receive a receipt for this transaction.
- Adjust the balance:
- Click the ✏️Adjust button on the package
- Adjust the used amount to the value of how many sessions the client has already used in the past.

- Click Adjust
- Schedule future appointments
- Click Schedule on the Main Menu
- Ensure the correct Club and Date are selected and then click anywhere on the calendar to add a booking for the client.
- Complete the Book an Appointment form

- Click Book
- Once all the future bookings are complete review the client's summary.
The Remaining Credits value on the package should now show the correct amount. - Once all the clients are processed use the Package Credits report to analyse all the clients who have had a package assigned in the period that the onboarding has taken place to check that the remaining values for their packages are correct.