![White Logo Blue Banner copy-100.jpg]](https://knowledge.fisikal.com/hs-fs/hubfs/White%20Logo%20Blue%20Banner%20copy-100.jpg?height=50&name=White%20Logo%20Blue%20Banner%20copy-100.jpg)
Overview
There are over 200+ email templates that are hard-coded in Fisikal. This means that out of the box Fisikal is setup to send emails in all the situations that it needs to.
The hard-coded emails:
- Are translated into the supported languages in Fisikal
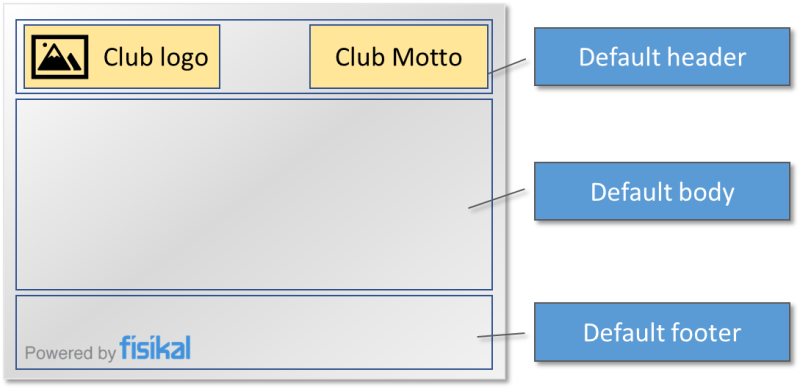
- Are made up of a Header, Body and Footer which includes the branding of your club.
- Can be overridden at Admin and Manager level.
- Admin level overrides the hard-coded email templates for all clubs in the instance.
- Manager level overrides the hard-coded and Admin level templates for the Manager's Club .

How to edit an email template
The first step is to identify the template that you need to edit.
The most commonly edited templates are the Welcome for Client and Restore password templates, as they are very visible for clients at the start of their journey and everyone receives them.
Some templates are more commonly sent than others.
There are a couple of techniques to help identify the template to edit:
- Trigger the emails for a test client and review them in the client's communication tab. Use the subject and contents of the email to determine the correct template to edit.
- Use this list to help determine which email template is sent in which circumstances. It also links emails by their template name in the database (if you have access to it) to the name in the user interface.
- Decipher the name in the list. The Email template names are assembled from:
- Area
- The event that triggered it
- Who caused it to be sent
- Who received it
Once you have determined which template to create or edit:
- Log in to Fisikal as an Admin user or a Manager user:
- Admin users click Email Templates in the main menu
- Manager users click Settings > Email Templates
- Click the Edit button to edit an existing template, or click the + button to define a new template.
The template editor is displayed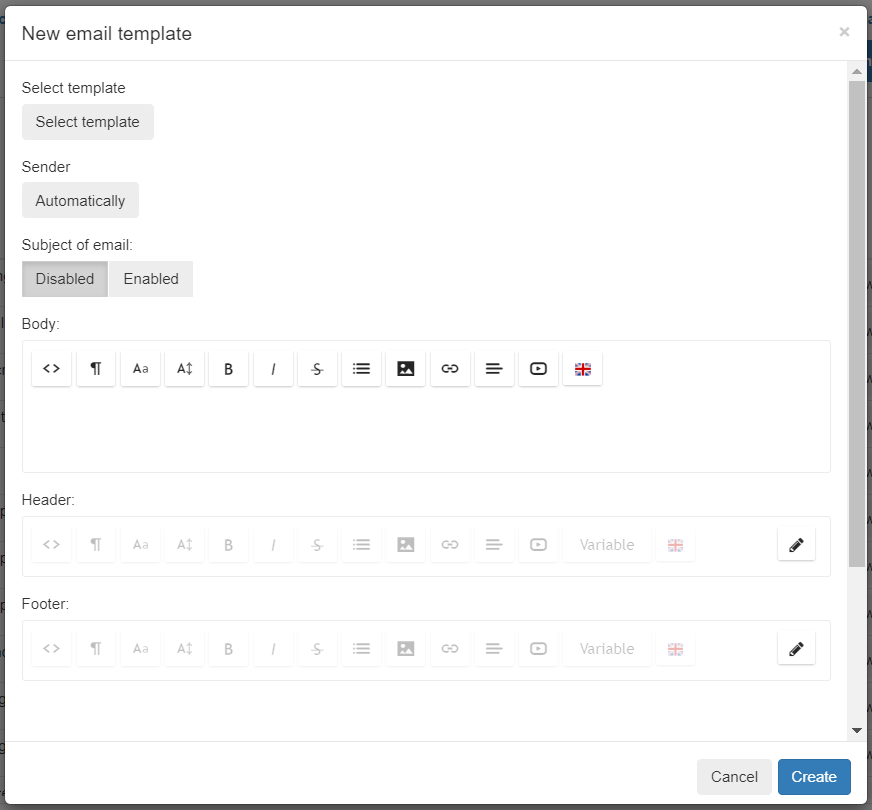
- If you are editing a new template then select the name of the template from the list.
See above for tips on how to determine which template to edit.
When a template is selected then the content is loaded into the other areas and you can edit it.
Once you have made your changes then click the Create or Update button to save the changes. You are recommended to trigger the email to verify that the edits are OK.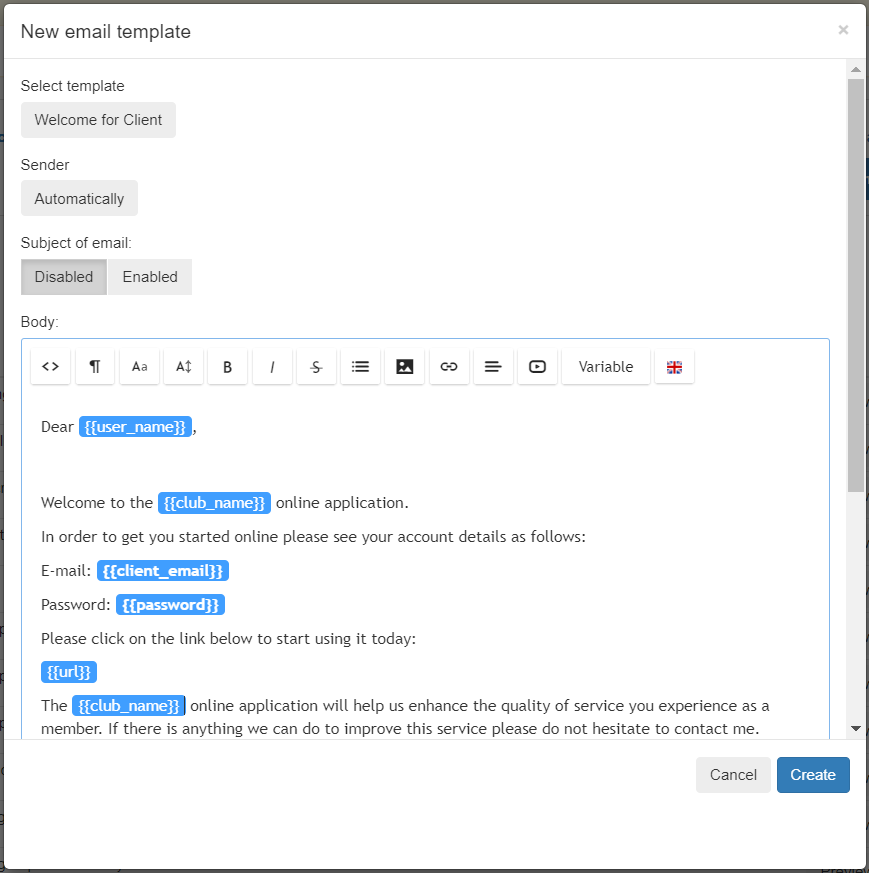
How to edit the Body, Header and Footer of an Email Template
You can simply edit the Body, Header and Footer parts of a template in the template editor.
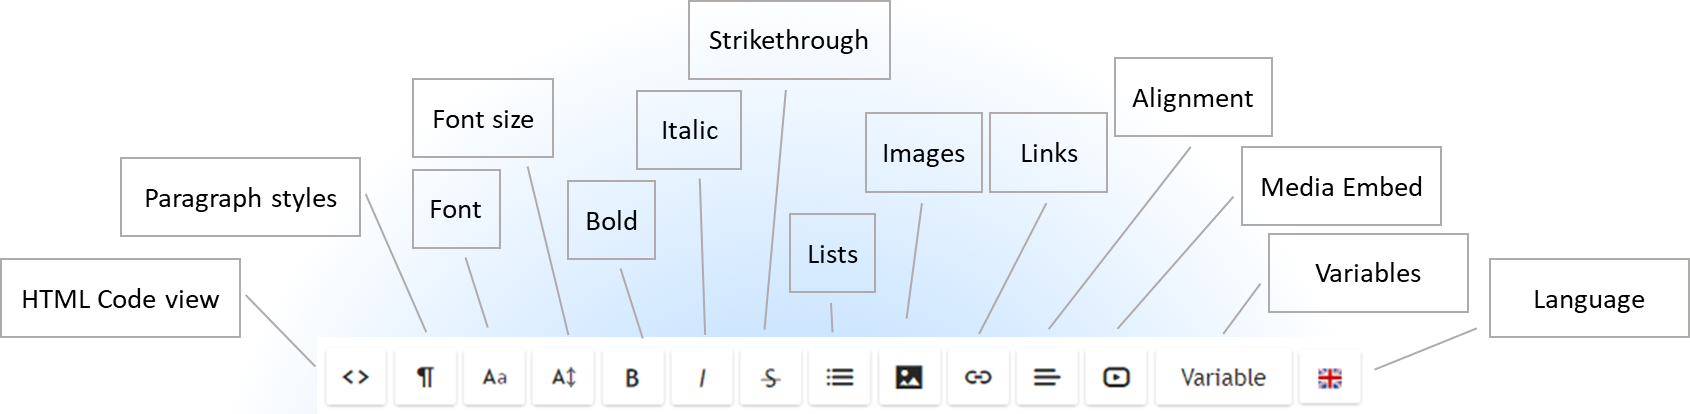
Switch to the HTML Code view to achieve anything that is not possible in the WYSIWYG editor.
Just type
The WYSIWYG editor is great for editing most email content. Just use the formatting toolbar to apply simple text formatting commands.
You can also:
Add variables
Each template has a set of variables that can be used in the email. For example if you type {{location_name}} into the email then if that is a valid variable it will be replaced with the name of the location for the event that the email is about.
Use the Variable button to select from the list of available variables.
Not all variable are available in all templates. Refer to the list before using one, particularly if you are using an email template design from a third-party tool.
Variables must be spelled correctly and are all lower-case with spaces replaced by underscores _.
Variable logical blocks
Some variables must be used in pairs as they represent a logical block.
These variables have a start variable indicated by a hash sign # which must eventually be followed by a matching closing variable that starts with a slash /. Everything enclosed by those variables will be affected by a value.
For example:
The sender_has_email logical block will only display the content between the start tag {{#sender_has_email}} and the end tag {{/sender_has_email}} if the sender has an email address in Fisikal.

So in the case in the image above, if the sender has an email then this line will appear in the email:
We will send email confirmation to this address: example@email.com
If the sender does not have an email in Fisikal then the whole section between the tags will be ignored and nothing will appear in the email.
For example:
The occurrences logical block will display between the start tag {{#occurrences}} and the end tag {{/occurrences}} all of the occurrences they have been added to for the same recurring appointment.

So in the case in the image above, if the client has been added to 3 occurrences of a recurring event then these lines will appear in the email:
You are booked in for SPRINT at 10:30 am on 1/4/2021 in Chelsea.
You are booked in for SPRINT at 10:30 am on 7/4/2021 in Chelsea.
You are booked in for SPRINT at 10:30 am on 14/4/2021 in Chelsea.
Note: If you insert a variable from the Variable list directly then it also inserts a little extra code to make them appear blue in the editor. This is just for readability while editing, the blue style is not visible in the email sent. It is also optional, if a variable is not blue in the editor then it will still work.
Insert images
Images must be uploaded to the server in order to be included in the email. If you paste an image then it is uploaded automatically. You can also use the Image tool to upload and then insert.
Always use web image file formats (jpg, png, gif) and optimise the file size before uploading.
Also ensure your email can still be understood if the image is not visible.
Translate the content
Use the Language selector to switch between the content for each language that is enabled in your club's Other Languages setting. If there is no translation entered then the default Locale language is used (usually English).
Style the email content
Email client software is all different. It is extremely difficult to make a complex email look good in all email clients. One that opens perfectly in Gmail may look terrible in Outlook, that is just the nature of an old technology.
There are two solutions to this:
- Keep the templates simple
- Use designs from a third-party email template editor
Keep the templates simple
-
- Most of the emails that are sent from Fisikal are transactional and are sent many times over and over. Clients find it easier to use the information if it is simply presented in text format and text formatting is universally supported.
- Simple templates do not need tables, css styling, responsive layouts, background colours etc.
Use designs from a third-party email template editor
If you want to have more complex email designs then we recommend you design templates in a third-party editor and paste them into the Body of the template.
- Use a third-party email template tool such as the template editor in SendGrid or MailChimp.
- Take care to generate a template that uses Inline Styling. There are services available to convert HTML and CSS into inline styles: https://templates.mailchimp.com/resources/inline-css/
- When you have a template that you like, paste the Body section of your code into the Body section of the email template editor.
We recommend you leave the Header and Footer sections of the template empty.
Anything outside the body section of your HTML code will not be used. - If you need to layout emails using tables, then this is the best approach.
- Ensure you use the correct variables for the template in your design.
- DO NOT USE the HTML generated by Microsoft Word. This popular option results in extremely verbose HTML code that is too complex for the editor.
Note that more complex email templates are often not displayed properly in the Fisikal email template editor, nor the preview. You need to send them as an email to properly assess how they appear in an email client.
How to remove the Fisikal branding from an email
The default footer on all hard-coded email templates contains the Fisikal logo.
You can remove the logo from any template by editing the footer and deleting the logo and text.
Note that the footer is unique for each template, you must remove it from every template one-by-one.