HOW TO CREATE A DOOR RECORD IN FISIKAL FOR USE IN ACCESS CONTROL
Steps to define a door record with Access Control enabled.
A door record in Fisikal represents a combination of:
- a physical barrier such as a door, turnstile or gate that is by default locked to prevent access
- a reader connected to the barrier to understand who is attempting to gain access.
In most cases there is a single reader attached to a single barrier.
It is possible for one real world barrier to be connected to more than one reader, for example to have an Entrance reader and an Exit reader, or to have a mounted reader by the door and another reader on the front-desk. In these cases there must be a door record for each reader.
The wiring of the access control solution will determine which door opens when a reader is swiped.
How to create a Door for Fisikal Access Control
- Log in as a Manager user
- Click Settings > Doors
- Either edit an existing door using the
 button or add a new door record by pressing the
  button.
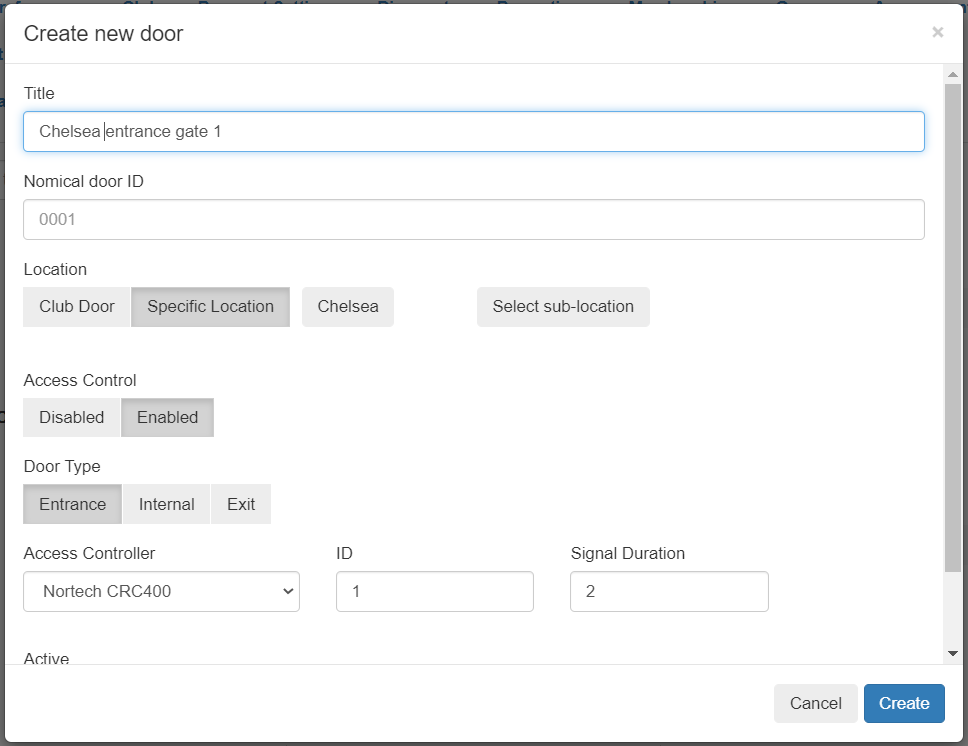
 - Enter the details of the door

- Enter a useful Title for the door that is uniquely identifiable
- Enter a unique Nomical door ID, this ID must be unique in the Club.
- Select the specific location option and choose the location of the door from the list.
Optionally a door can be linked to a specific sub-location too. - Set Access Control to Enabled for this door.
This option is only available if Access Control is Enabled in your club. Contact your account manager if necessary to enable. - Choose the Door Type:
- Swipes at Entrance doors will increase the count of clients in the location for the day by 1.
- Swipes at Exit doors will decrease the count of clients in the location by 1.
- Internal doors have no effect on the client count.
- Choose the Access Controller in the club that the door is connected to.
- Enter the controller specific details for the door:
- For the Nortech CRC400 device:
- Enter the ID of the door as known by the controller. The results of requests received by reader of ID 2 will be sent to the relay output port 2.
- Enter the Signal Duration field. This specifies the amount of time in seconds that the relay will be held open to allow the barrier to be used. This value should be adjusted as per the hardware requirements of the barrier.
- For the Nortech CRC400 device:
- Set the Status of the Door to Active.
- Click Create or Update to save the details of the door.
Tip: Once the location and door config is defined that is enough for the access control function to operate, especially if access is only granted if the client has an upcoming booking and not based on their package purchases, or to perform an initial test of the config.
- Run the FKL Doors application and log in with a user who has a home location of the location you are testing.
- Using a client of the club open the app and view the QR code, swipe the code on the reader and you should see a door access record appear in the FKL Access view, and on the client's record.
![White Logo Blue Banner copy-100.jpg]](https://knowledge.fisikal.com/hs-fs/hubfs/White%20Logo%20Blue%20Banner%20copy-100.jpg?height=50&name=White%20Logo%20Blue%20Banner%20copy-100.jpg)