![White Logo Blue Banner copy-100.jpg]](https://knowledge.fisikal.com/hs-fs/hubfs/White%20Logo%20Blue%20Banner%20copy-100.jpg?height=50&name=White%20Logo%20Blue%20Banner%20copy-100.jpg)
By default Fisikal sends email notifications through the built-in Fisikal email account. This means that:
- All emails are sent from noreply@fisikal.com
- There is no additional cost for email sending, regardless of volume.
- The email account is fully managed by Fisikal Ltd.
It is possible to use a different email account to send emails. This is particularly useful if:
- You would like emails to appear to come from your business domain instead of @fisikal.com
- You would like to get insight on the volume of email traffic
- You would like to analyse email delivery, opening and bounce statistics
You can change the account to any SMTP email delivery platform (including GMAIL or O365). We recommend sendgrid.com and we have a specific integration with them.
Use the instructions below to configure the email account to use to send emails:
How to send email using a SendGrid account
How to send email using a SMTP account
How to send email using a SendGrid account
- Log in to your SendGrid account as the account owner.
- Navigate to Settings > API Keys

- Click Create API Key and create a key:
- API Key Name: Fisikal
- API Key Permissions: Full Access
Click Create & View
- The key is displayed to you. Copy the key to the clipboard.
Note: You have only one chance to copy the key! If you do not copy it now, you will have to create a new one. - Log into Fisikal as a Manager user
- Click Settings > Club and Edit the Club Settings

- Under the Custom SMTP settings heading click Enabled, and choose the SendGrid option
- Paste the API Key into the API Key field.
- Enter the Domain and Email fields
- Ports: Usually 25 or 587. If you're using Fisikal infrastructure then both the ports are open and are OK. If you are self-hosting Fisikal then please discuss which port to use with your infrastructure team.
- Domain: the base domain of where the emails appear to originate, eg: fisikal.com
- Email: This is the address that all email's appear to be sent from (replaces the noreply@fisikal.com). It does not have to be a real account.
- Ports: Usually 25 or 587. If you're using Fisikal infrastructure then both the ports are open and are OK. If you are self-hosting Fisikal then please discuss which port to use with your infrastructure team.
- Click Update.
Emails will now be sent through the specified SendGrid account.
Next steps:
- Test the email configuration by navigating to Clients in the menu and clicking the +Message button.
Send a test message to a client who has an email address that you can log in to.
How to send email using an SMTP account
You can use any SMTP server that allows connection using Basic Auth.
Some SMTP servers require additional options to the below. In this case you must use the Custom Advanced option and enter the details manually.
We advise you to test the credentials using a free tester tool before using them in Fisikal, such as https://www.smtper.net/
Office 365 SMTP servers typically require these settings in addition to the below:
enable_starttls_auto: true
authentication: login
UPDATE: Microsoft recently deprecated the Basic Auth option for O365 if it was not in use (see article here). So no new customer can use O365 as an SMTP server with Fisikal.
- Obtain the following details from the account owner.
- Username
- Password
- Server, eg: mail.smtp2go.com or smtp.gmail.com
- Port, eg: 25
- Domain, the part of your email address to the right of the @. For example fisikal.com
- Email, this is the address that all email's are sent from (replaces the noreply@fisikal.com)
- Log into Fisikal as a Manager user
- Click Settings > Club and Edit the Club Settings

- Under the Custom SMTP settings heading click Enabled, and choose the Custom option.
Enter the fields as supplied by the email account owner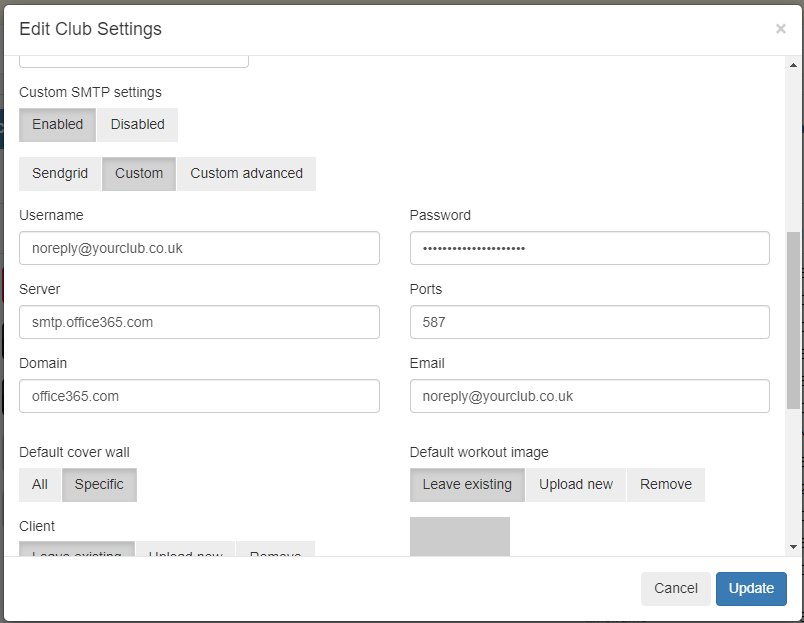
If your SMTP server requires additional fields then use the Custom advanced option and enter all the fields manually.
Enter details in this format:user_name: noreply@yourclub.co.uk
password: eNtErYoUrPaSsWoRdHeRe
domain: office365.com
address: smtp.office365.com
port: 587
from: noreply@yourclub.co.uk
enable_starttls_auto: true
authentication: login - Click Update.
Emails will now be sent through the specified email account.
Tip: If you use the Custom Advanced settings then you are highly recommended to keep a copy of the settings used stored securely outside of Fisikal so that they can be quickly replaced in case of accidental change.
Next steps:
- Test the email configuration by navigating to Clients in the menu and clicking the +Message button.
Send a test message to a client who has an email address that you can log in to.