![White Logo Blue Banner copy-100.jpg]](https://knowledge.fisikal.com/hs-fs/hubfs/White%20Logo%20Blue%20Banner%20copy-100.jpg?height=50&name=White%20Logo%20Blue%20Banner%20copy-100.jpg)
The Packages section of a Clients profile shows Users Packages that have been assigned to the Client and the remaining booking credits the Client has for each Package. There are several actions Users can make on a Package that has already been assigned to the Client's profile.
- PACKAGE OVERVIEW
- ASSIGNING A PACKAGE
- ADD AN INSTALMENT
- REFUND A PACKAGE
- ADJUST THE CREDIT BALANCE OF A PACKAGE
- PAUSE A PACKAGE
PACKAGE OVERVIEW
Users can view Package which have been assigned to a Client on this page. On this page, Users can filter information shown by PACKAGE and POS (Point of Sale).
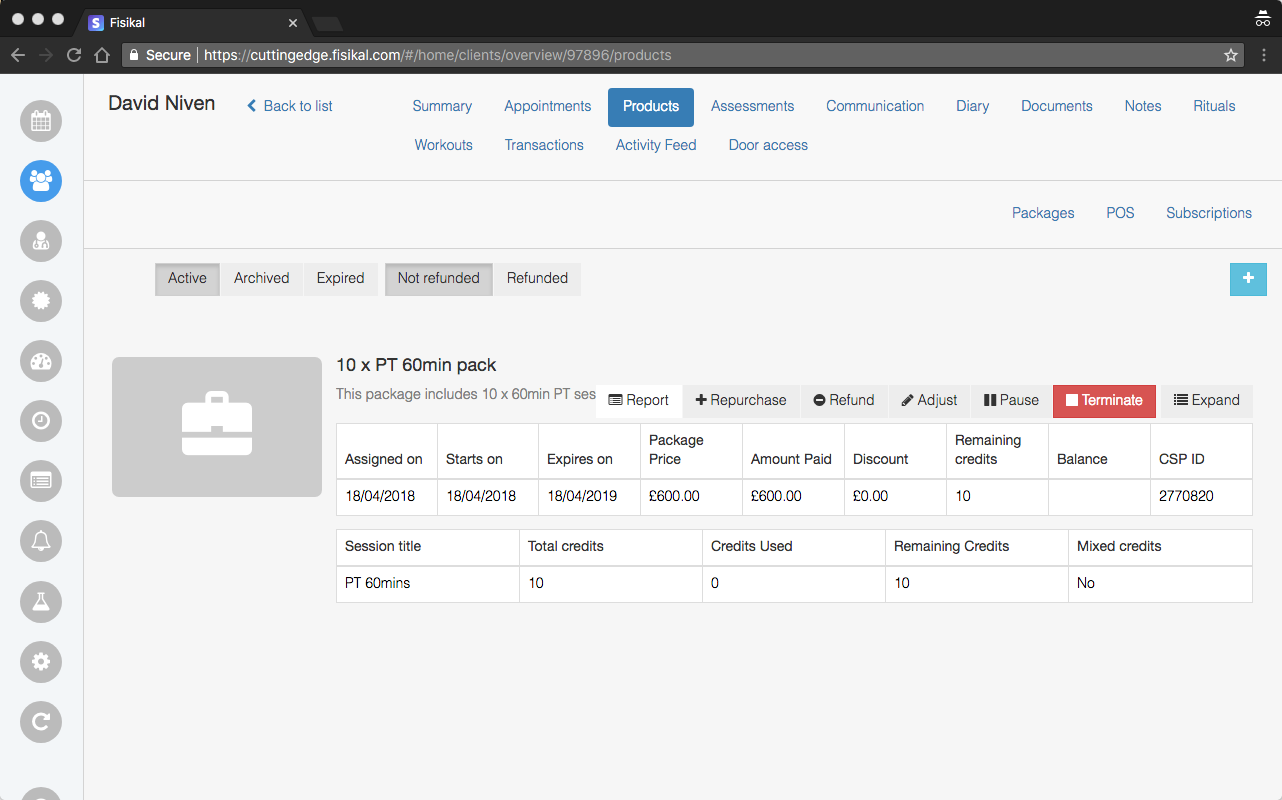
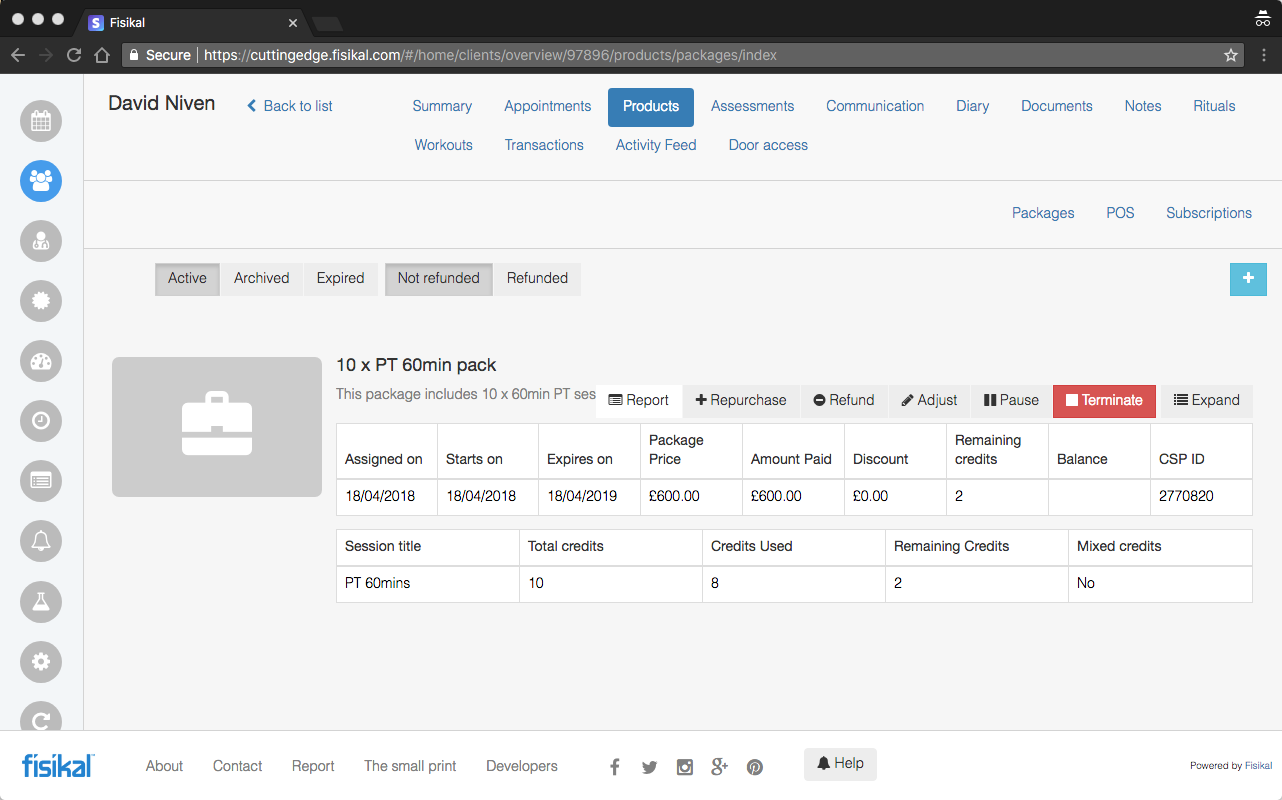
The screen shot below shows the EXPAND button has been selected.
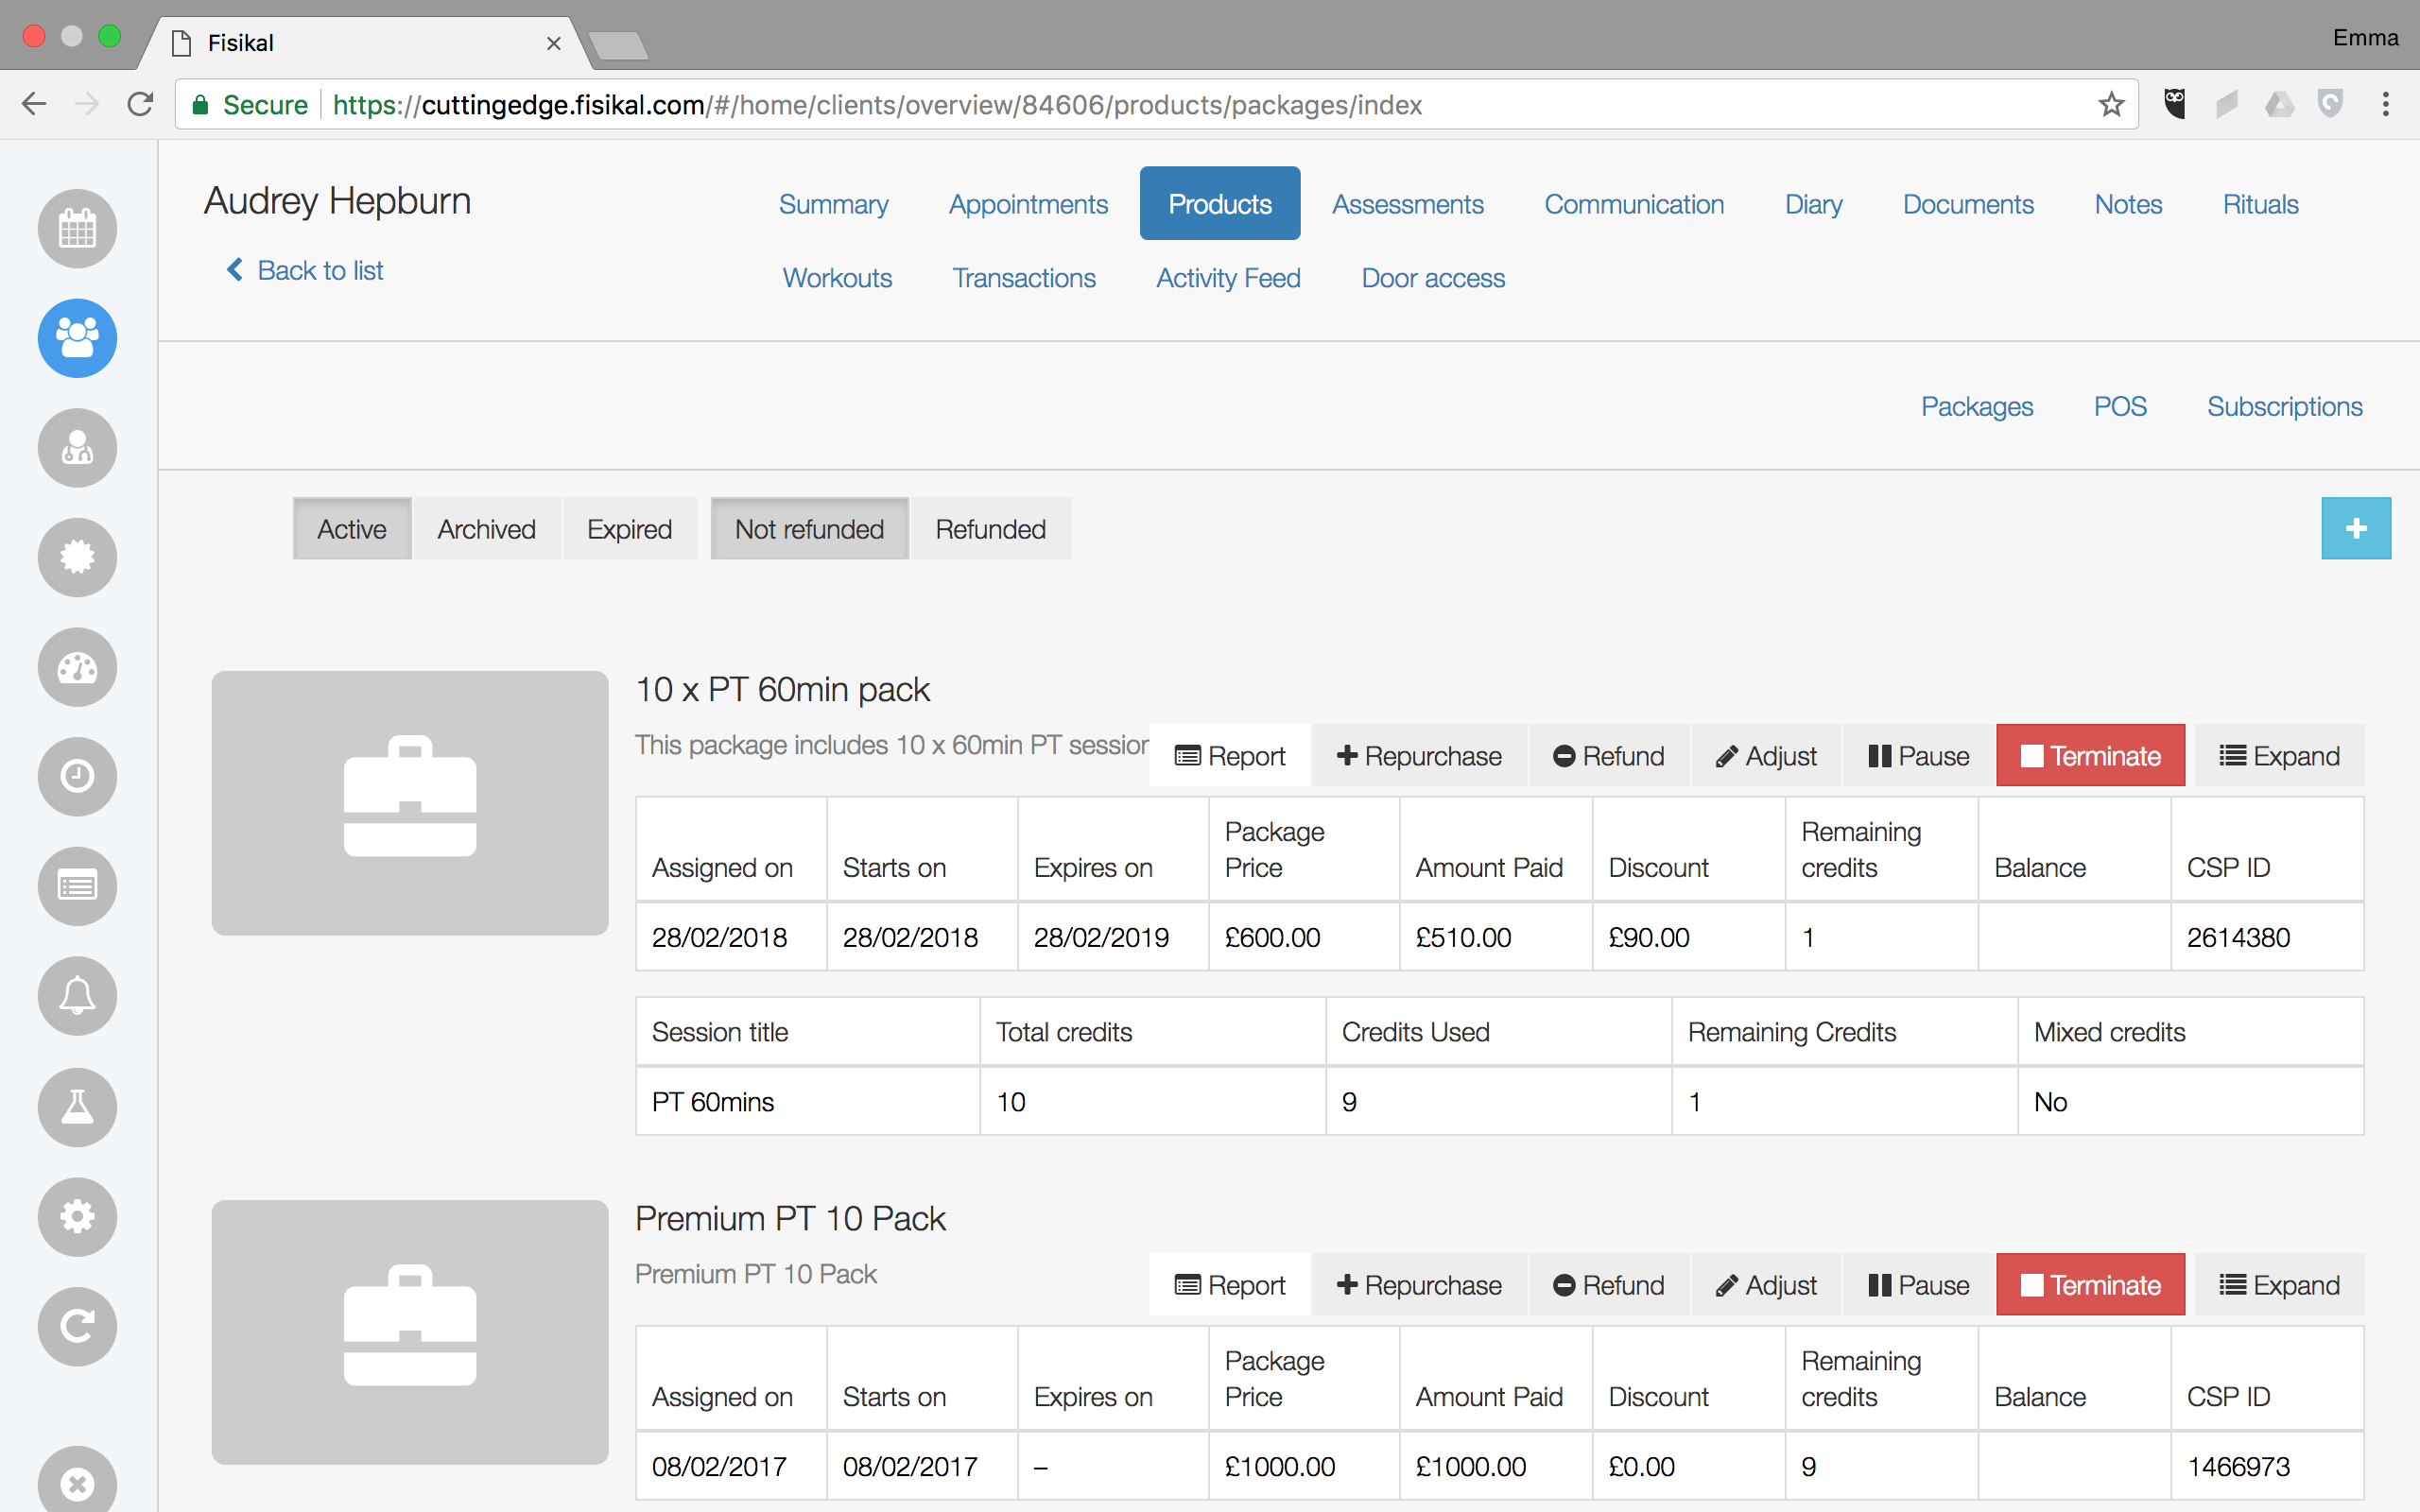
Users can see the following details
ASSIGNED ON
The date that the Package was assigned to the Client.
STARTS ON
The date that the Package is valid from and Package credits can be used.
EXPIRES ON
The date that the Package and the credits included within it must be used by before they expire and are taken back into the system and removed from the Clients profile.
PACKAGE PRICE
The default price of the Package.
AMOUNT PAID
The price the Client paid for the Package.
DISCOUNT
The discount price the Client paid for the Package.
REMAINING CREDITS
The number of remaining credits unused by the Client for credits assigned to this Package.
BALANCE
The amount unpaid for this Package.
CSP ID
The Client Service Package ID for this Package. This field is automatically created by the software and links the Client to the Package that has been assigned to them.
SESSION TITLE
The Modules that have been included in this Package and assigned to the Client.
TOTAL CREDITS
The number of specific Module credits assigned to the Client in this Package.
CREDITS USED
The number of specific Module credits used by the Client in this Package.
MIXED CREDITS
A Package can be configured so that it enables Clients to have different Modules associated to the Package and to have a limit on the total number of Credits they can use within any specific Package.
If YES is shown, then this Package has a limit on the total number of Credits that can be used for a specific Module within this Package.
If NO is shown, then this Package does not have a limit on the total number Credits that can be used within this Package by the Client.
ASSIGNING A PACKAGE
Users can assign a Package to a Client by navigating to the Clients Profile > Packages and by selecting the "+" button and select the Package you wish to assign to the Client. You will see the following form.

Users should select the Package from the drop-down menu and the form will load to show the selected Package and the default price for this Package or the Custom price if this Client has been associated to a Custom Pricing for this Package (directly as an individual Client or through Client Groups).
Users should select if the Payment should be made in FULL or if only a DEPOSIT is taken at this point. The screen below shows a FULL payment:
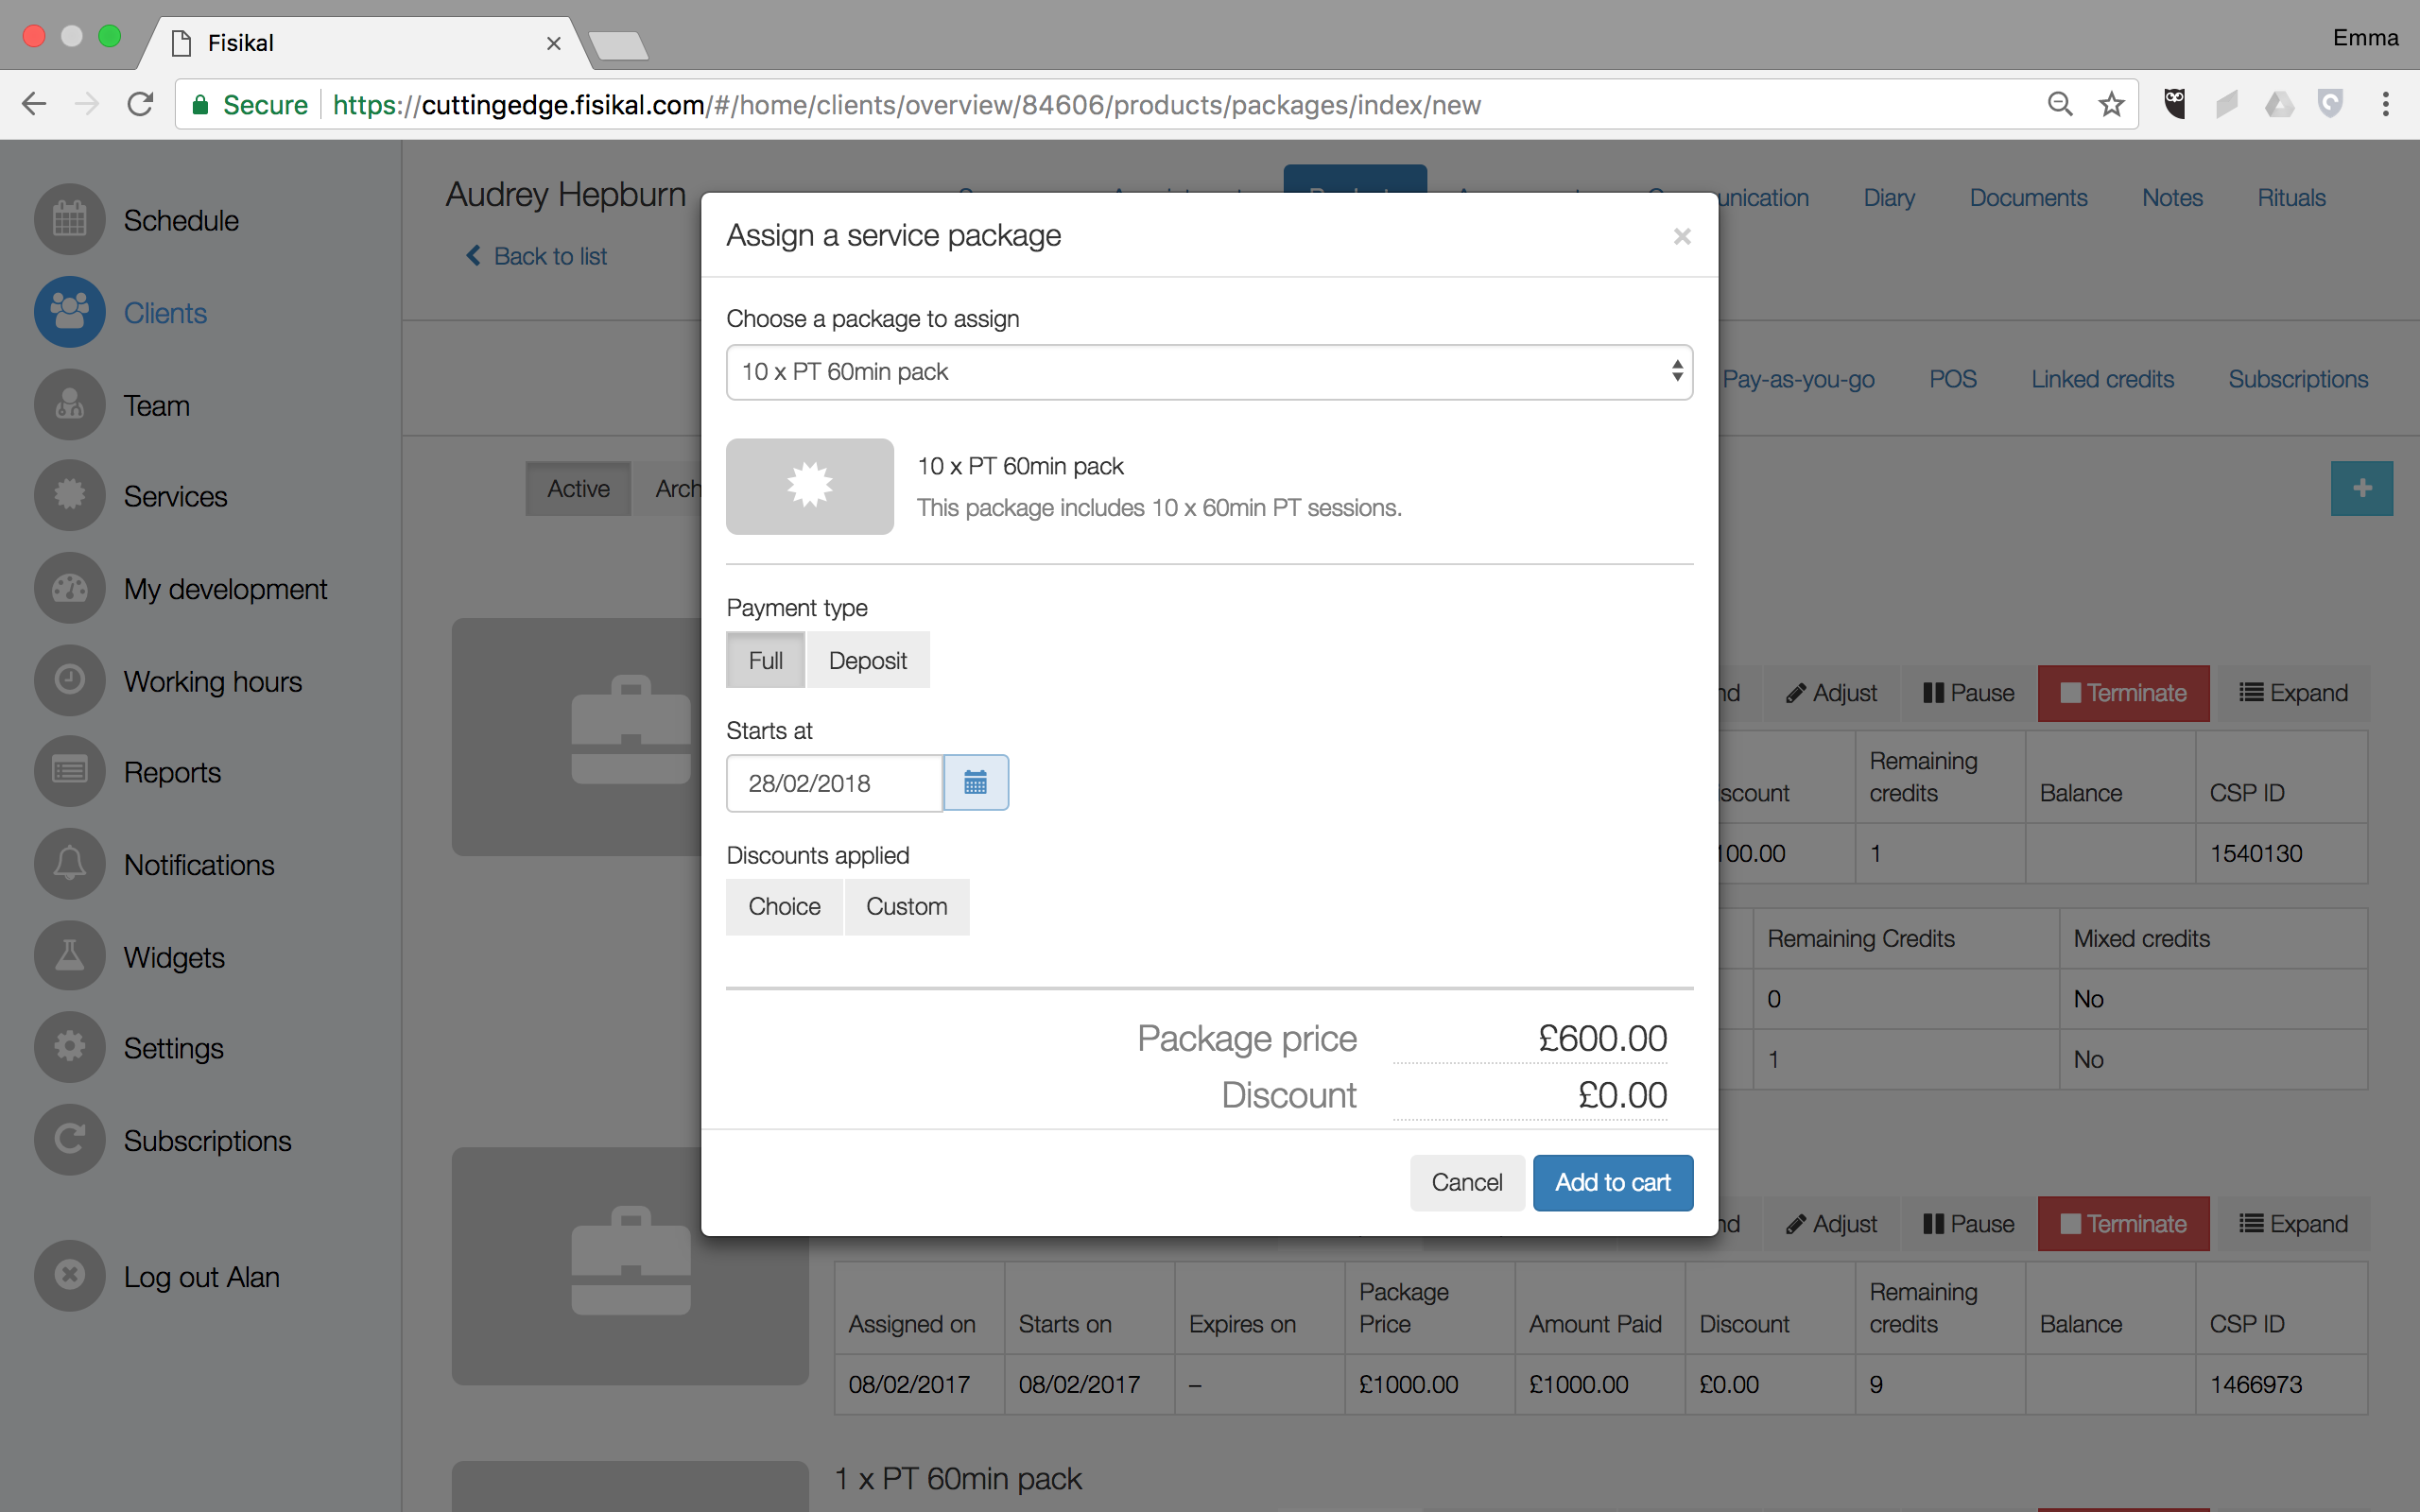
If a DEPOSIT should be taken, Users will need to enter the Deposit amount and how many Instalments the remaining balance should be taken over as shown below:

Users can choose a START DATE and if they want to apply a DISCOUNT. There are 2 types of Discounts available, CHOICE (pre-configured Discounts managed by Users in SETTINGS > DISCOUNTS) and CUSTOM (free text discount field where users can amount(s) or 10%(s) to be assigned). It is possible to assign multiple discounts to the Package as required. Discount amounts are shown in the payment summary section at the bottom of the form.
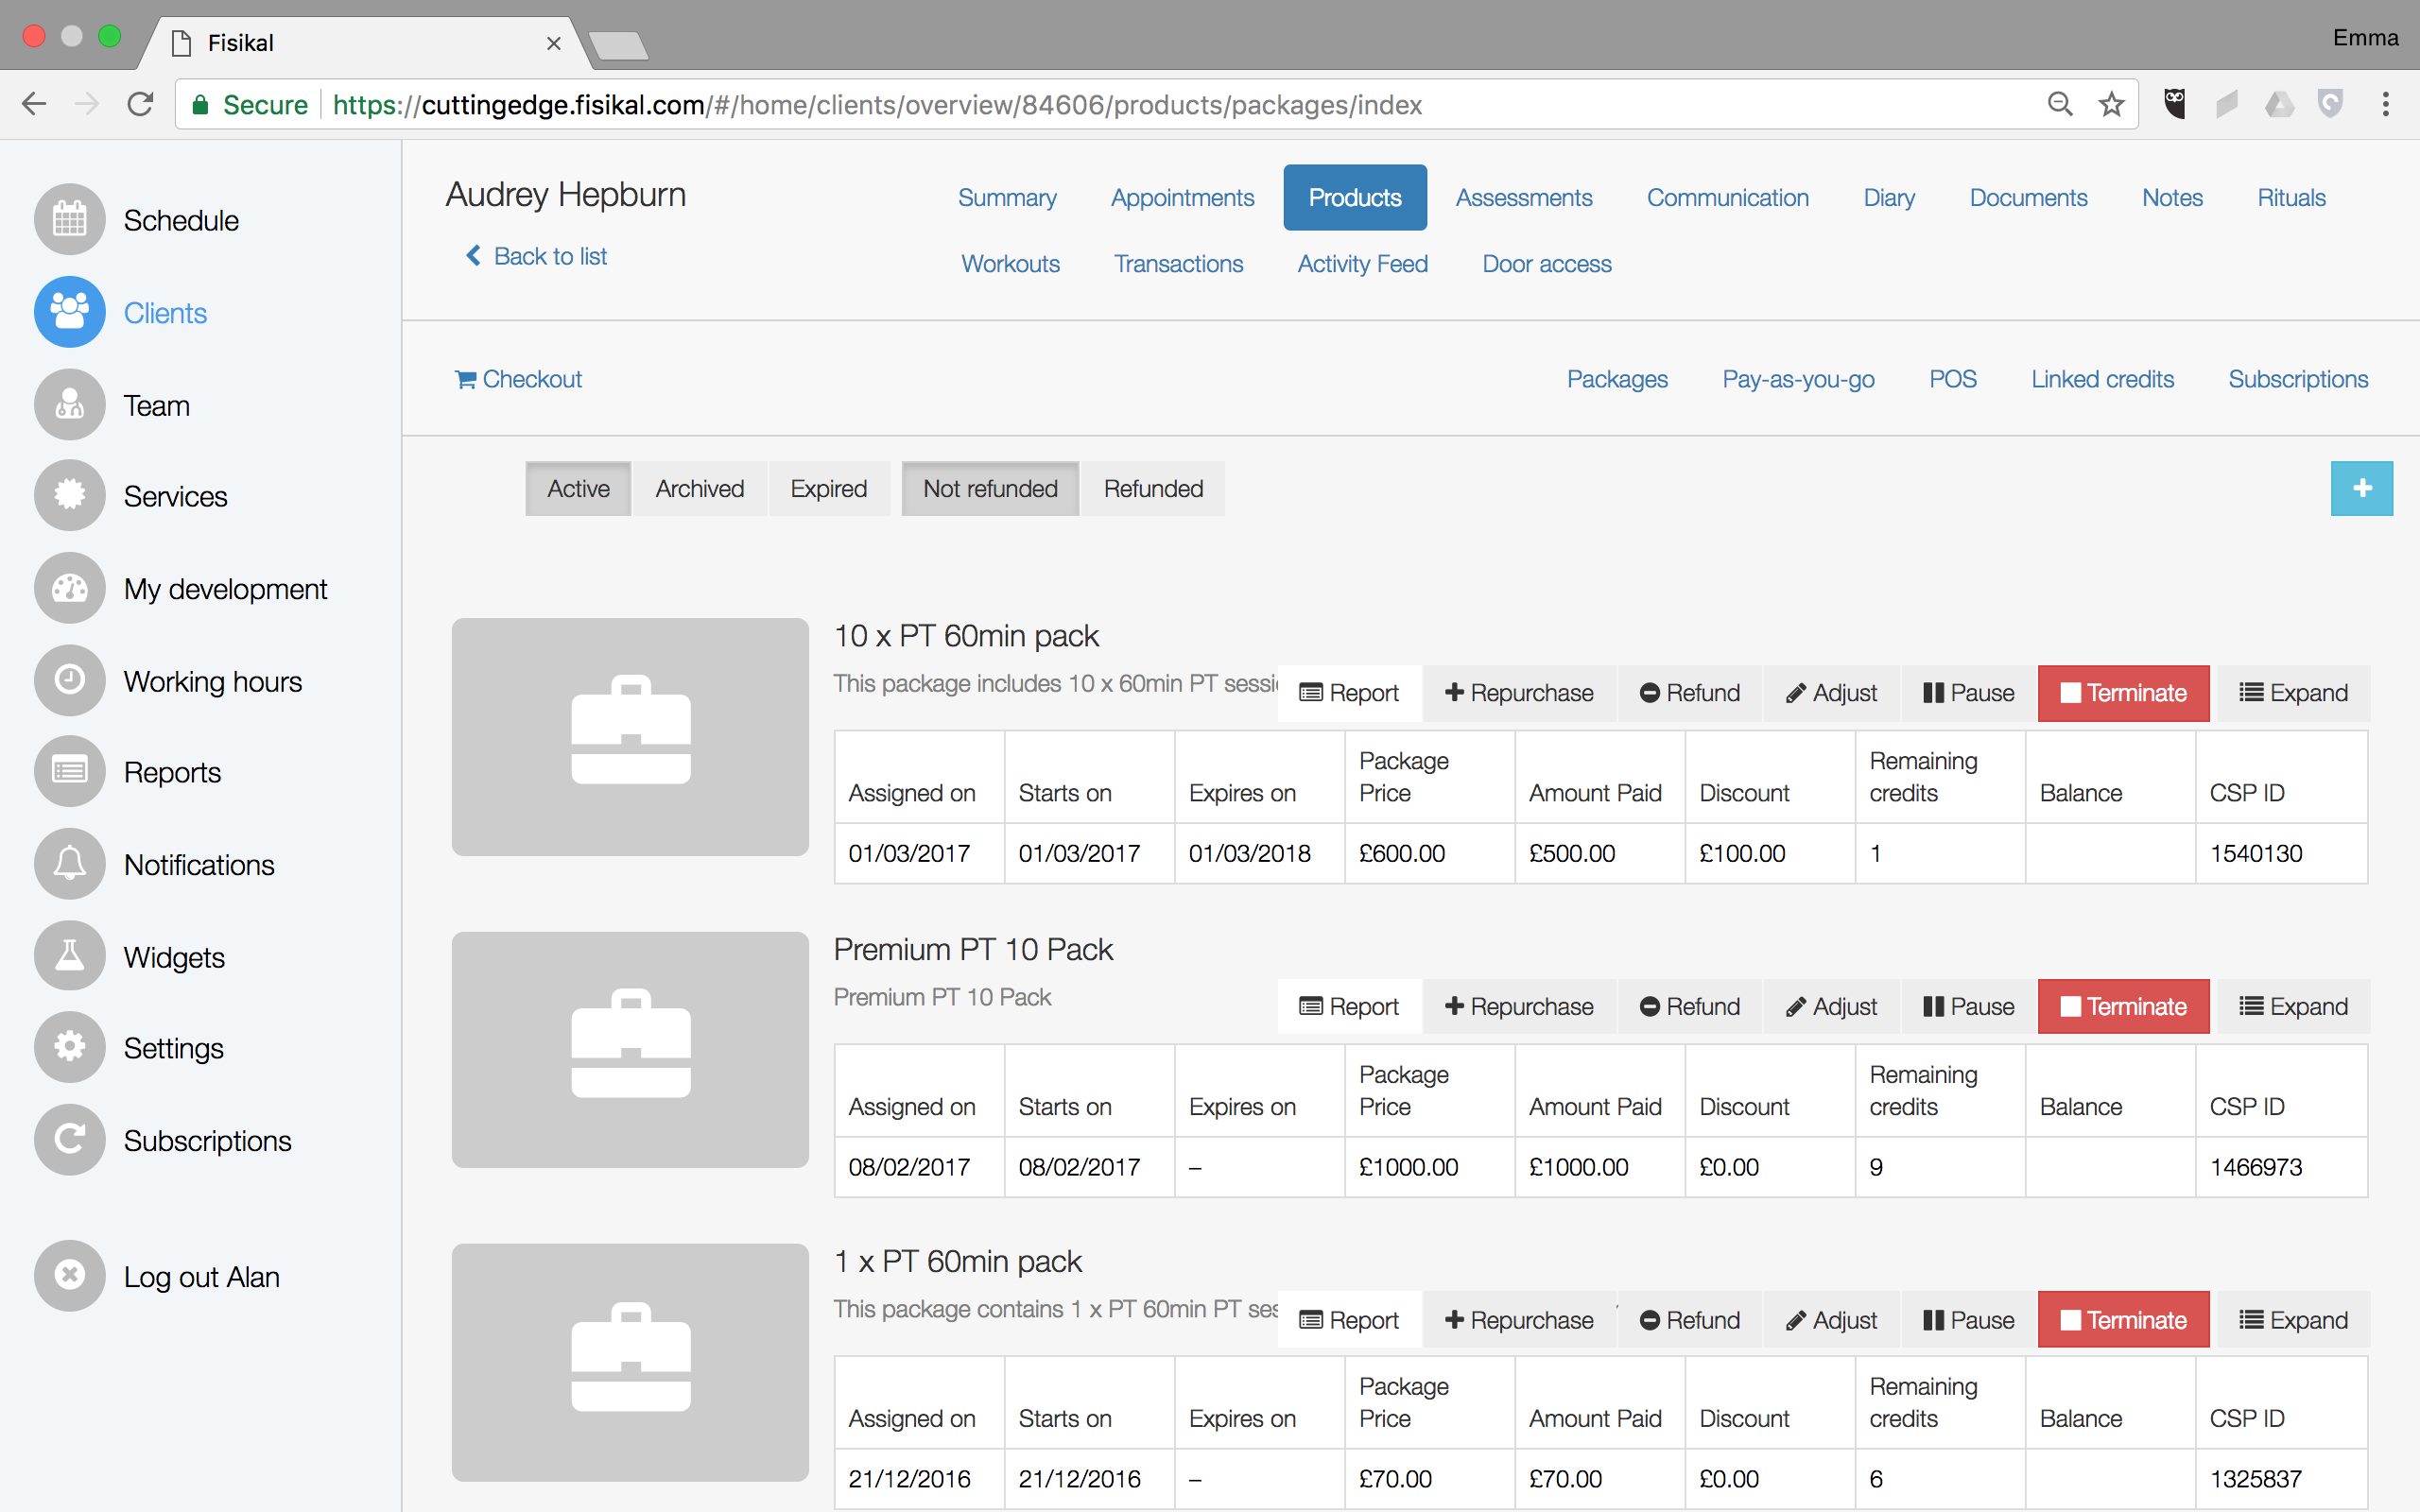
When the User selects ADD TO CART the screen will refresh and they will see a CHECKOUT link shown on the left side of the page as shown below. At this stage, the Package has only been added to a CHECKOUT and payment has not yet been taken / assigned.
Once Users select the CHECKOUT link, they will see the Checkout form where they can select how the Package will be paid.

On this form Users can associate a Start Date, select the correct Payment Method, add a Payment reference and also add the quantity of Packages to be assigned to this Client. Users can enter a Note and should select CHOOSE A PAYMENT METHOD.
If STRIPE.COM or PAYPAL payment platforms have been configured, they will show in the menu when CHOOSE A PAYMENT METHOD is selected, or they will just see PAY OFFLINE (which means that the payment is processed outside of Fisikal).
If Stripe is configured for the Club, Users can to enter and store a Client's Credit Card on their profile. This makes it very easy in the future to take payments for Instalments and other Packages / Products and charge the Client's Credit Card without having to have it present each time.
Once the payment method has been selected and the payment has been successfully transacted, Users will see instructions to close the cart as the Package has successfully been assigned.
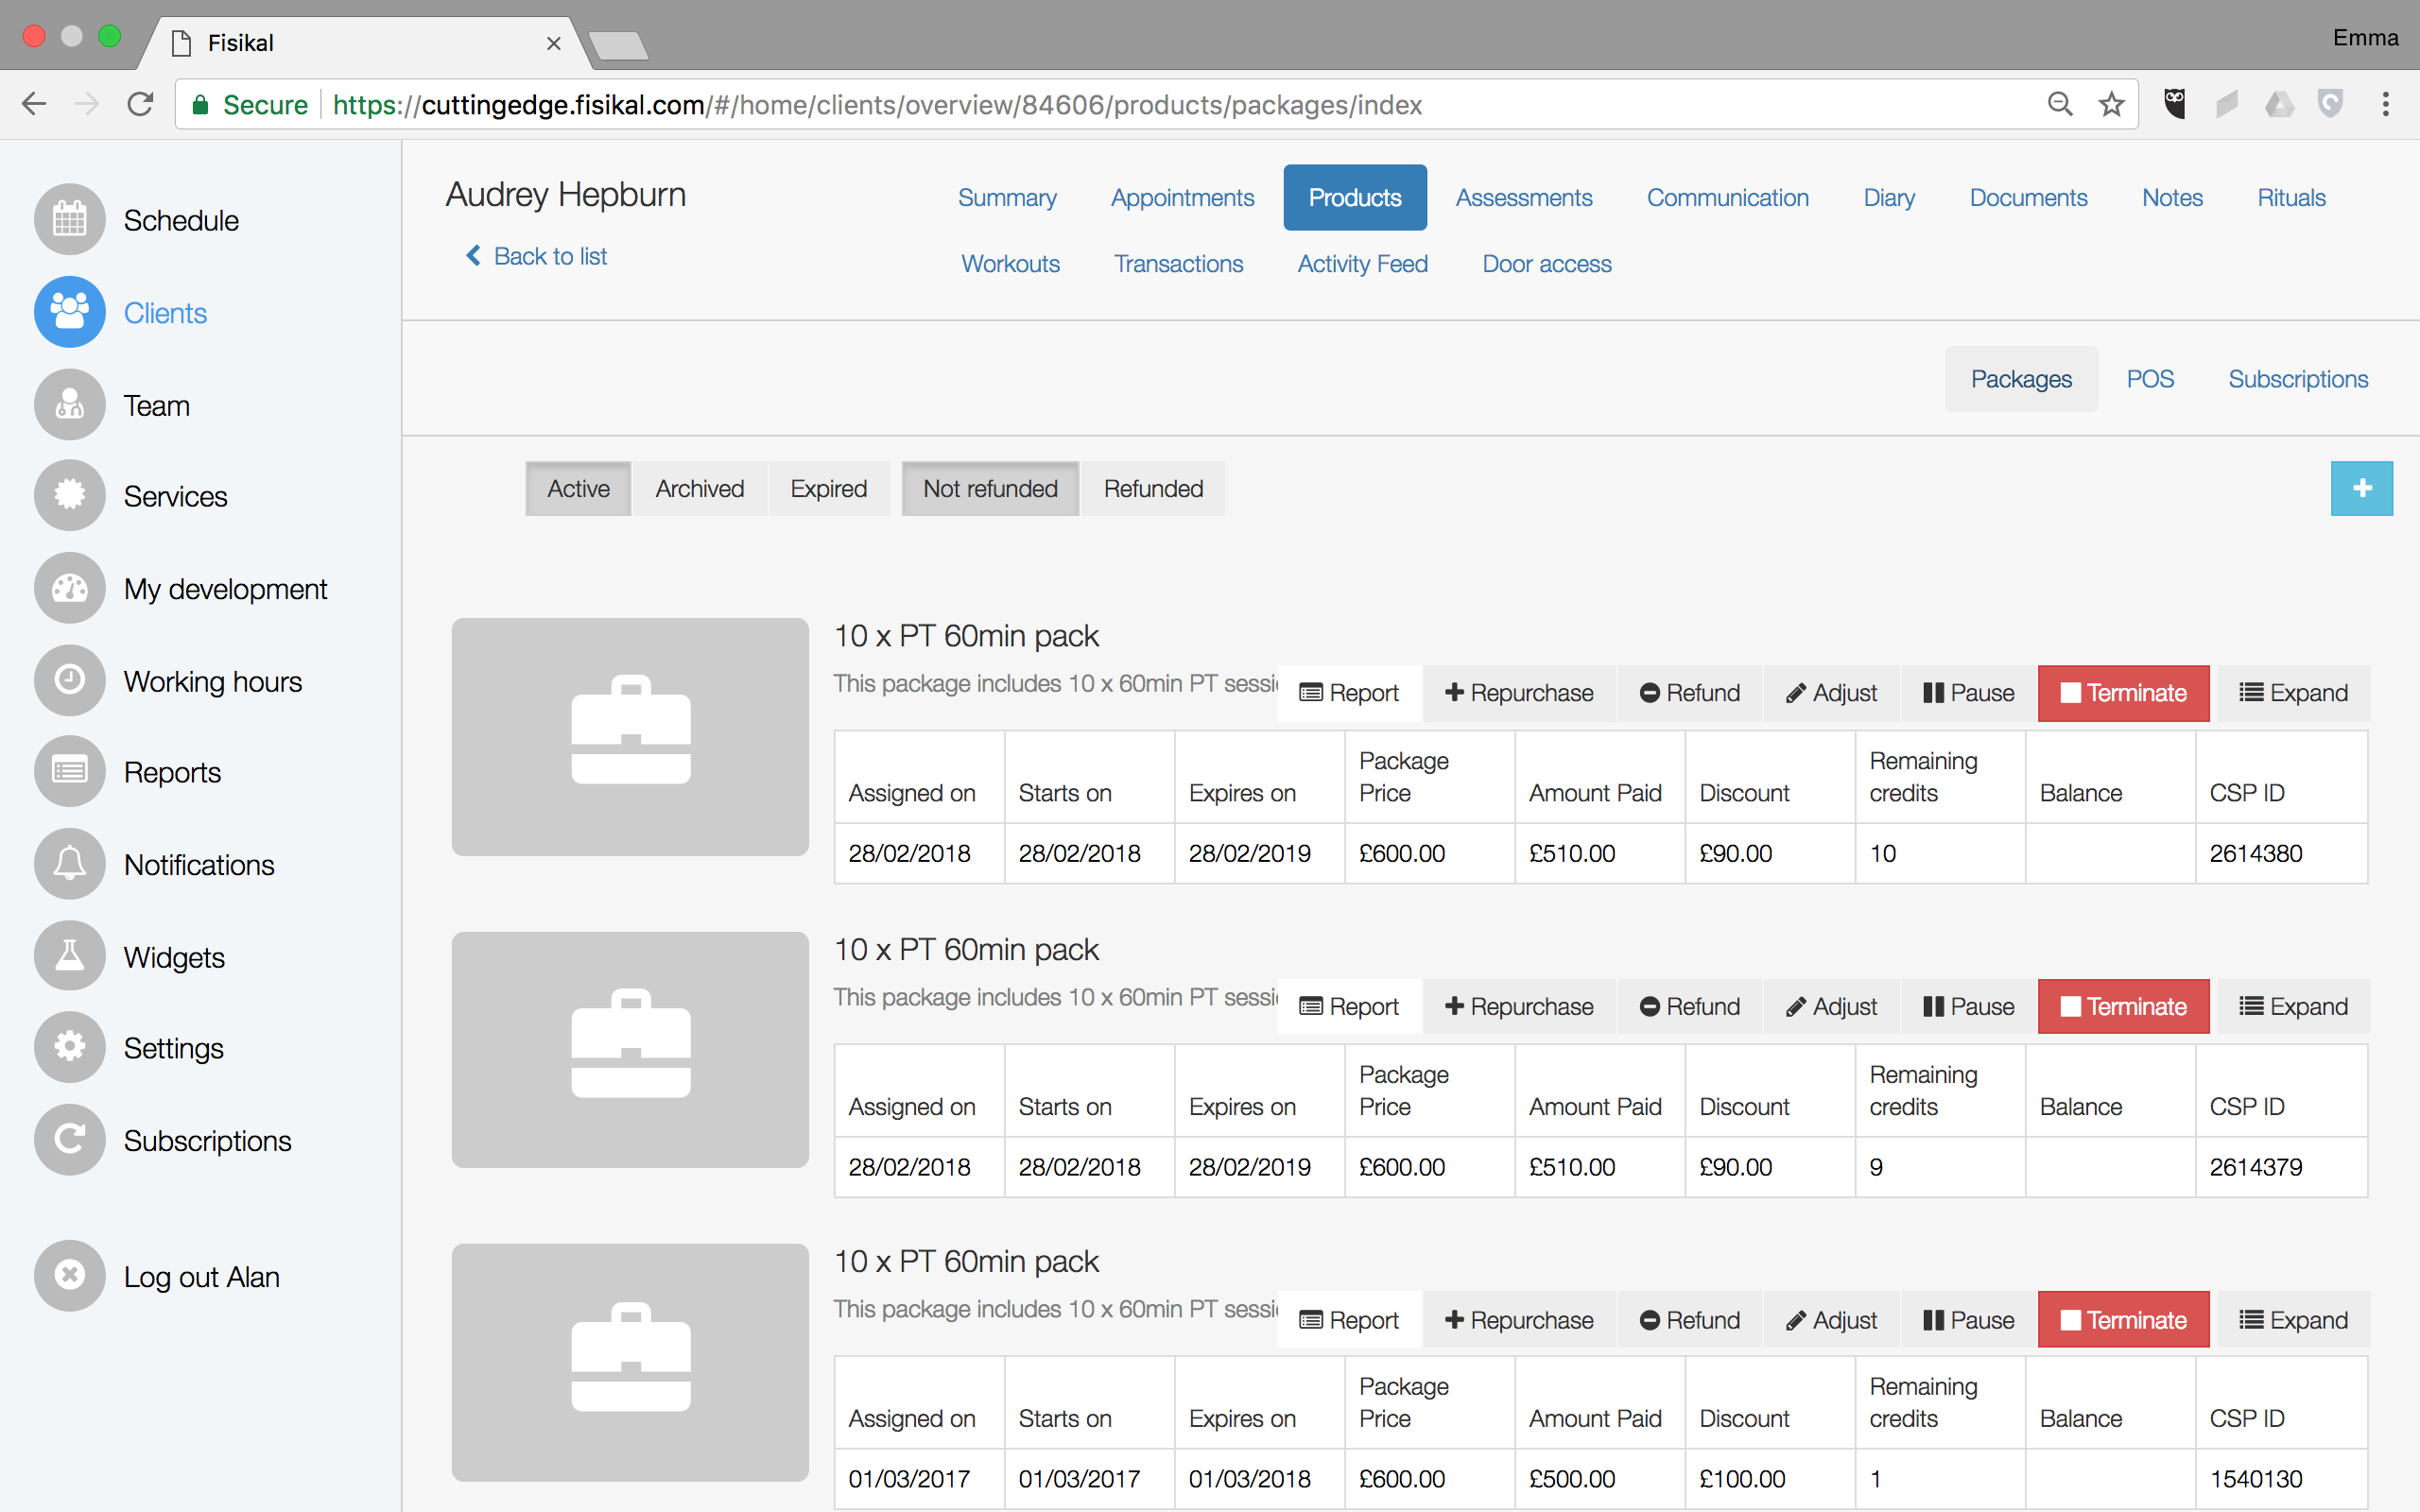
Once the Package has successfully been assigned to the Clients profile, Users will see details of the assigned Package as shown below.
When a Package is assigned to a Clients profile, the system will check if they have any outstanding credits for the Services that are included in the Package. If they do have an outstanding balance, the Credits assigned within the Package will be adjusted to balance out previously owing credits - newly assigned credits. In some cases the Package will be completely consumed by the owed Credits and the package will be used in full in which case it will immediately expire as all the Credits have been used in the Package already (from those that the Client owed for outstanding Service Credits).
Users at any point can filter this page to view Active, Archived, Expired, Not Refunded and Refunded packages.
Users can also view the details of all Money Transactions by navigating to TRANSACTIONS > MONEY where they will be able to see the following:

ADDING AN INSTALMENT
If a Client has been assigned a Package and has only paid a Deposit, the Client will have an outstanding balance for this Package. Clubs often set up a Direct Debit directly with this Client or take a manual Credit Card payment and use Fisikal to enter the payment data manually once the funds have arrived in their bank accounts.
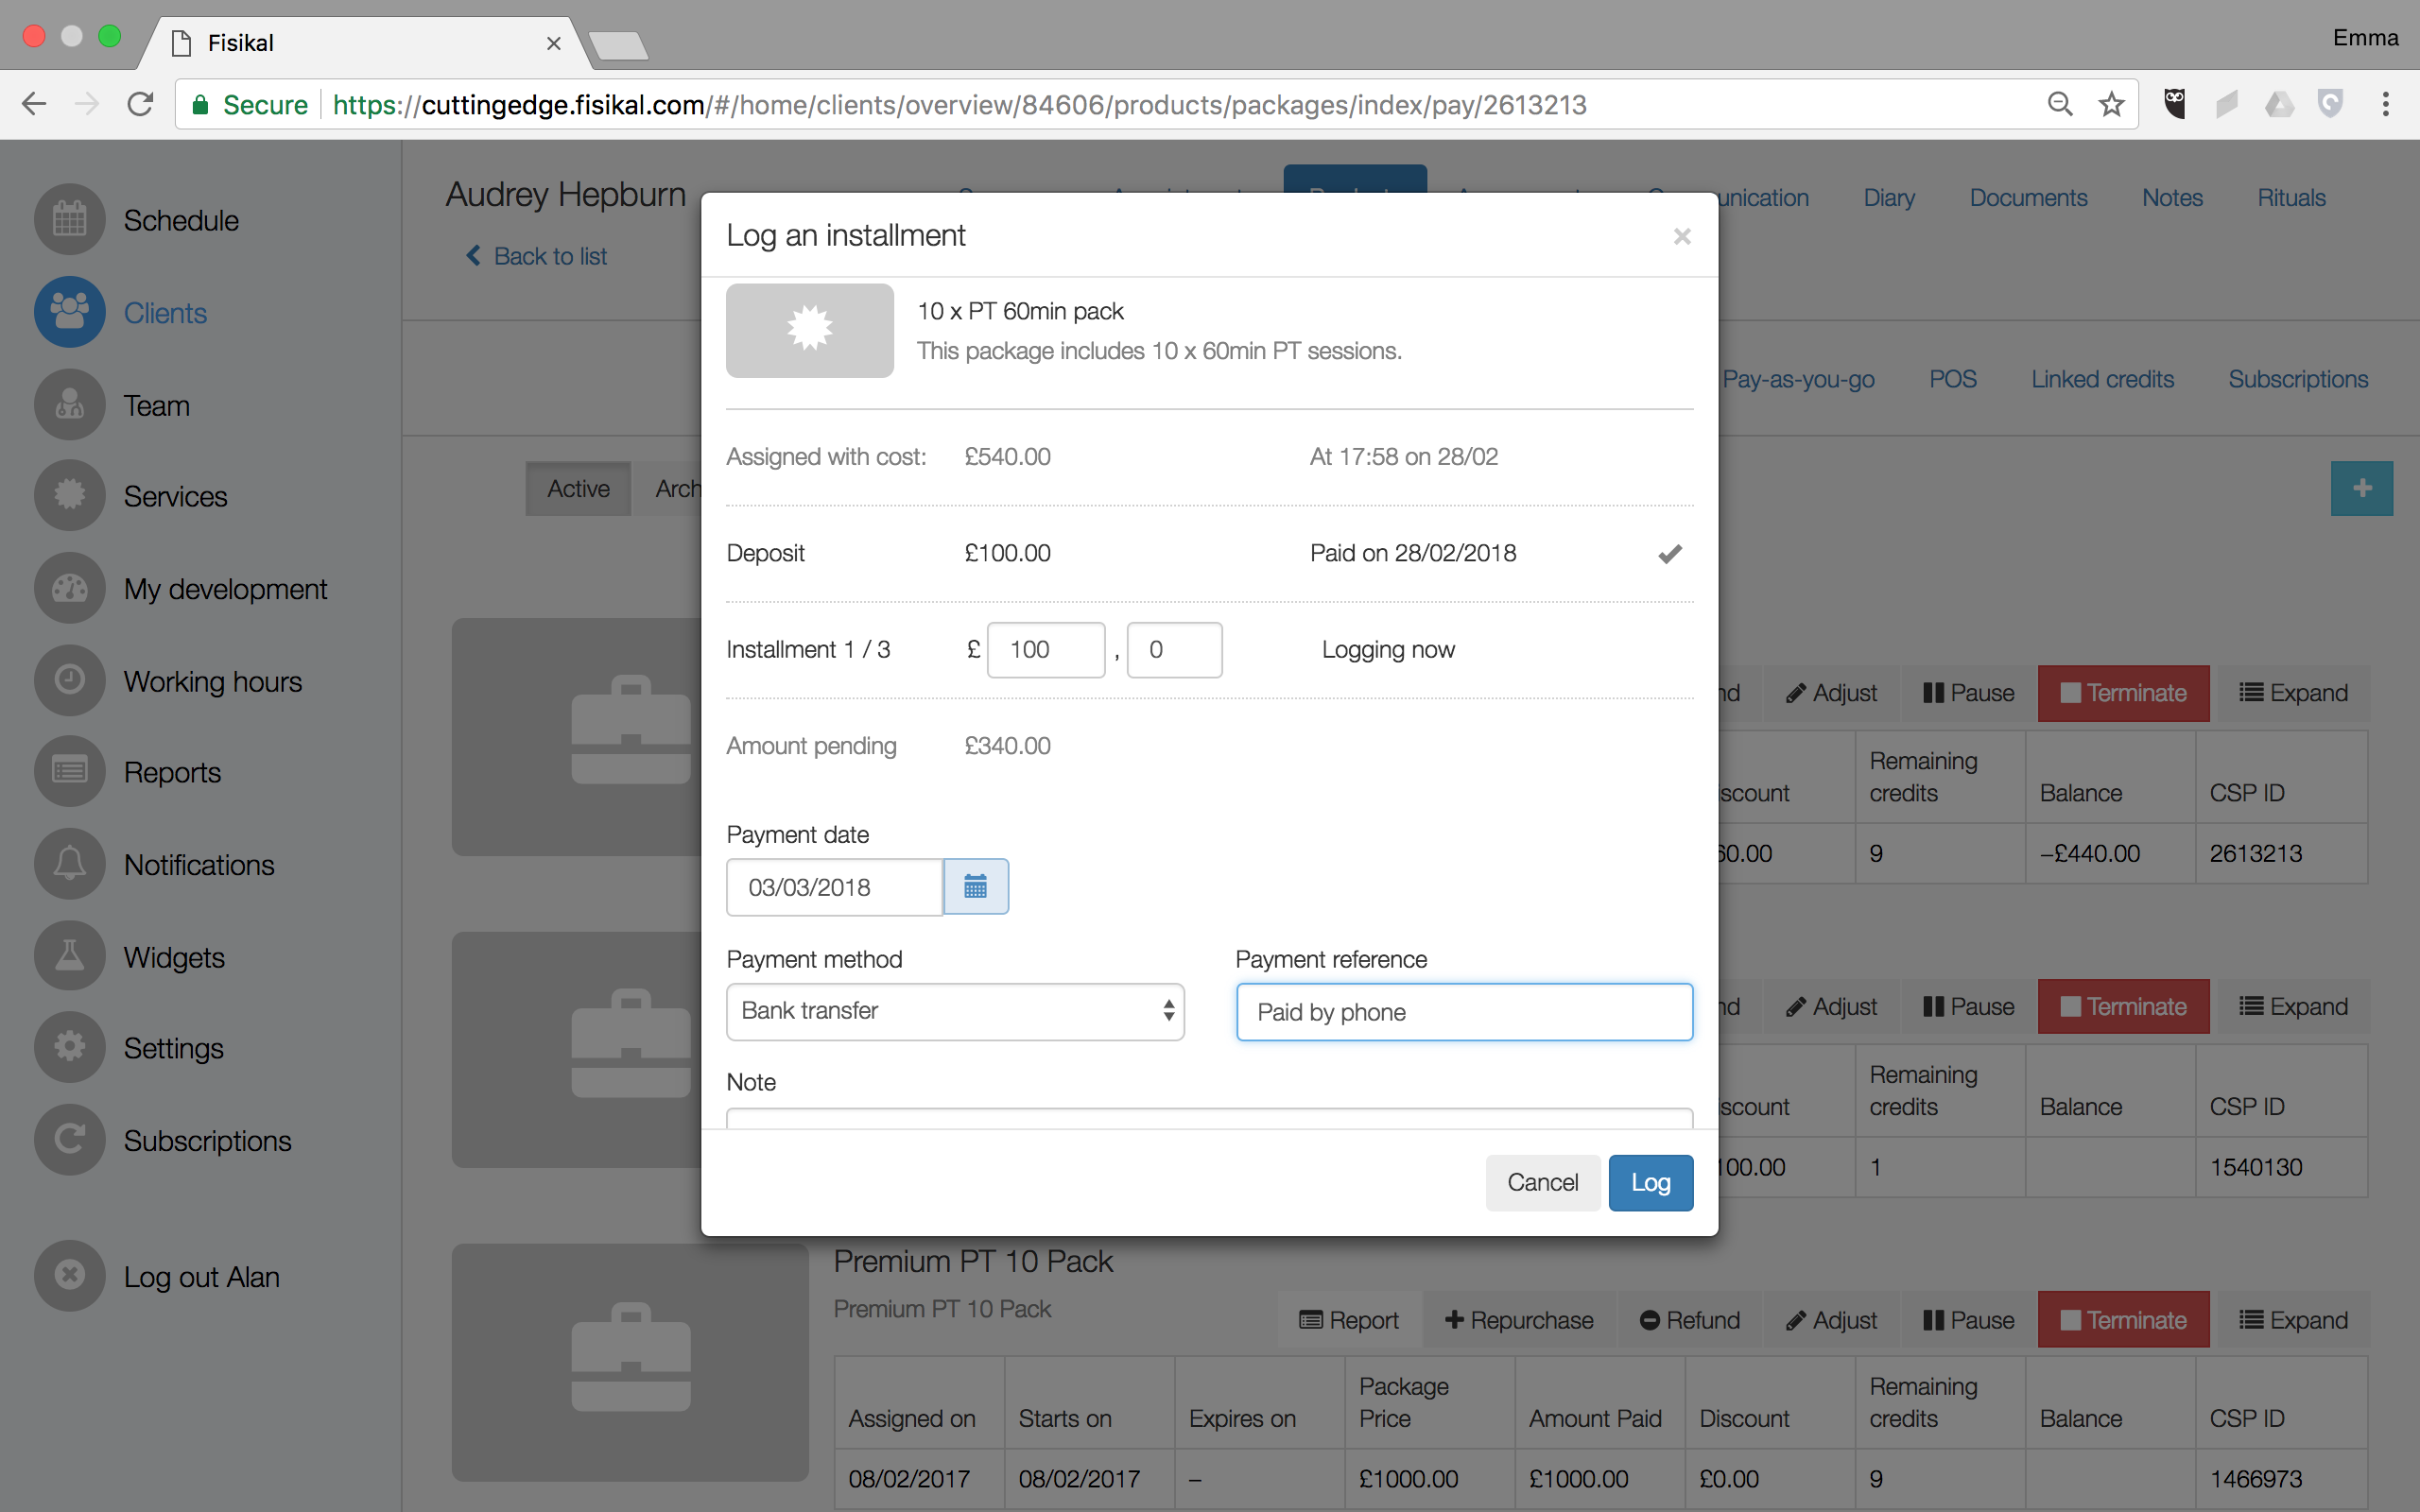
To add an Instalment, Users should select the "Add Instalment" button. They will see the following form where they can enter an Instalment amount. Users will also see details of previous Instalment payments and a remaining outstanding balance.
Users can set the Payment date, Payment method and can enter a Payment reference and note as shown below.
Once the User has selected LOG the Instalment will be added to the Package. Users can view the recent Instalment payment in the PAYMENTS > MONEY section of the Clients profile.
Note, it is always possible to make an overpayment on an Instalment which will then readjust the balance remaining. If Users want to pay off the balance in one go, the remaining instalments will go to 0.
REPURCHASE A PACKAGE
Users can select to repurchase a Package on behalf of a Client by going to the Clients profile page and selecting PRODUCTS > PACKAGES. Here they should select the "+ REPURCHASE" button and the ASSIGN A SERVICE PACKAGE form will show.

Users should assign the Package as outlined in the Assigning a Package section.
REFUND A PACKAGE
Users can select to refund a Package that has been assigned to a Client by going to the Clients profile page and selecting PRODUCTS > PACKAGES. Here they should select the "- REFUND" button and the REFUND A PACKAGE form will show.
On the page, Users are able to select the REFUND TYPE options as shown below:
REFUND WHOLE AMOUNT
Users can choose to refund the full amount paid by the Client for the Package.
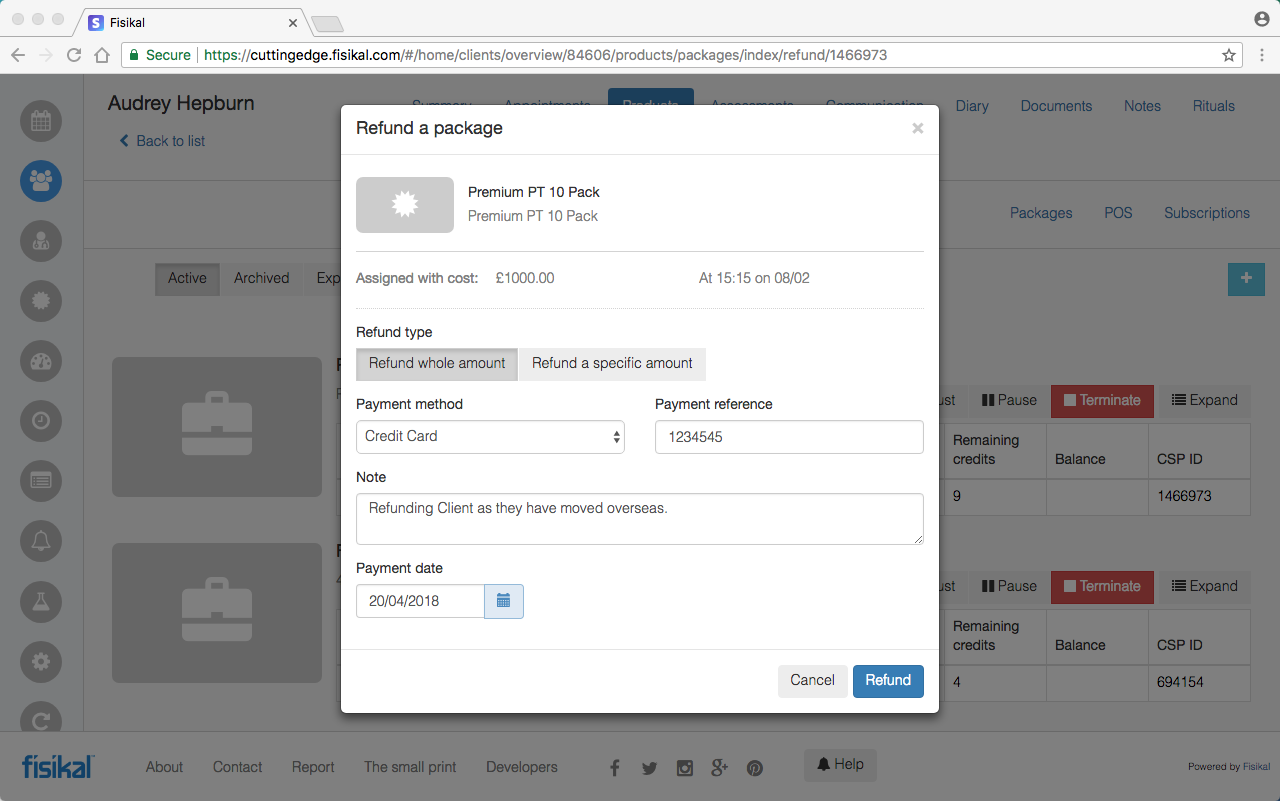
REFUND A SPECIFIC AMOUNT
Users can choose to refund a specific amount paid by the Client for the Package. This may be because the Client has used some of the Credits in the Package. Users should enter a value in the AMOUNT TO REFUND field.

Users should select a PAYMENT TYPE, enter a PAYMENT REFERENCE (if required), select a PAYMENT DATE (if nothing added will show the date the refund was initiated).
Users should select REFUND to complete the transaction. Following the successful transaction, the Package will immediately be removed from the Active Packages overview and can be found again by selecting the REFUNDED button as shown below.

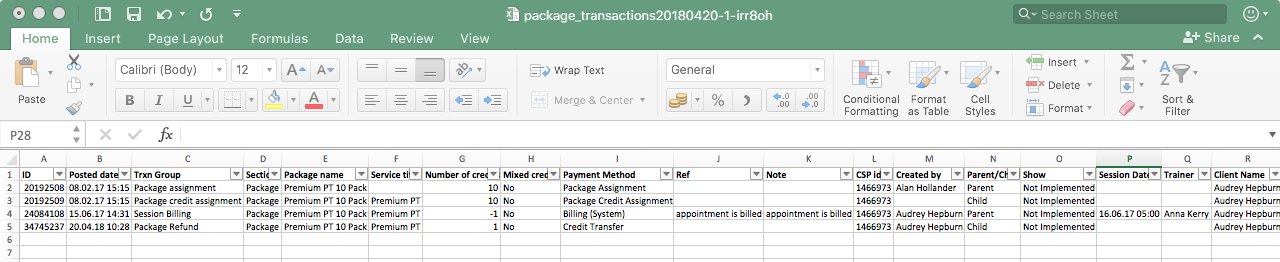
Users can select the REPORT button which will generate a specific PACKAGE TRANSACTION report which will help them see the movement of money and credit transactions for this specific Package.
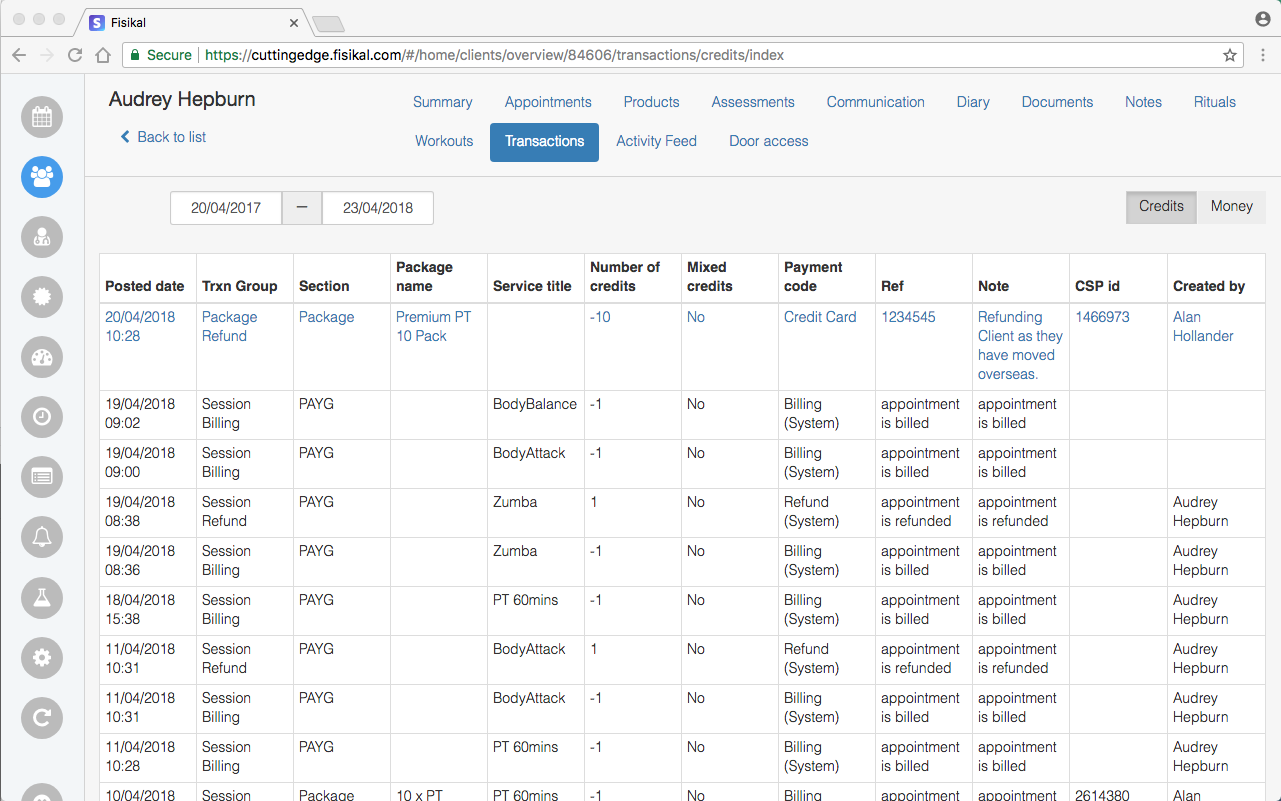
Users can also view the Credit transaction on the Clients profile in TRANSACTIONS > CREDITS section as shown below.
Users can view the Money transaction on the Clients profile in TRANSACTIONS > MONEY section as shown below:

ADJUSTING A PACKAGE
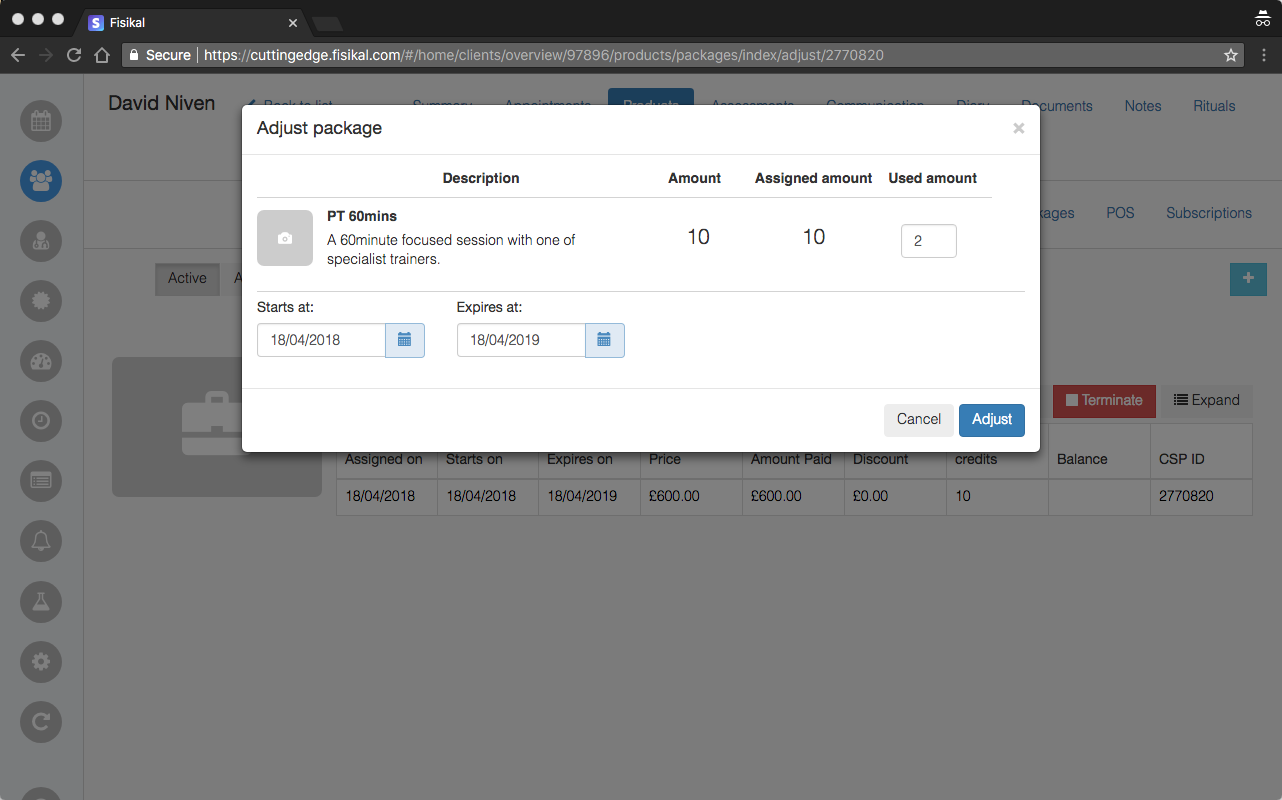
Navigate to CLIENTS and enter the name of the Client you want to adjust assigned credits to. Once you are on their profile select PRODUCTS > PACKAGES to view the assigned Packages to this Client. Users can select the EXPAND button to view the exact number of Credits a Client has for specific Services, as a Package can contain multiple Service types with varying assigned Credits.
Select ADJUST so that you can make changes to the Package. You can make the following changes:
- Adjust Credits
- Adjust Start date
- Adjust Expiration date
These are outlined in detail below.
ADJUSTING CREDITS
To adjust the Credits available in the Package, Users should enter a value in the USED AMOUNT field. If the Package has 10 Credits and you want the only have 2 Credits remaining, Users should enter 8 in the USED AMOUNT field.
To apply the changes to the Package select ADJUST.
ADJUSTING START DATE
To adjust the start date of the Package, Users should adjust the date by selecting the calendar icon then select the date that they wish the Credits to be start from.
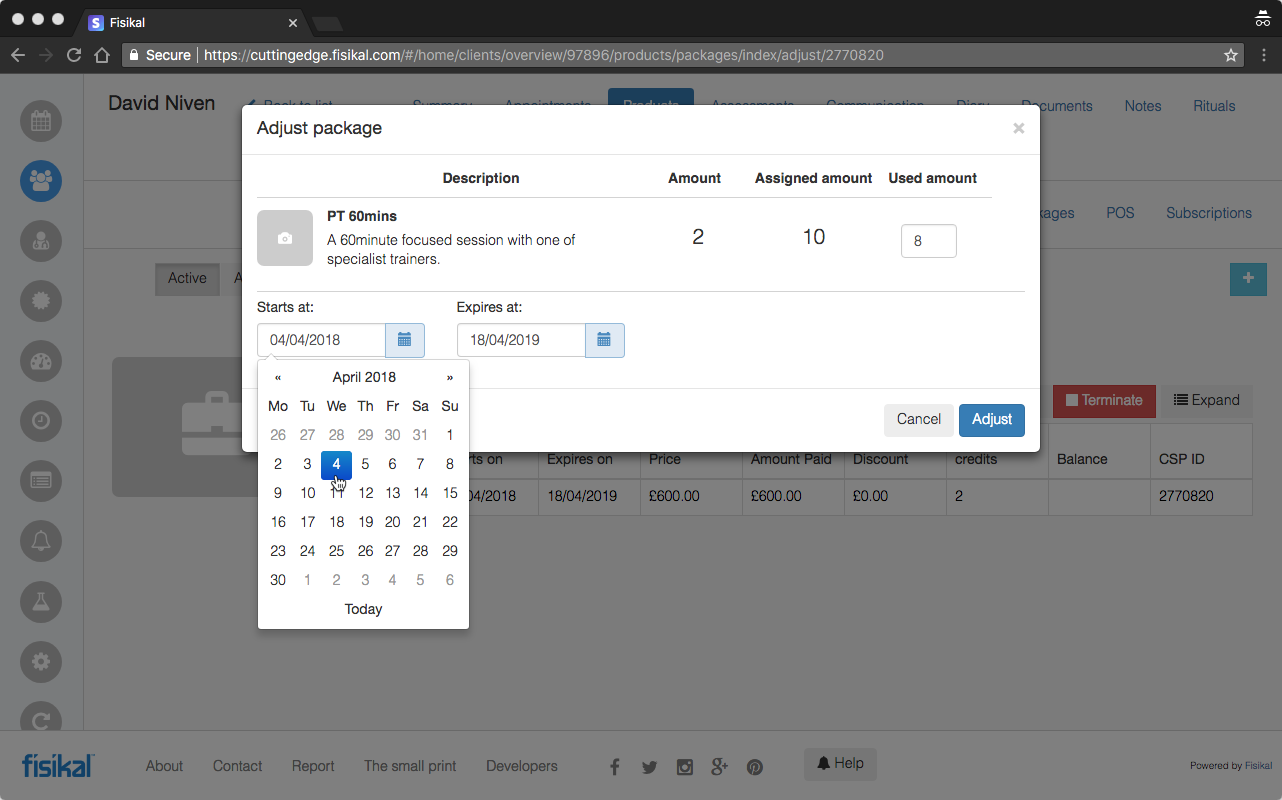
To apply the changes to the Package select ADJUST.
ADJUSTING END DATE
To adjust the end date of the Package, Users should adjust the date by selecting the calendar icon then select the date that they wish the Credits to be end on.
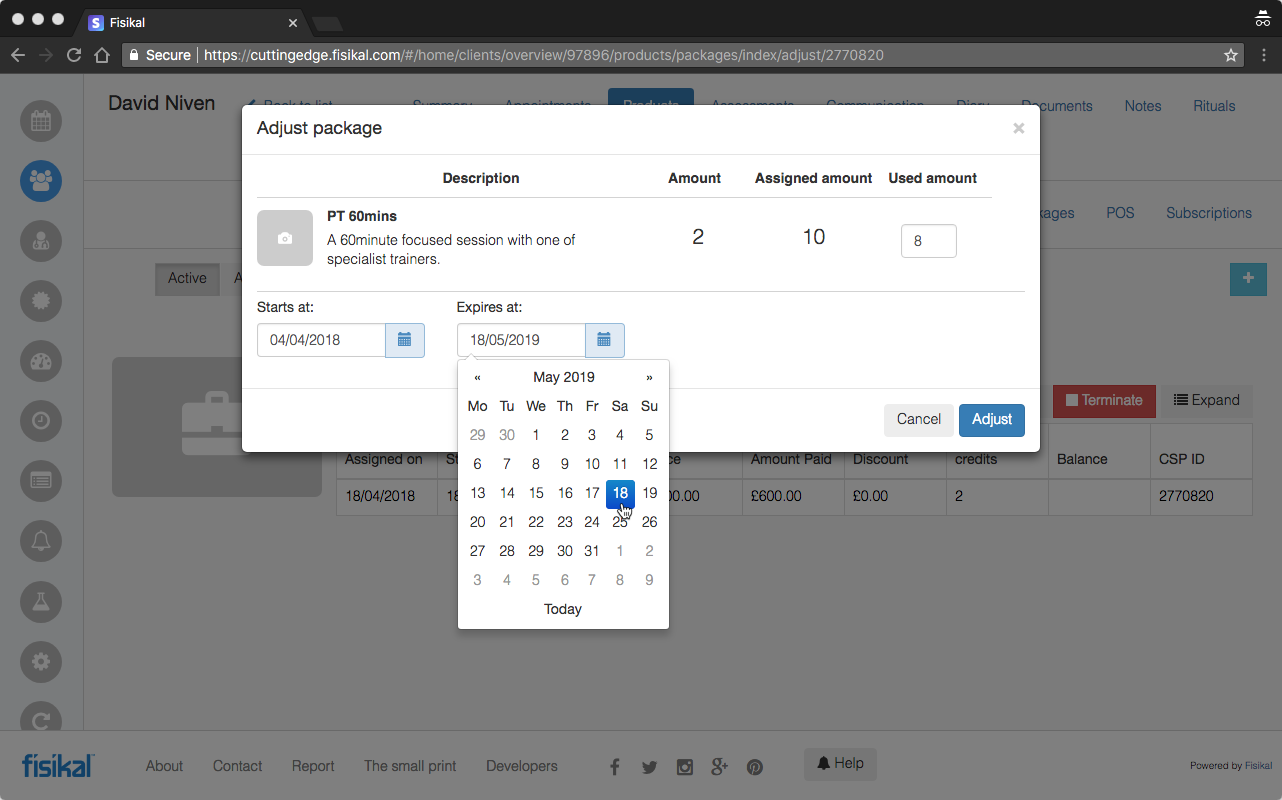
Once all the adjustments have been applied to the Package, Users will see the updated Package and can select EXPAND to view the details of the Credits in the Package.
PAUSING A PACKAGE
Users can select to Pause a Package if it is a Package Type = Subscription. Depending on the specific type of Subscription Package, Users can PAUSE a Package mid Subscription. This action will stop the Package from collecting the Subscription payment for the duration of the Paused period.
To Pause a Package Users should select the "PAUSE" button to view the PAUSE PACKAGE screen.
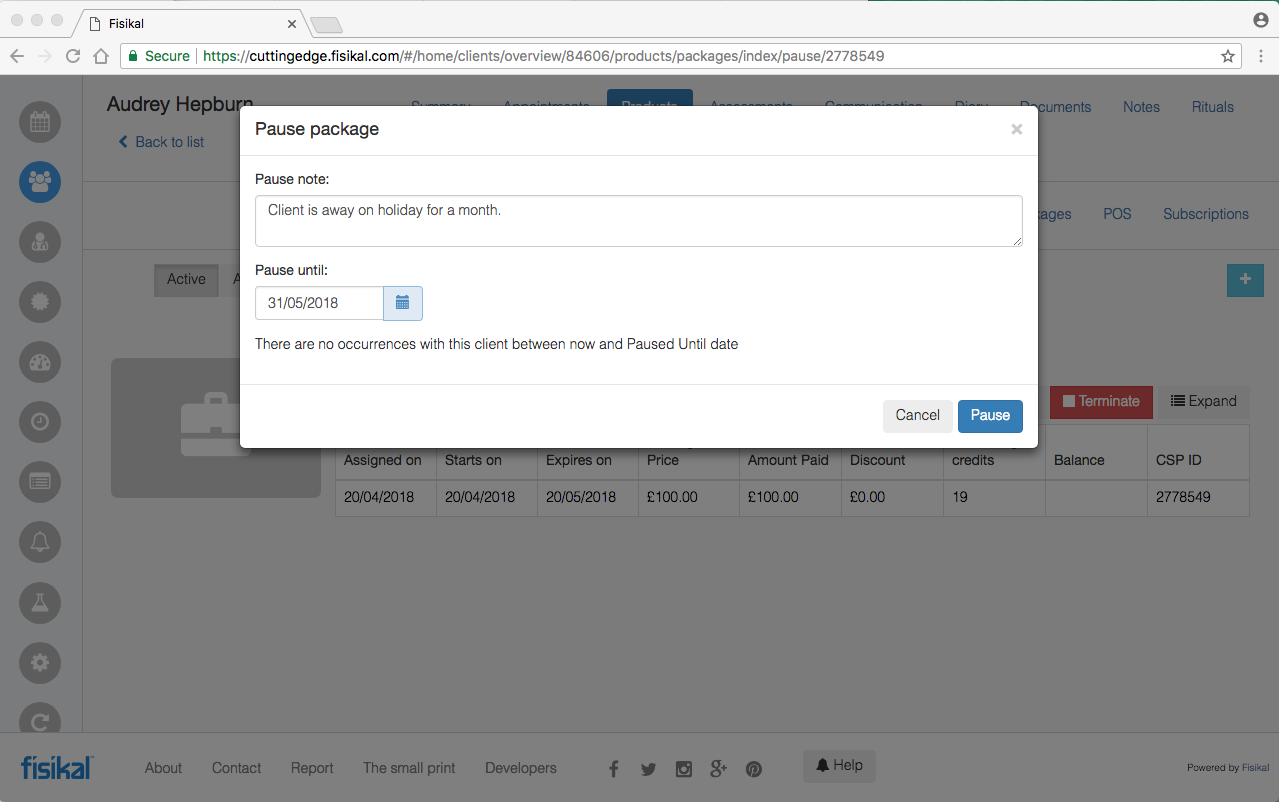
Users should enter a PAUSE NOTE and select a PAUSE UNTIL date. The Package will not charge the Client during the Pausing period and the Client cannot use any Credits within the paused Package. Users should select PAUSE to complete the transaction.
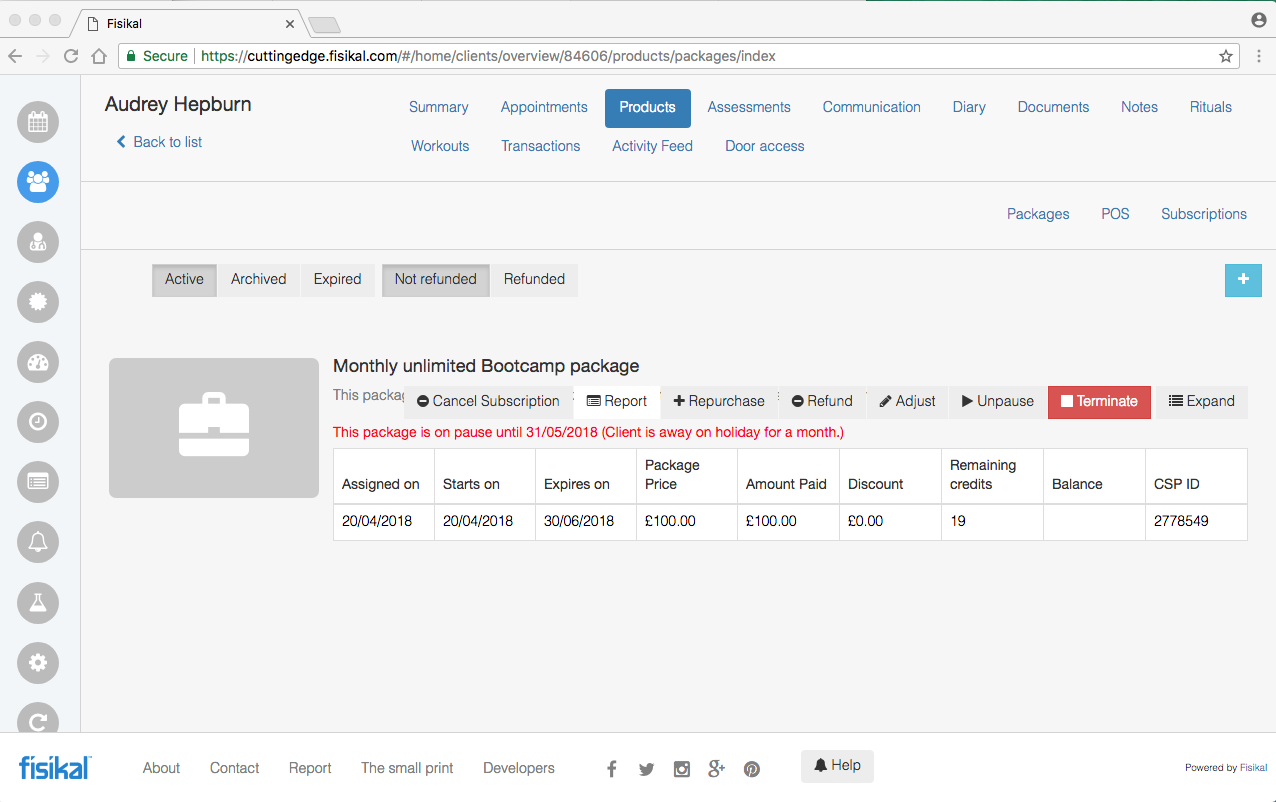
Once the Package pausing has been completed, Users will see an alert has been displayed on the Package.
UN-PAUSING A PACKAGE
Users can select to un-pause a paused Package. Users should select the "UNPAUSE" button to see the UNPAUSE PACKAGE form as shown below.
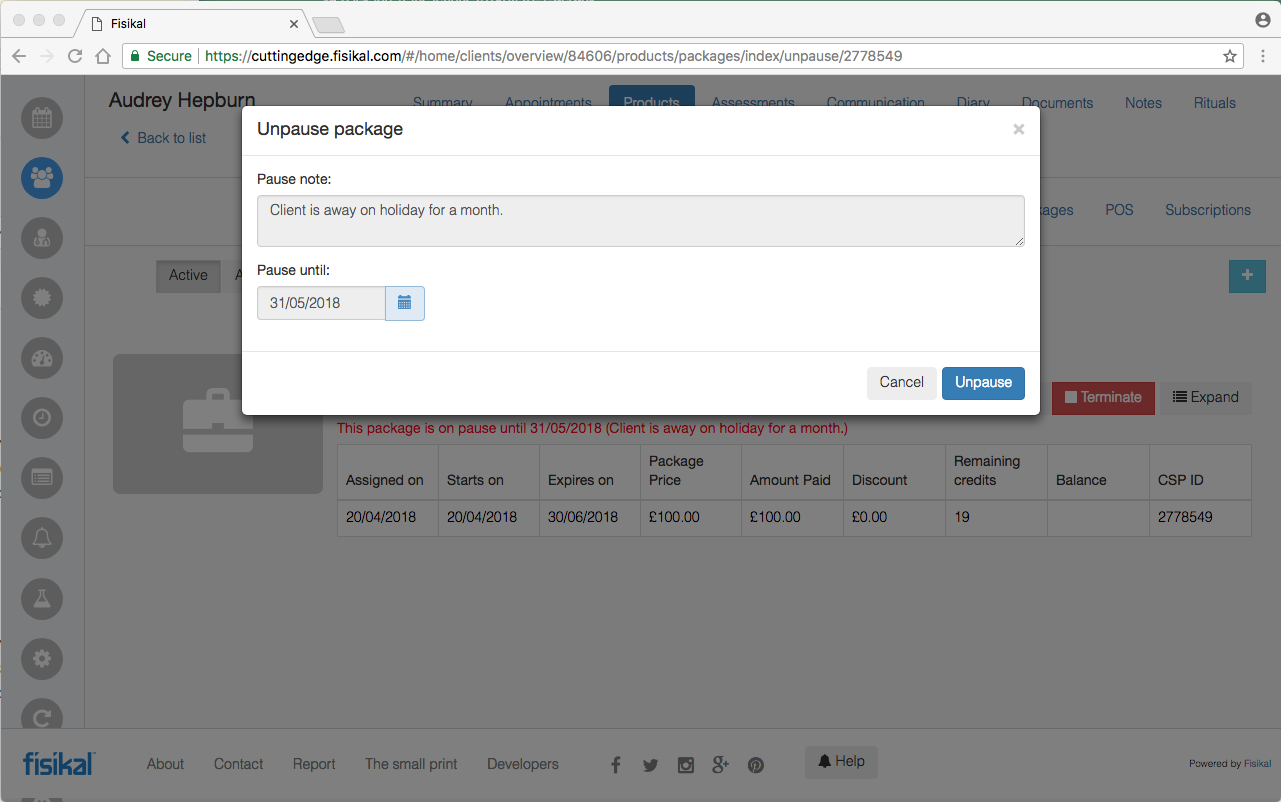
Users should select the UNPAUSE button to complete the transaction. Once the Package has been successfully un-paused, the Client can continue to use the Credits within the Package and it will resume its usual Subscription pattern.