![White Logo Blue Banner copy-100.jpg]](https://knowledge.fisikal.com/hs-fs/hubfs/White%20Logo%20Blue%20Banner%20copy-100.jpg?height=50&name=White%20Logo%20Blue%20Banner%20copy-100.jpg)
This article does not show Users how to set up Assessment Templates. To learn more about Assessment Templates click here.
CLIENT ASSESSMENTS OVERVIEW
To VIEW a Clients' Assessment information, Users should navigate to CLIENTS > CLIENT NAME > ASSESSMENTS. Here they will see the Client Assessment Overview page as follows:
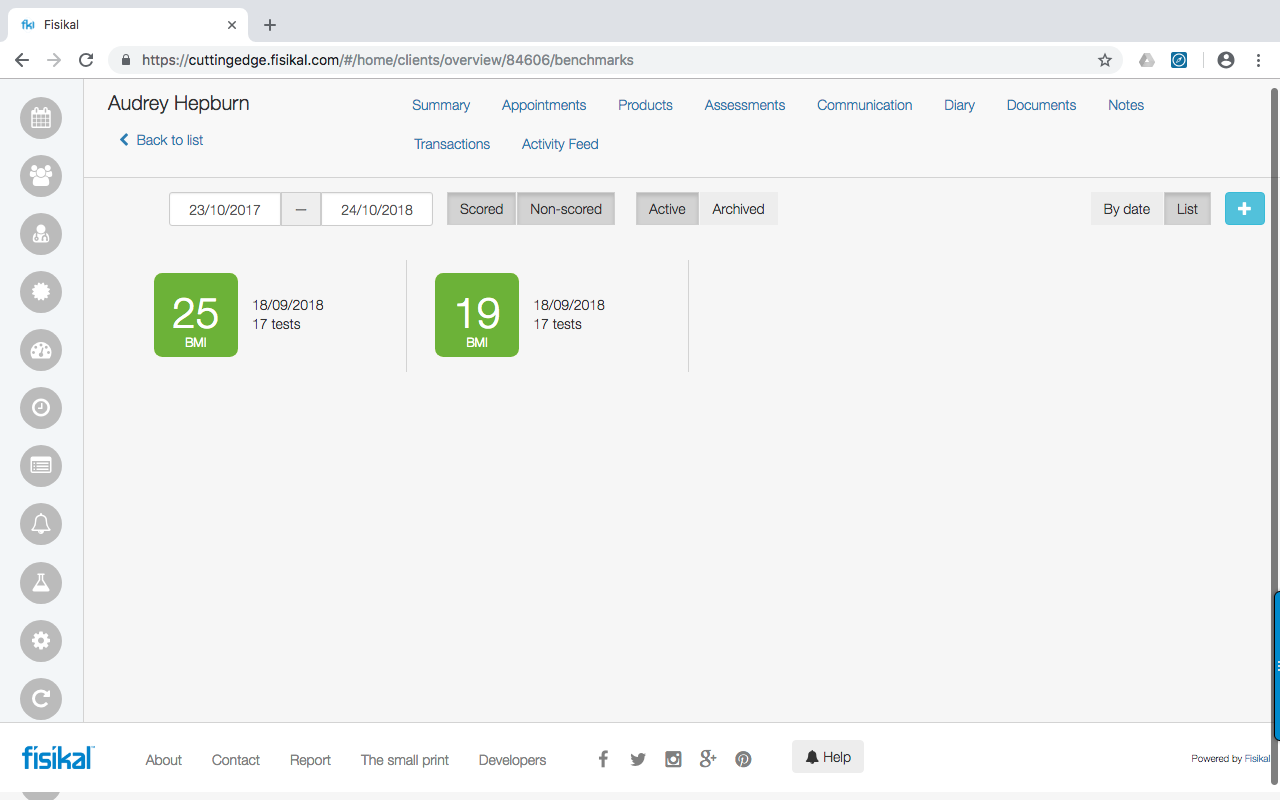
On this page you can see the following:
DATE RANGE
Users can search to retrieve Client Assessments between a date range.
SCORED / NON-SCORED
Client Assessments by default will be scored using BMI (weight in KG / height in CM). If the Assessment has not had these values entered in the answers then the score will show "-" (no score). This score is displayed on the Client Assessment panel along with the date of the Assessment and the number of tests completed in the Assessment.
If Client Assessments are scored, Users will be able to see a colour chart ranging from the following:
- RED - WARNING
- GREEN - OPTIMAL
There are many colours in between giving Users a good colour range to visually see how a Client is progressing.
ACTIVE / ARCHIVED
As Assessments can be marked as INACTIVE or DELETED, Users are able to see Assessments that have previously been ARCHIVED (Deleted).
BY DATE / LIST FILTER
Users are able to select if they want to show Assessments in Date order or List order. List order is the default view.
ADD NEW ASSESSMENT
To ADD a new Assessment to a Client, Users should navigate to CLIENTS > CLIENT NAME > ASSESSMENT and then select the "+" ADD button on the right of the screen. The following form will be shown:
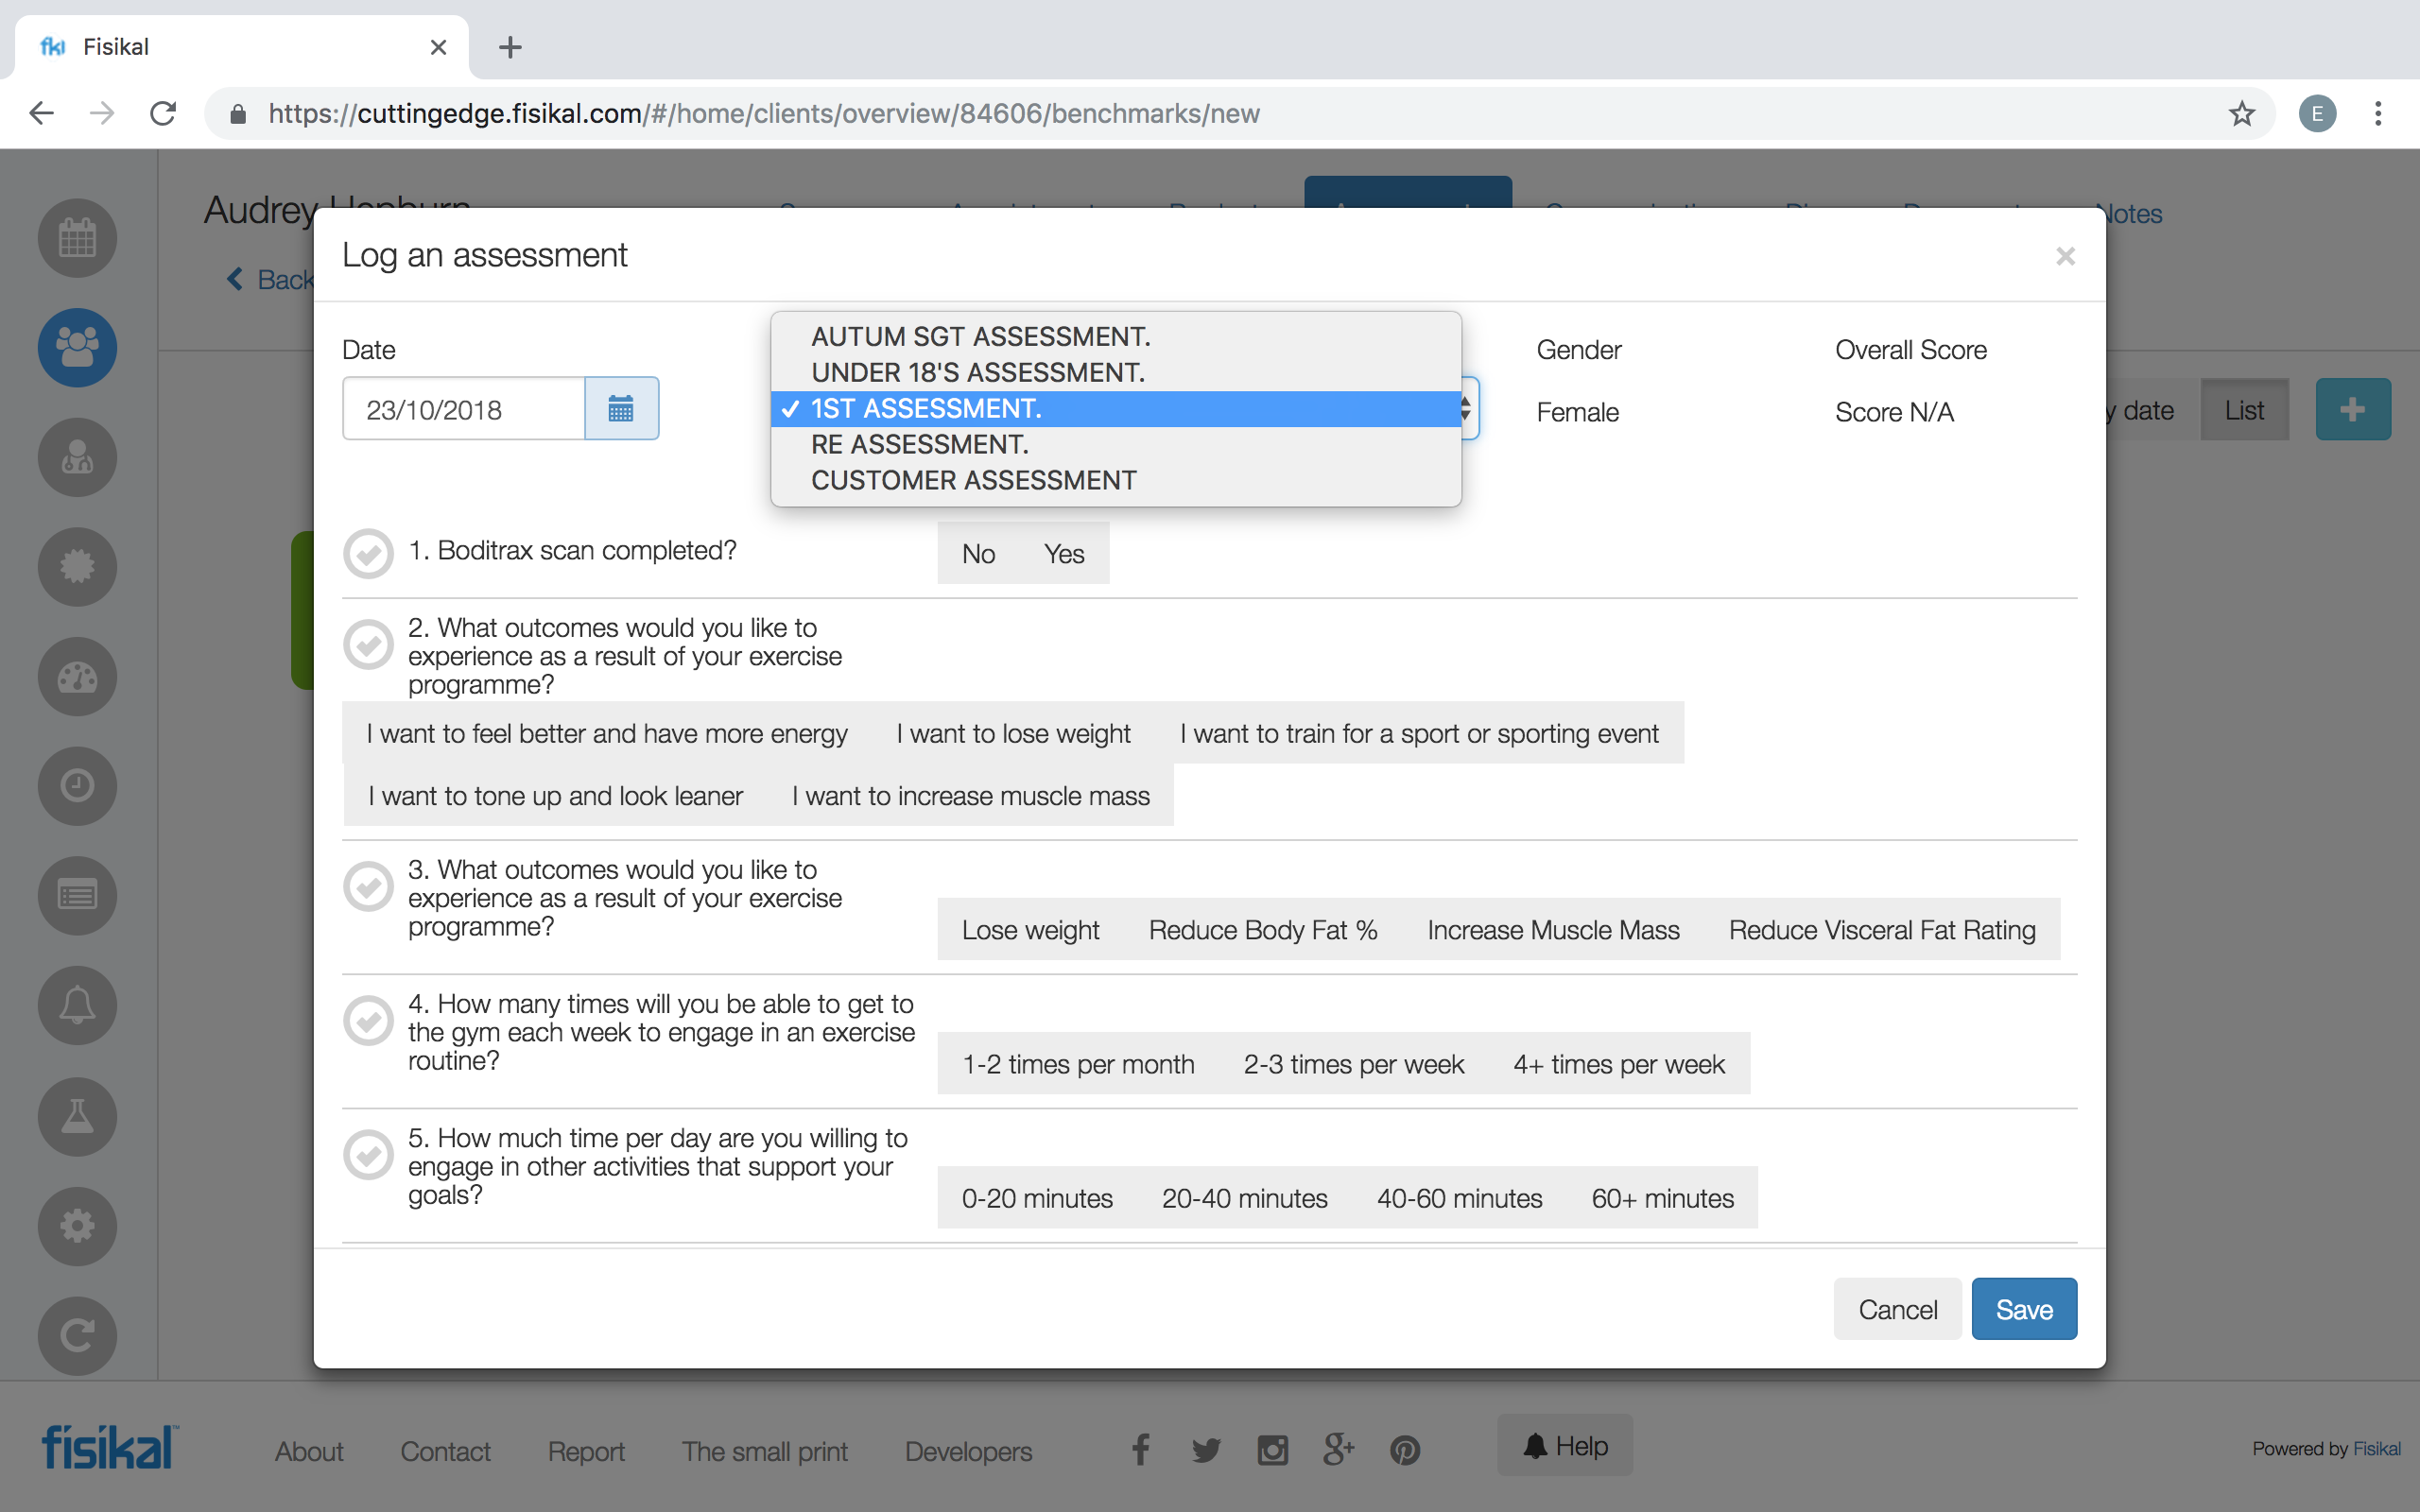
On the create an Assessment form Users can select the following:
DATE
Users can enter todays date or enter a date in the past for the Assessment (so that past Assessments not done online can be uploaded after the Assessment was completed).
TEMPLATE
Users can select the Assessment Templates from the dropdown. Only Assessment Templates that the Trainer has visibility on will be shown in the list.
Once the Assessment Template has been selected all the questions and options relating to the template will be displayed.
Once the User has gone through the questions and enter the answers they want to they can select SAVE or CANCEL. SAVE will save the Client Assessment an CANCEL will remove the information stored on the form.
At any point Users can EDIT and make changes an existing Client Assessment.
EDIT / DELETE AN ASSESSMENT
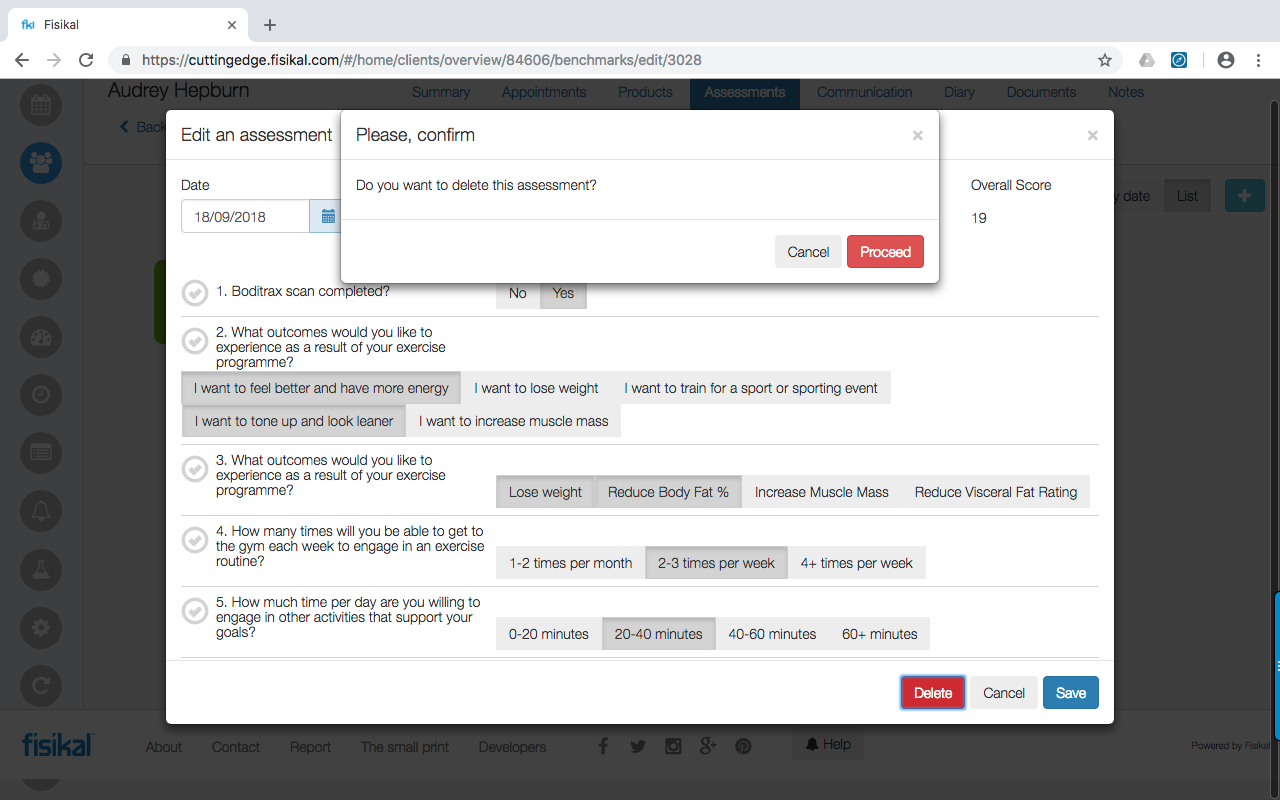
To EDIT an existing Client Assessment, Users should navigate to CLIENTS > CLIENT NAME > ASSESSMENTS and select EDIT on the Assessment they want to change.
Users can make changes to the following:
DATE
Users can change the date of the Assessment to today or a date in the past.
ANSWERS
Users can change any of the answers that were logged in the Client Assessment.

Here Users can make any changes to the Assessment or DELETE the Assessment. If the User selects the DELETE button, they will be informed prompted to confirm that they want to DELETE the Assessment as shown below:
ASSESSMENT RECOVERY
The Software has an auto-save function in built, which helps reduce the changes of the Assessment data being lost due to internet connectivity or the device shutting down. The form will save every 5-10 seconds. The Fisikal PRO and other connected Trainer mobile applications also have the same feature in built.
Should the platform or device not respond the next time the Users goes into the Client Assessments area and selects to ADD an Assessment, the form will show a request to restore data from the last session as shown below:

If NO is selected the User can create a new Assessment as required.
If YES is selected the form will populate with the data from the previously saved save point.
ASSESSMENT REPORTING
Users can analyse all Client Assessment data in their Club. To do this they should go to REPORTS and then select BENCHMARK REPORT on the option dropdown. On the form Users can select the following:
FORMAT
Users can select from the following the following types:
- CSV (default)
- JSON
- XLSX (this option takes longer to create)
The CSV option can be selected to open in Microsoft Excel or Numbers programmes.
SINCE / TILL
Users can select a start and until date that they can query the data between.
CLIENTS
Users can select from the following options:
- All
- Active
- Specific
If SPECIFIC is select Users can select from the following options:
- Specific Client(s)
- Specific Group(s)
Once all fields are completed Users should select GENERATE. The Report will generate automatically and Users can continue to use the Software without any possible concern on performance as Report generate on a separate server. Once the Report has been completed the page will automatically update to show that the report is ready to be downloaded.
Once the report has been downloaded to the browser, Users can open this in a software of their choice. In the example below, Users can see an example output. The fields shown on the report include the following:
- Client Name
- Age of Client
- Client Gender
- Client Home Club
- Groups that the Client is associated to
- Trainer name that captured the Assessment
- Status
- Fitness Index score (BMI value)
- Tests Completed (number value)
A separate column will be presented for each question. This enables User apply a filter on the data output so Users to filter data for further analysis.
