![White Logo Blue Banner copy-100.jpg]](https://knowledge.fisikal.com/hs-fs/hubfs/White%20Logo%20Blue%20Banner%20copy-100.jpg?height=50&name=White%20Logo%20Blue%20Banner%20copy-100.jpg)
To add a new booking the Club Manager should be on the Schedule and needs to either select the BOOK button or select a time and day directly on the schedule. If the Club Manager is on a Trainer Schedule view, and selects a time slot under a Trainer's name on the Schedule the form will only show Services that the selected Trainer is associated to.
BOOKING CONDITIONS
Bookings will only be made under the following conditions:
- The Trainer that will deliver the booking is associated to the Service that you want to book
- The Trainer is working at the Location that you want to book
- The Trainer is working and they are able to deliver this Service at the selected time as the Service Delivery Hours (if applied) enable them to do this
- The Location or Sub-Location has not reached it's booking limit for available bookings
- The Client does not already have another booking at this time (this applies to either adding a client into a group booking or an individual booking
- The Service does not have “Restrict to book with advanced credits” and the Client does not have an ACTIVE credit for the Service you want to book
- The User that is making the booking has permission to make this specific booking
The “Book an appointment form” will show as follows:
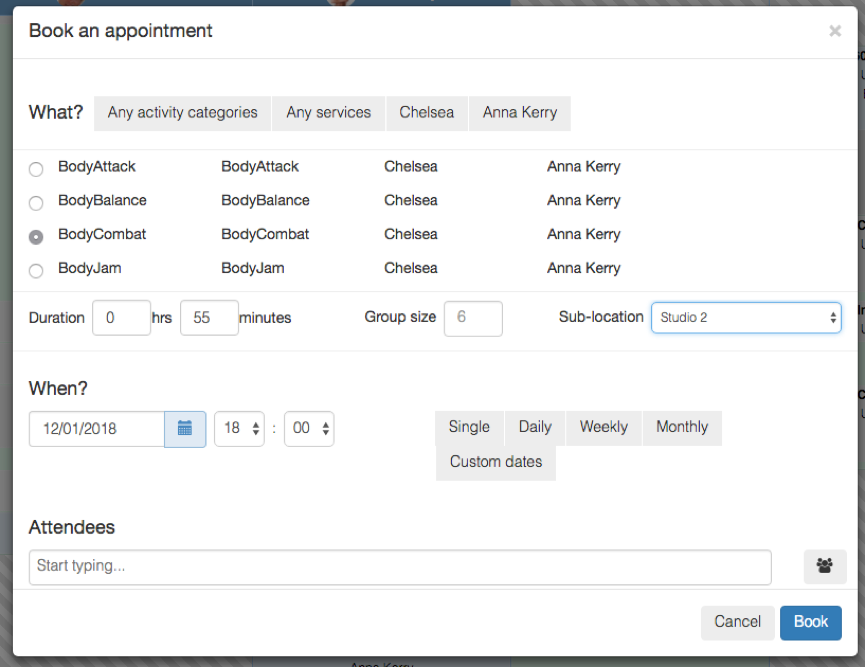
WHAT?
Users can select Services directly by scrolling to locate a specific Service with the correct Trainer or they can select a filter to select from the following options:
- An Activity (from the drop down box e.g. Bodyfit)
- A Service
- A Location
- A Trainer
Once you have found the Service you want to make a booking for, you need to select the radio button for this Service. This will show the default settings of the Service to include the following:
- Duration (shown in hours and minutes)
- Group size
- Sub-Location (default configured option)
If the user wants to change any of the default settings of the Service they can do this on the form. The new details will be applied to this booking once it has been completed. This form does not change the default settings of the Service, just this booked instance of it.
WHEN?
Users then choose what date the new booking will be on, at what time and how often. You should select:
- Date
- Time
SINGLE BOOKING
If users want to make a one-off booking, they should select the SINGLE button as shown below:

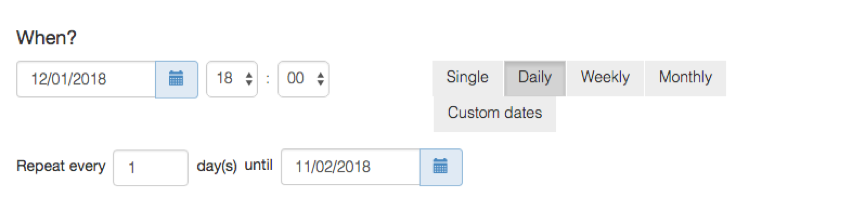
DAILY BOOKINGS
If users want to make a booking repeat for multiple days at the same time, they should select the DAILY button. Users will have to select a recurring frequency (Repeat every x days) and an until date option. If “Repeat every” = 1 then the booking will be shown every 1 day from the start date until the end date. If “Repeat every” = 2, the booking will be shown ever 2 days from the start date until the end date, and so on.
WEEKLY BOOKINGS
If users want to make a booking repeat for multiple days at the same time within a specific week, they should select the WEEKLY button. Users can select the specific days in the week and the recurring frequency and an until date. If Mon, Wed and Fri are selected to recur every 1 week from January 01 until Jan 26 and every 1 week is selected, the booking will be made every week during January. If Mon, Wed and Fri are made every 2 weeks, then the booking will be made every 2 weeks, and so on.

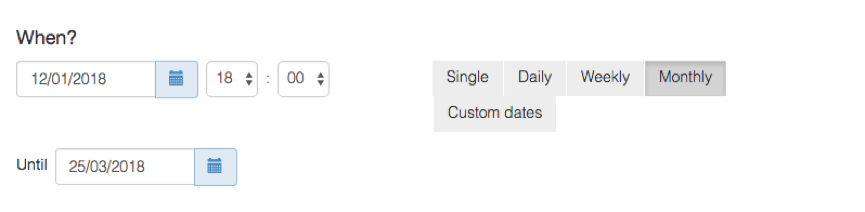
MONTHLY BOOKINGS
If users want to make a booking repeat on a specific date and time in the month, they should select the MONTHLY button. Users can select the specific date in the month that the booking should be made on and the date that the recurrence should occur until. If Jan 01 is selected as the start date and 01 Apr is selected as the until date, the booking will occur on Jan 01, Feb 01, Mar 01 and Apr 01. The recurring date will always be on the same date each month for the recurring period.
CUSTOM DATE BOOKINGS
If users want to make a booking that has multiple selected dates and either the same or different start times, they should select the CUSTOM DATES button. Users will need to enter the date and time of each booking and then select the “+” button for it to be shown in yellow as shown below. Users simply repeat the process of entering date and time and the “+” button for as many times as they need to.

ATTENDEES
Users can enter Attendees (Clients) into a booking either by entering their name or email address into the "Attendees box") or by selecting the Groups icon on the right of the form which will load Groups showing Clients in.
If users enter a GROUP of Clients, only Clients that have been added to the booking at the point it was created will be shown. If Clients are added to the Group after the appointment has been created, they will not appear in the booking. Also if Clients are removed from the Group after the booking has been created, they will not be removed automatically from the booking.
If users are adding Attendees through Groups, they should make sure that only the Clients they want are added to the booking.
NOTES
Users can add a Note to the booking by simply entering the text in the NOTE field. Notes only work for Single bookings and cannot be seen by users on recurring appointments. Notes are not visible to Clients associated to the booking.
SEND NOTIFICATIONS
Users can select if they want Appointment Reminders to be sent to Attendees for the booking. Notifications will be sent to follow the configurations set in the Settings area of the Club and also for the specific Service.
If notifications have been configured to send to Trainers or Clients on making the booking in Club Settings, they will be sent immediately to the recipients.
BOOK
Once the BOOK button is selected, the system will check that it is able to make this booking in line with BOOKING CONDITIONS. If it is successful, users will see the page reload with the booking completed on the Schedule. If the booking has not been successful, users will see an error message outlining the specific issues with the booking.
TROUBLE SHOOTING
CANNOT ADD TRAINER TO A BOOKING
If you cannot add a trainer to a specific booking it may be that this specific trainer is not associated to the LOCATION that the booking should be made in. It is possible to associate a Trainer to a Service at a Location that they have not been associated to, please make sure you associated the Trainer to the additional Location and you manage their Working Hours at this new Location as well.
To do this please do the following:
- Open a new browser tab and select TEAM > TRAINERS NAME
- EDIT the Trainers Profile and add the new Location to the "Allocated Locations: section and the save the update on the Trainers profile
- Go to WORKING HOURS and select the Trainers name
- Select the new LOCATION that you have just associated to the Trainer and manage their Working Hours availability (you may want to BLOCK ALL for a period of time)
- Go back to the Appointment form in the other tab and select BOOK
- The form may now show you that the Trainer is not working at that time and gives you the option to open some working hours, select a Working Hour option and then select PROCEED
The appointment should now correctly save for this Trainer.